

- Check Windows Microphone and Set It as Default Device
- Allow Microphone Access for Apps from Privacy Settings
- Restart Windows Audio in Local Services
- Replace Outdated Device Drivers with Device Manager and Windows Update
- Turn On Audio Device in CS:GO
- Use Enable Developer Console in CS:GO Game Settings
- Check CS:GO Cache Files in Steam Library and Verify Integrity of Game Files
There are very few things that can be as frustrating as your mic tripping off during an intense Counter-Strike: Global Offensive (CS:GO) gaming session. This is especially the case if you are gaming on the new Windows 11 edition. So, if like everybody else who experienced this issue, you are wondering, “why isn’t my mic working on cs:go” or “why does my mic work in discord but not in cs:go,” this article is for you.
There are many reasons for your mic not working in CS:GO. In this article, we present 7 reliable ways on how to turn mic on in CS:GO.
Check Windows Microphone and Set It as Default Device
The first way out for any software problem on Windows 10 or Windows 11 is the restart function. When you restart your Windows properly, the system terminates every process and component, and refreshes its operations. But if you have restarted your PC and still have no access to audio while playing CS:GO, you should check the system microphone component and set it as the default device.
To check whether the Windows microphone is the default device, you need to do the following:
- Right-click on the sound icon on the right-hand side of the notification.
- From the options that pop up, select and right-click on the fourth—Sounds.
- From the four tabs (Playback, Recording, Sounds, and Communications), navigate to the Recording tab and select the option representing the audio device you are currently using. This option should have a green tick mark showing that it is currently connected to your PC and in use.
- Right-click on the device and choose the Set as Default Device option.
- You can click on the Apply and OK options to execute the new changes.
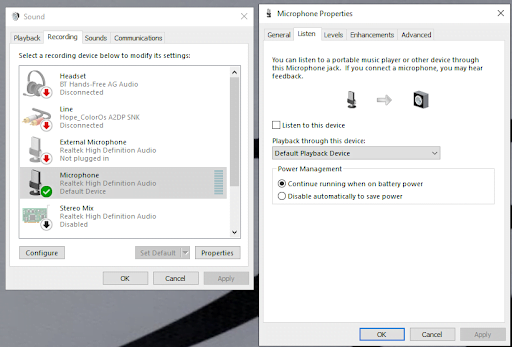
You may also choose to modify some of the properties of the device you just set as the audio recording default device. To do this, simply select Sounds from the bottom screen once again, navigate to the Recording tab, select the (now) default device, and choose the Properties option. From here, you can choose any of the tabs (General, Listen, Levels, Enhancement, and Advanced) and effect whatever changes you want.
After all these, you can try playing CS:GO once again to see if the audio is back on and your teammate(s) can hear you.
Allow Microphone Access for Apps from Privacy Settings
One of the common problems with audio devices in Windows is the lack of microphone access. This is usually the case when these devices are required to record and transmit online during gameplay. So, if you are playing CS:GO and suddenly lose audio, you may want to investigate the Windows access for the game.
The first place to look for Windows access modifications with regards to sound problems is privacy settings. This is where you find Windows and app permissions in terms of your location, camera function, and microphone. So, if you are using Windows 10 or 11, you need to do the following:
- Use the combination of the Windows key and I key to launch the Windows Settings page.
- On the default Settings page, move your cursor to Privacy and select it.
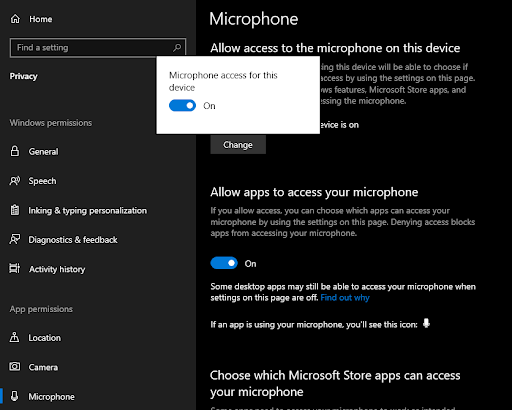
- There are two main headings on the left pane for privacy: Windows permissions and App permissions. Scroll down to App permissions and select Microphone.
- On the Microphone page that subsequently pops up, select the Change button under the Microphone access for this device is on option and toggle it on.
- Scroll down the Microphone page to Choose which Microsoft Store apps can access your microphone and activate all the ones related to gaming and output, including Camera, Mixed Reality Portal, Voice Recorder, and Xbox Game Bar.
Allowing Windows microphone access should return audio to your game. If not, restart your computer and try once again.
Restart Windows Audio in Local Services
If you set your audio device as the default device and granted the game microphone access, but still can’t use sound while playing CS:GO, you may need to delve a bit deeper by restarting Windows audio on the Services page. This page presents the Windows user with the majority of the services that are actively running or dormant. Because this page offers the local services, a Windows account user can stop or start these services.
Restarting the Windows audio service is one way to answer your question, “how to turn on my mic in cs:go 2022.” So, to restart the Windows Audio service and get your mic running again for CS:GO, do the following:
- Launch the Windows Start menu and type services. The item on the top of the list named Services is what you need to click on. You may use the Windows Run option instead by clicking the Windows key + R key. Then you type msc into the console and click OK.
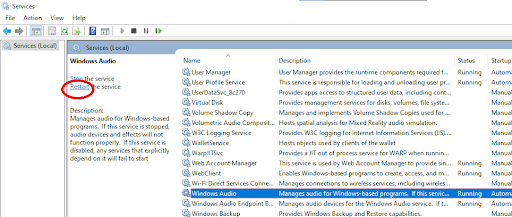
- From the list of local services that pop up on the Services page, navigate to Windows Audio and select it to have it highlighted.
- Move your cursor to the left-hand side and select the Restart the service
Once the Windows Audio service has been restarted, you can close the page and play CS:GO once again.
Replace Outdated Device Drivers with Device Manager and Windows Update
One persistent cause for terminated audio while playing CS:GO is an outdated driver. Ordinarily speaking, Windows drivers are components that allow you to interact with the Windows environment, granting you access to visuals, sounds, and other functions. So, when these drivers become outdated, it is more difficult for Windows to connect your world and the visual world. One of the consequences of this difficulty is audio malfunctions, especially when you are playing CS:GO online.
So, if the solutions so far presented have not fixed the problem, you should update your drivers, one of which includes the driver for audio and sounds. There are many ways to update Windows 10 and 11 drivers. The default method is via Device Manager. To use this method, follow the instructions below:
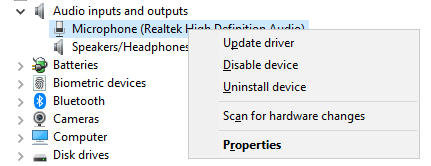
- Use Windows key + X to launch a shortcut and select Device Manager.
- Under the driver category for Audio inputs and outputs, select Microphone and right-click.
- In the subsequent options, select Update driver.
- In the options that follow, select the first one—Search automatically for drivers. Your computer needs to be connected to the internet to use this option.
- Once the driver has been found and installed, restart your PC and check again.
However, in many editions of Windows 10 and 11, you will be directed to Windows Update to update your drivers. If this option pops up for you, follow through with the instructions.
Nevertheless, you can use third-party software to update all your drivers in one go. There are so many of these software applications, but Auslogics Driver Updater is one of the best. With this app, your PC is not at risk of being infected by malware and the app does not add an extra strain on the processing speed of your PC.
Turn On Audio Device in CS:GO
If none of the proffered solutions has worked, you have to consider the possibility that the problem of audio disconnection is with the game and not Windows. Thus, the first place to check in CS:GO is the Game Settings tab.
To turn on the audio device from CS:GO, follow the instructions below:
- Launch CS:GO and navigate to Settings.
- Of the 5 tabs (Keyboard/Mouse, Controller, Game Settings, Audio Settings, and Video Settings), click on Audio Settings.
- Check the Audio Device option and make sure that your preferred device is selected.
- You can also check the Game Settings tab and select Communications. From here, you can check to see if you unintentionally muted the enemy team or your teammates, and fix it.
- Next, navigate to the Controller settings and assign a key for the Use Mic game function.
These modifications should help you get the audio back on track with CS:GO. If it does not, the integrity of your game files may have been compromised.
Use Enable Developer Console in CS:GO Game Settings
If the audio settings modifications from CS:GO do not work, you can delve into the Developer console and effect the needed changes there. To do this,
- Select Settings from the CS:GO interface.
- Navigate to the Game Settings tab and choose the Game mini tab.
- Scroll down to the Enable Developer Console (~) and choose the Yes This grants you access to the command line from within CS:GO.
- Exit the Settings page and tap SHIFT + ` (the key above TAB on your keyboard) to open the command line.
- From the subsequent page with many lines of code, type voice_enable 1 on your keyboard, and select the Submit button to activate the code.
Then you can check the game once again to see if audio is now working. If not, you may have to go out of the game and use Steam.
Check CS:GO Cache Files in Steam Library and Verify Integrity of Game Files
The Steam in-game interface has proved to be a big help regarding game settings. As long as you are part of the Steam community, you can easily clear the cache gathered from playing video games, and verify the integrity of game files.
- You need to first log in to your Steam and navigate to the Library tab.
- CS:GO (as Counter-Strike: Global Offensive) on the left pane.
- Right-click on CS:GO and choose the Properties option.
- From the subsequent tabs, select LOCAL FILES.
- From the subsequent options on the LOCAL FILES page, choose VERIFY INTEGRITY OF GAME FILES.
Once the verification process is complete, every gap in the game should be fixed, including the problem of being unable to use audio.