

Most of the time, Windows users can rely on their computer’s clock to accurately tell the time. However, recently, the Windows Time Service (W32Time) malfunctioned, sending incorrect times to PCs across the globe. Implemented by the W32Time.dll file, this Microsoft service is supposed to synchronize the clocks for computers, depending on the user’s preferred time zone.
You’ll be glad you found this article while trying to research how to fix the Windows Time service not running. We’ve got several solutions that will help you if the Windows Time service breaks down.
Common Issues Associated with Windows Time Services
Before we try to fix Windows time not syncing automatically, it would be advisable if we discuss some of the related problems that users reported. In this way, you can effectively resolve the issue and prevent it from happening again. That said, here are the scenarios you might encounter:
- Windows Time Service could not be started – This is a common problem that can be fixed by changing the Startup type of the service. We will discuss how this can be done in the instructions below.
- Windows 10 Time Service not working, access denied, not showing, or not found – There are many various issues associated with this service. You can fix them by trying one of our methods below.
- Windows Time Service keeps on stopping – Some users reported that the service keeps on stopping. You can fix this issue by running SFC and DISM scans.
- Windows time not syncing automatically – This is another common issue associated with the service. You can resolve this by checking your scheduled tasks.
- Windows Time Service not starting error 1792, 1290, 1079 – Various errors can prevent the service from running. Make sure you try one of our solutions to get rid of them.
- Windows Time service missing, not installed – Make sure you reregister the service to ensure that it is properly installed in your computer.
Method 1: Running SFC and DISM scans
It is possible that there are corrupted files in your system which prevent Windows Time Service to run properly. To resolve this issue, you can try performing SFC and DISM scans. These can easily be done by following the instructions below:
- Right-click the Windows icon on your taskbar.
- Select Command Prompt (Admin) or Powershell (Admin) from the list.
- Once Command Prompt is up, type “sfc /scannow” (no quotes), then hit Enter. This should launch the SFC scan.
The process might take around 15 minutes. So, make sure you do not interfere with it. Once the SFC scan is complete, check if the problem persists. If you’re still experiencing troubles with Windows Time Service, it would be ideal to run a DISM scan. You can do that through Command Prompt (Admin). Instead of running ‘sfc /scannow’, what you should type is “DISM /Online /Cleanup-Image /RestoreHealth” (no quotes).
To avoid file corruption, protect your PC by using a reliable tool like Auslogics Anti-Malware. This program effectively detects threats and attacks that might harm your computer. What’s more, it is designed not to conflict with your main anti-virus. So, you can prevent the Windows Time Service issue from happening again while ensuring optimum protection for your PC.
Method 2: Changing the startup type
One of the ways you can fix problems with Windows Time Service is by changing its startup type. Make sure that it is set to Automatic by following these steps:
- On your keyboard, press Windows Key+R. This should open the Run dialog box.
- Type “services.msc” (no quotes), then press Enter.
- Scroll down until you find Windows Time. Double-click it, then set the startup type to Automatic.
- Save the change you made by clicking Apply and OK. This should automatically launch the service with Windows and resolve the problem.
Method 3: Ensuring that the Local System account starts with Windows Time Service
It is possible that problems with Windows Time Service occur because it is not launched properly. However, this can be easily fixed by doing the following:
- Click the Search icon on your taskbar.
- Type “Services” (no quotes), then press Enter.
- Double-click Windows Time from the list.
- Go to the Log On tab, then select Local System Account.
- Save the change you made by clicking Apply and OK.
Method 4: Re-registering the Windows Time Service file
One of the ways you can fix Windows Time Service issues is by re-registering it. This is quite simple to do. You just have to follow the steps below:
- Click the Search icon on your taskbar.
- Type “command prompt” (no quotes).
- Right-click Command Prompt from the results, then select Run as Administrator.
- Once Command Prompt is up, run these commands:
net stop w32time
w32tm /unregister
w32tm /register

Method 5: Using a different time server
It is also possible that problems with the time server are causing the Windows Time Service issues. In this case, you’d just have to manually change your time server. Just follow the steps below:
- On your taskbar, click the Search icon.
- Type “control panel” (no quotes), then hit Enter.
- Select Clock, Language, and Region.
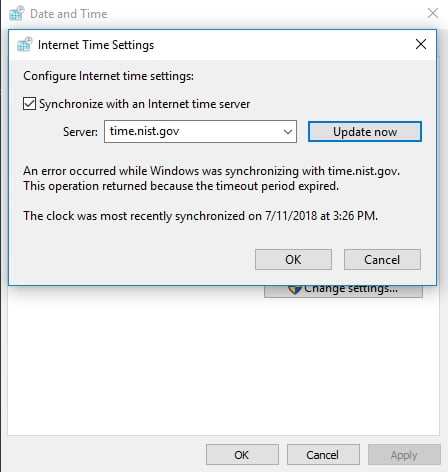
- Click Date and Time, then go to Internet Time.
- Click the Change Settings button.
- Type “time.nist.gov” (no quotes) as the Server, then click the Update Now button. You can also try using “pool.ntp.org” if that does not resolve the issue.
![Register your time server manually]()
- Save the changes by clicking OK.
Once you’ve changed the time server, check if the problem persists. You can also try adding more servers to the list through the registry. Just follow these instructions:
- On your keyboard, press Windows Key+R.
- Type “regedit” (no quotes), then hit Enter.
- Once the Registry Editor is up, navigate to this path:
- HKEY_LOCAL_MACHINE\SOFTWARE\Microsoft\Windows\CurrentVersion\DateTime\Servers
- You will see the current servers in the right-hand pane. You can add a new time server by right-clicking an empty space. Choose New, then select String Value.
- Type the appropriate number, then double-click the entry.
- Enter the server’s address in the Value Data field. Here are some servers you can use:
time-a.nist.gov
time-b.nist.gov
128.105.37.11
europe.pool.ntp.org
clock.isc.org
north-america.pool.ntp.org
time.windows.com
time.nist.gov
- Once you’ve added servers to the registry, go to Time and Date settings. Select any of the servers you’ve added.
Have you tried any of our solutions?
Tell us the results by commenting below!