
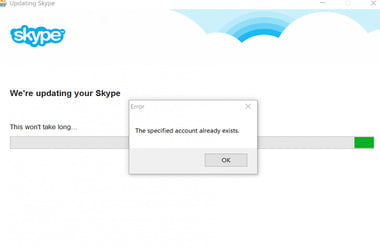
When using Skype, have you ever encountered this error message: “The specified account already exists?” It typically occurs to some Skype users when they are either installing or updating the communication application software. You get an update failure besides that error code 1603.
Why does this happen?
The likely cause is some problem with file installation in your computer’s registry. This detailed guide is your blueprint on how to fix the ‘specified account already exists’ error:
Reset Your Skype App
Before you try some technical troubleshooting solutions, start by resetting your Skype app. Resetting will restore the default settings on the program. It does this by clearing the cache data.
Follow these steps to reset your Skype:
- Click the “Type here to search” button on Cortana’s search box.
- Type apps, then select ‘Apps & features.’
- Type Skype and click on the Skype option.
- Click on ‘Advanced.’
- Click ‘Reset.’
After doing that, you can now check if Skype works appropriately.
Uninstall, Automatically Clean and Reinstall Skype
In some cases, resetting Skype isn’t enough. You may have to uninstall the entire app, clean your computer’s registry, and finally reinstall the app.
Cleaning your computer’s registry can be done conveniently using Microsoft’s ‘Program Install and Uninstall Troubleshooter.’ Alternatively, you can do it manually. You’ll see how to use both options.
Follow these instructions to use Microsoft’s troubleshooting software.
Start by uninstalling Skype:
- Go to the Start menu on Windows 10.
- Click ‘All apps.’ You’ll get the app index.
- Right-click on Skype, then select ‘Uninstall.’
Once you uninstall Skype, you should now clean your computer’s registry using Microsoft’s ‘Program Install and Uninstall Troubleshooter.’
Follow these steps:
- Go to Microsoft’s troubleshooter page.
- Click on the ‘download’ button.
- When you get the File Download dialog box, click ‘Open’ or ‘Run.’
- Follow the steps in the Program Install and Uninstall Troubleshooter.
- If you can’t download the troubleshooter in your computer, you can do it from another CPU, save it in a flash drive, and then run it on your computer.
After doing that, your computer should be clear of corrupt registry items which prevent Skype from installing or updating correctly. You can now go on to reinstall Skype.
Follow these steps to reinstall Skype:
- Go to the Skype download page.
- Press or click on the button, ‘Get Skype for Windows 10.’
- Run the Skype installer.
Once that is done, Skype should function correctly.
Uninstall, Manually Clean and Reinstall Skype
In case the Microsoft troubleshooting tool doesn’t adequately clean your computer’s registry (after you uninstall Skype), you can do it manually.
However, be extremely careful when doing this. A small mistake can adversely affect your computer’s functions. Registry items are crucial to your computer’s operations. Deleting anything vital will negatively impact your CPU.
Therefore, before you do this, you should back up anything that you want to delete from Windows registry. In case you make a mistake, you’ll quickly restore your system. A backup is easily created by right-clicking on any registry item you want to delete, then selecting ‘Export.’ This will save a .REG file backup of the registry item.
Start by uninstalling Skype:
- Go to the Start menu on Windows 10.
- Click ‘All apps.’ You’ll get the app index.
- Right-click on Skype, then select Uninstall.
After uninstalling Skype, follow these steps:
- Check the program files by typing this on the Windows search box: %programfiles%.
- The program files folder will open up. Search for any folder bearing the Skype name and delete it.
- Also, check the app data by typing this on the Windows search box: %appdata%.
- The app data folder will open up. Search for any folder bearing the Skype name and delete it.
- Next, type regedit in the search box.
- The Registry Editor will open up.
- Go to this destination folder: HKEY_CURRENT_USERSoftware.
- Look for a folder with the Skype name and delete it.
- Type this key: HKEY_LOCAL_MACHINESOFTWARE.
- Look for a key with the Skype name and delete it.
- Type this key: HKEY_USERS.DEFAULTSoftware.
- Look for a key with the Skype name and delete it.
Finally, reinstall Skype:
- Go to the Skype download page.
- Press on the button, ‘Get Skype for Windows 10.’
- Run the Skype installer.
Having done all that, Skype should be working correctly.
Check Your Windows Firewall Settings
Sometimes, your Windows Firewall may be the culprit. It could be blocking Skype.
So, you should check and change your firewall settings by following these steps:
- Type ‘Windows Firewall’ in the Windows search box and hit Enter.
- Go to ‘Allow an app through Windows Firewall.’
- Click on the button labeled ‘Change Settings.’
- Locate Skype. Check the boxes next to it.
- Click OK.
This should do the trick.
Turn Off Your Anti-Virus Software
Just as your Windows Firewall can block Skype, so can your anti-virus software. You’ll have to disable your anti-virus software so that Skype can function. In such a situation, your computer will be vulnerable to malware attacks. You can get an anti-malware program like Auslogics Anti-Malware to keep you safe even when your anti-virus is disabled.
Conclusion
Using these simple solutions, you’ll no longer inquire, “Does Skype update fail because my account already exists?” As you can see, it’s not really about your account, but the registry issues and other programs affecting your Skype app.