

- 1. Make Sure Your Webcam Can Work
- 2. Choose the Right Camera in Skype’s Settings
- 3. Connect Your USB Webcam to Another Port
- 4. Test Your Webcam
- 5. Check Your Camera Permissions
- 6. Make Sure Your Computer is Compatible with Skype
- 7. Close Other Programs That Could Be Using the Webcam
- 8. Disable and Enable Your Webcam
- 9. Set the Windows Camera Frame Server Service to Automatic
- 10. Make Sure Your Internet Connection is Working Properly
- 11. Reinstall Your Webcam Drivers
- 12. Update the Webcam Drivers
- Use a Special Tool
- 13. Try Using Generic Drivers for Your Webcam
- 14. Update Skype
- 15. Run the Windows Store Apps Troubleshooter
- 16. Reinstall Skype
- 17. Perform a System Restore
- 18. Delete the StructuredQuerySchema.bin file
- 19. Check Your Manufacturer’s Website
- 20. Reseat Your Webcam Connector
- 21. Reset Your PC
- 22. Replace the Webcam
- Conclusion
- FAQ
Imagine finding yourself on the precipice of a life-changing remote meeting or interview, only to be met with the unsettling “Skype camera not working” issue.
Skype is no doubt a reliable virtual communication tool. However, one minor malfunction has the power to derail plans, disrupt connections, and overshadow the very purpose of crucial interactions.
If you’re currently livid with frustration because your camera has inexplicably refused to cooperate with Skype, this article is for you.
In this guide, we’ll show you all the possible ways to fix the annoying issue.
You’ll find that when Skype can’t detect your webcam Windows 10 and Windows 11 may hold one solution or two.
Let’s begin.
1. Make Sure Your Webcam Can Work
Sometimes, the best fixes are the easiest ones. So, the first step is checking if you haven’t missed anything. So, consider the following:
- Is your webcam turned on?
- Is it pointing towards you?
- Is there anything obstructing it (if your computer has a webcam cover, for example)?
- Is your Skype video icon switched on?
If answering those questions hasn’t helped you fix the “Skype can’t detect any webcam” problem, then you should dig a little deeper.
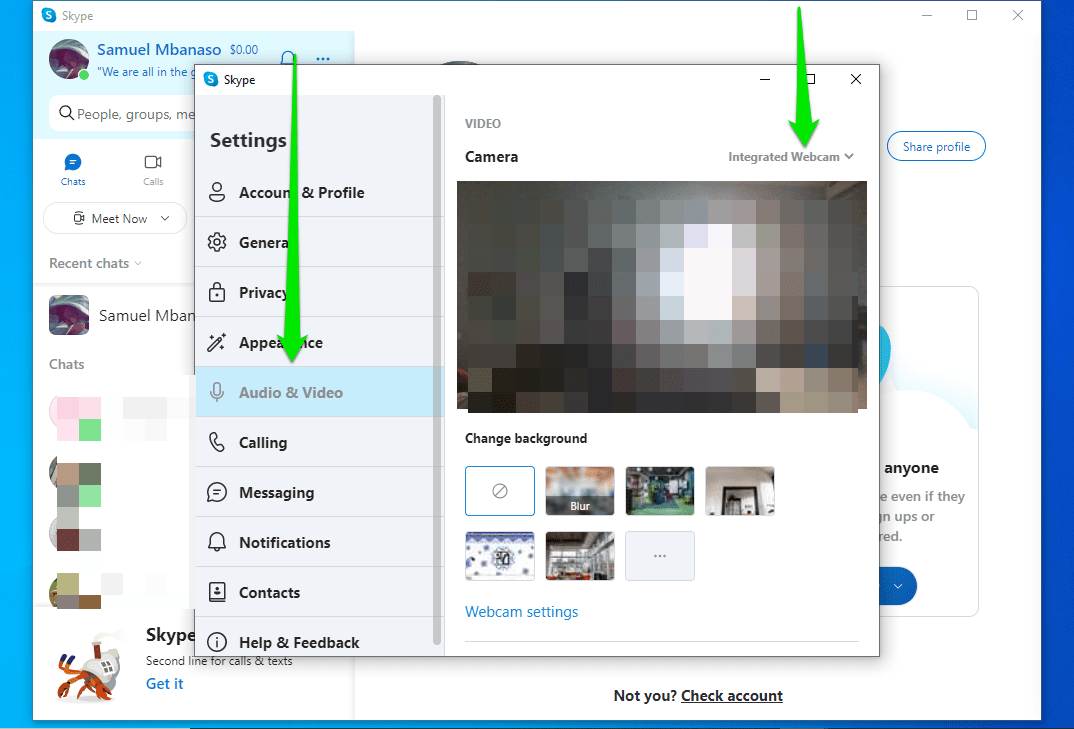
2. Choose the Right Camera in Skype’s Settings
The “Camera not working on Skype” problem may be occurring because Skype is configured to use a different camera device. So, go to the app’s settings and select the right camera. Follow these steps:
- Launch Skype.
- After the app opens, click on the three dots beside your name in the upper-left corner.
- Select Settings.

- After the Settings window appears, go to the left sidebar and click Audio & Video.
- You should now see your video output on the right side of the window.
- If you can’t see a video output, go to the drop-down menu beside Camera and select your webcam device.
![Audio and video settings on Skype]() 3. Connect Your USB Webcam to Another Port
3. Connect Your USB Webcam to Another Port
 3. Connect Your USB Webcam to Another Port
If you use an external webcam, chances are your computer may not recognize it due to the port you used to connect the device. In such a scenario, even Skype won’t list the device as an option in the solution we listed above.
You can do the following:
- Try connecting the external webcam to another USB port.
- If your webcam is connected to a USB 3.0 port, connect it to a USB 2.0 port.
- Your USB hub/docking station might be having issues – connect your camera directly to your computer’s USB port.
Check whether Skype can find your webcam now.
No luck? Then move on to the following tip.
4. Test Your Webcam
The next step involves checking if the “Skype camera not working” issue is tied to your computer’s webcam or Skype. This step involves using another application, such as your computer’s native camera program to test the hardware device.
Do the following to test your webcam with the Windows Camera app:
- Launch the Start menu and type “Camera.”
- Click on Camera in the search results.
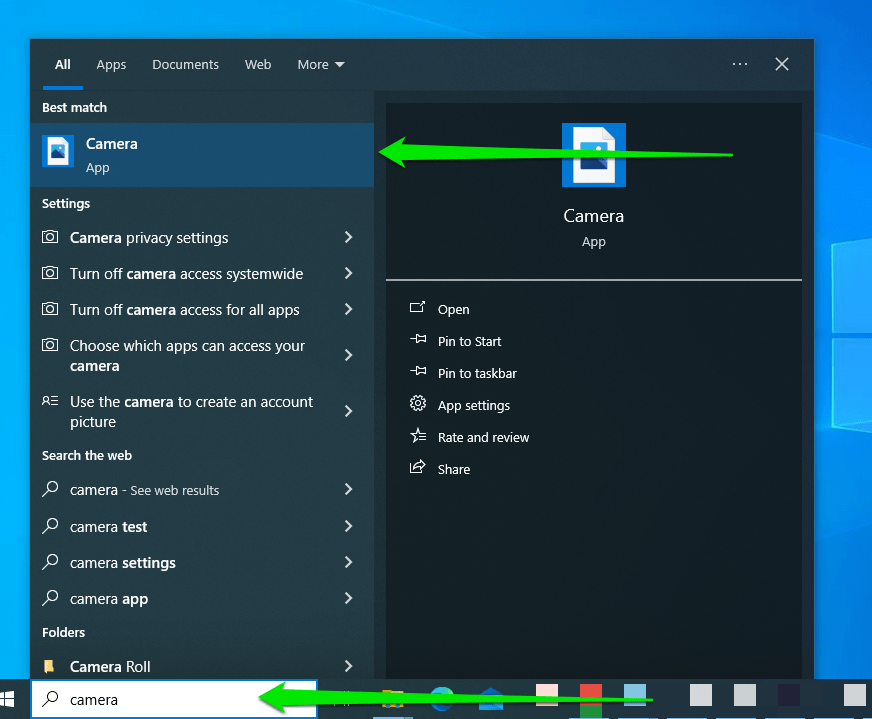
- Check if the camera app is producing pictures from your webcam.
Also Read: [SOLVED] Laptop Camera Not Working in Windows 10
You can also connect an external webcam and try running the camera app to check if it works. This way, you can confirm whether your built-in camera is experiencing issues.
Besides, it is a good idea to also check whether your external webcam is fine by testing it on another Windows-based PC. Obviously, a defective camera will not work anywhere, which means it must be replaced.
The next fix you should apply depends on the test you just ran. If the camera app cannot access your webcam and works with an external camera, your hardware may be defective. On the other hand, if it works without issues, then the problem likely rests with Skype.
That said, the camera app and Skype may fail to use your computer’s webcam if they do not have the required permissions.
This issue brings us to the next possible solution.
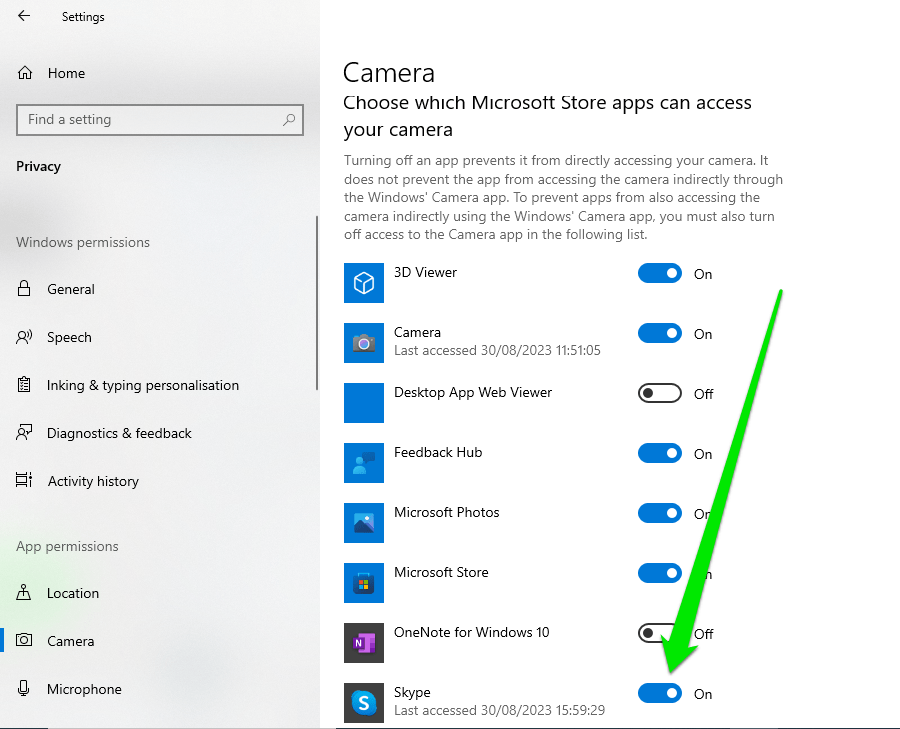
5. Check Your Camera Permissions
Check that Skype has permission to use your webcam
If Skype doesn’t have permission to use your webcam, you won’t be able to video chat on Skype. Here’s how to check if Skype is allowed to access your camera:
For Windows 10:
- Use Windows+I to launch the Start menu.
- Click Privacy when Settings opens.
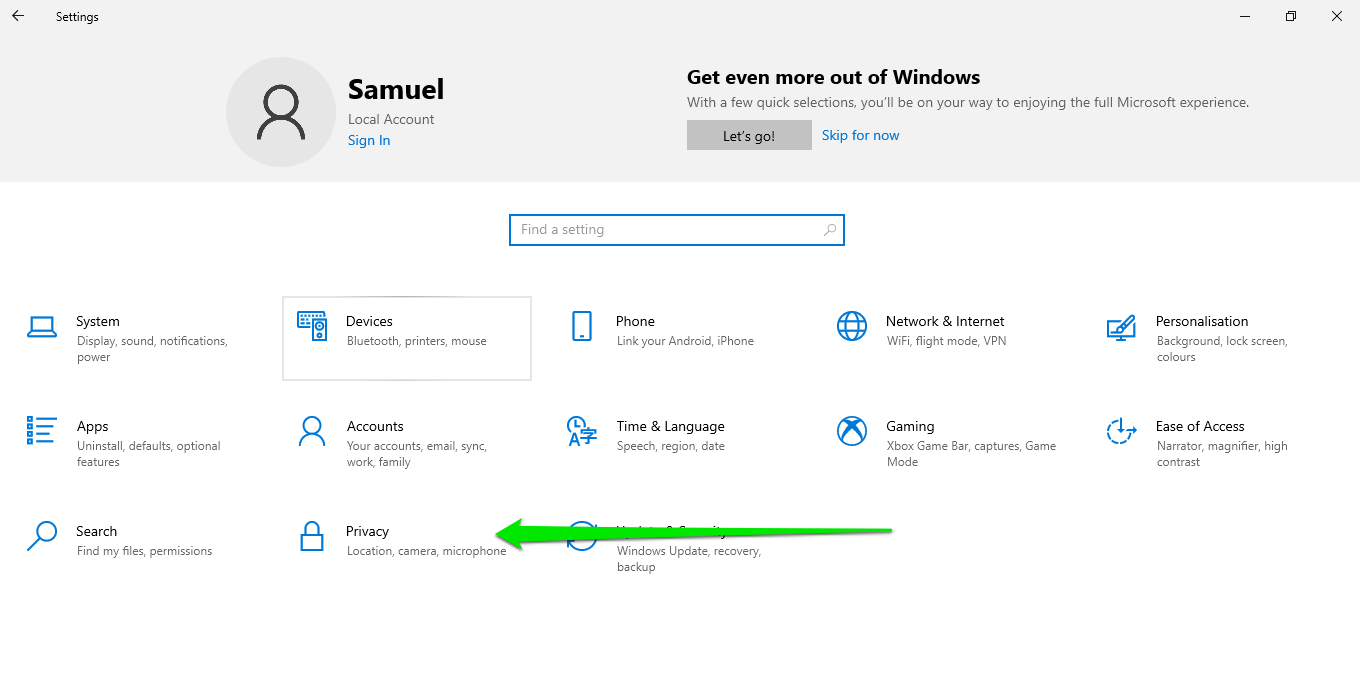
- Go to the left sidebar and click Camera.
- Go to the Camera page and toggle the “Allow apps to access your camera” to the On position.

- Next, go to Skype under “Choose which Microsoft Store apps can access your camera” and toggle the switch to On.
For Windows 11:
- Press Windows+I to launch the Settings app.
- After Settings opens, go to the left sidebar and click Privacy & Security.
- Go to the Privacy & Security page, scroll down to App Permissions, and click Camera.
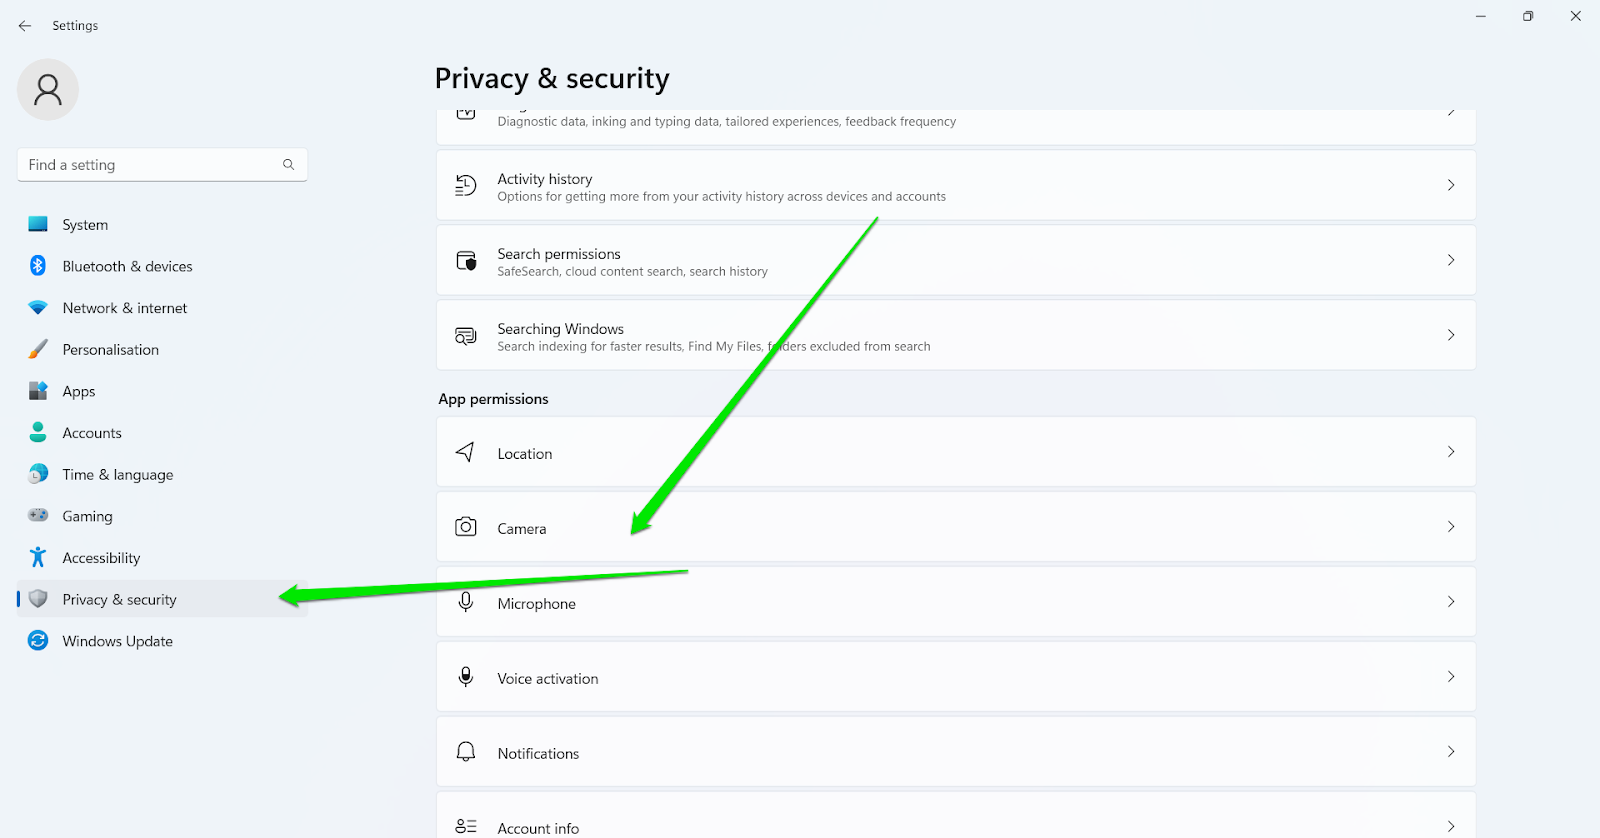
- Turn on Camera Access.
- Expand the “Let apps access your camera” list and turn on the switch for Skype.
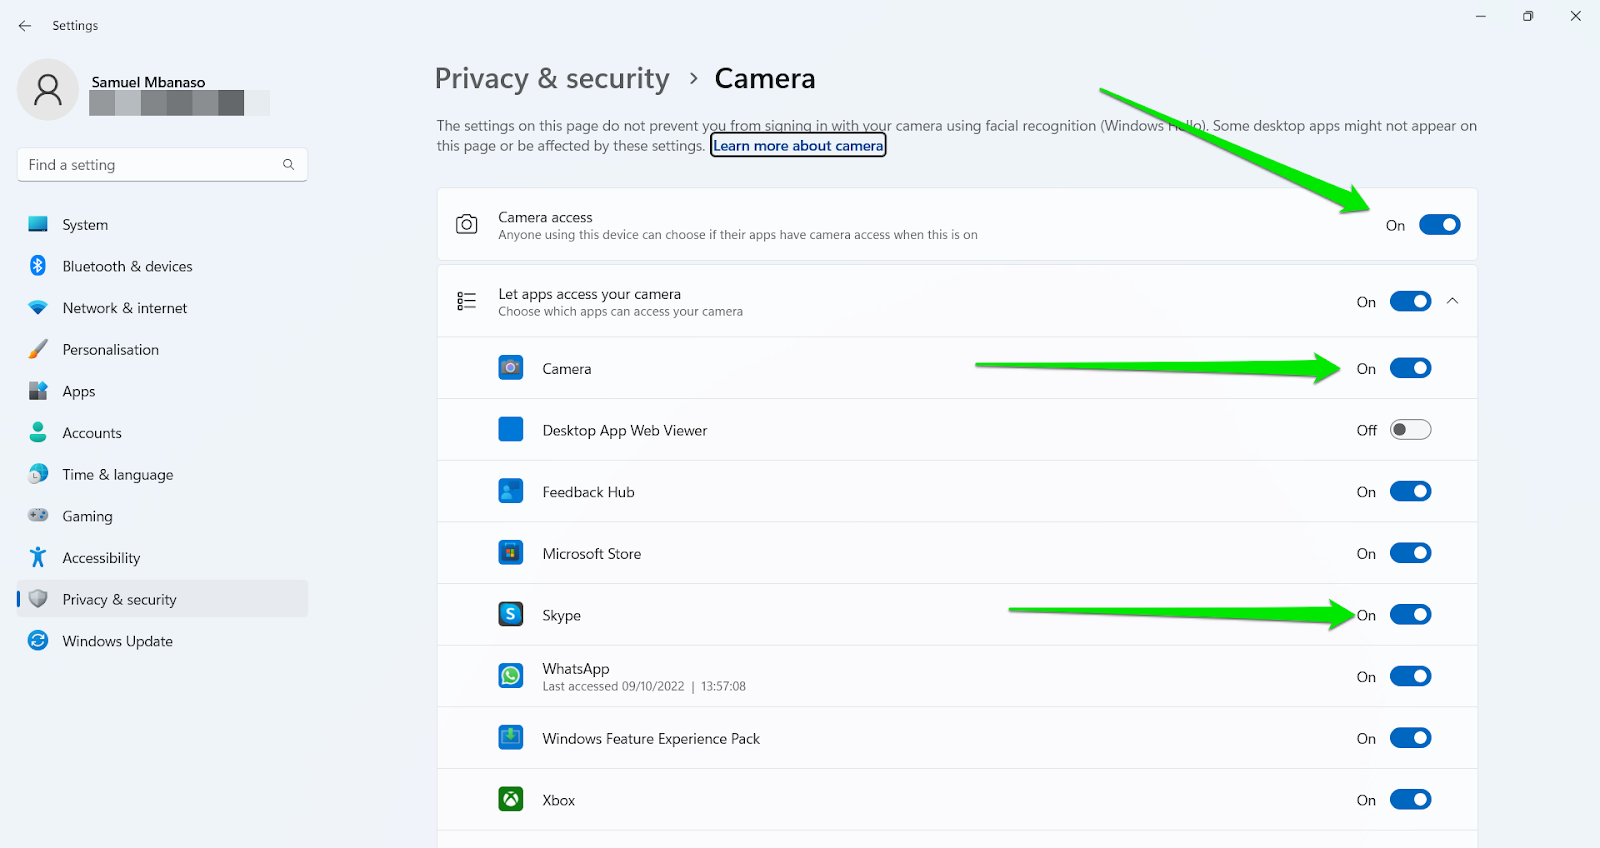
- If Skype still doesn’t work, turn on the permission for the Camera app and check to confirm if your webcam is defective.
It would also be a good idea to permit your browser to use your camera if you’re running the web version of Skype. You may have previously prevented the browser from using the device because you wanted to beef up your privacy and security.
Once this is done, go back to Skype and check if your camera is working properly.
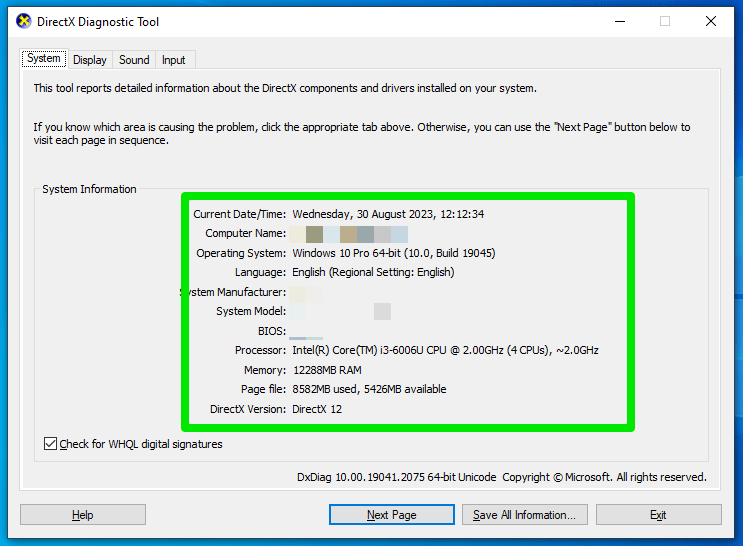
6. Make Sure Your Computer is Compatible with Skype
You’re likely experiencing the “Skype can’t start video calls” problem because your computer does not meet one or more of Skype’s minimum system requirements.
Your system must be running at least Windows 7 (but it should ideally be Windows 10 and up), using at least 2 GB RAM, a dual-core processor, and DirectX 9.0 or higher.
Also Read: How to Upgrade to Windows 10 From Windows 7?
If you’re running Windows 10 or Windows 11, you must be on version 1809 or higher.
You can follow these steps to check if your computer meets these requirements:
- Press WIndows+R on your keyboard to launch Run.
- Type “dxdiag” in the text box and tap Enter or click OK.
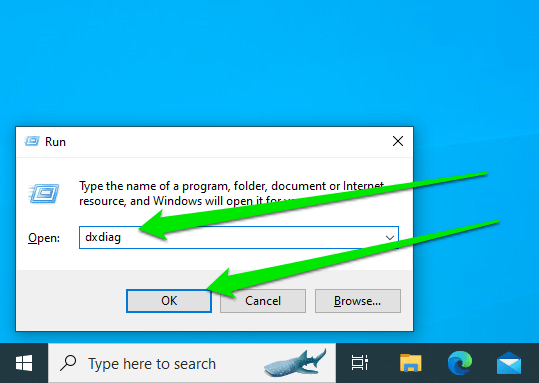
- Once the DirectX Diagnostic Tool appears, go to the System Information area under the System tab to compare your computer’s configuration against Skype’s requirements.
You can update Windows to meet requirements such as your Windows 10 (or 11) and DirectX versions if your computer lacks those configurations.
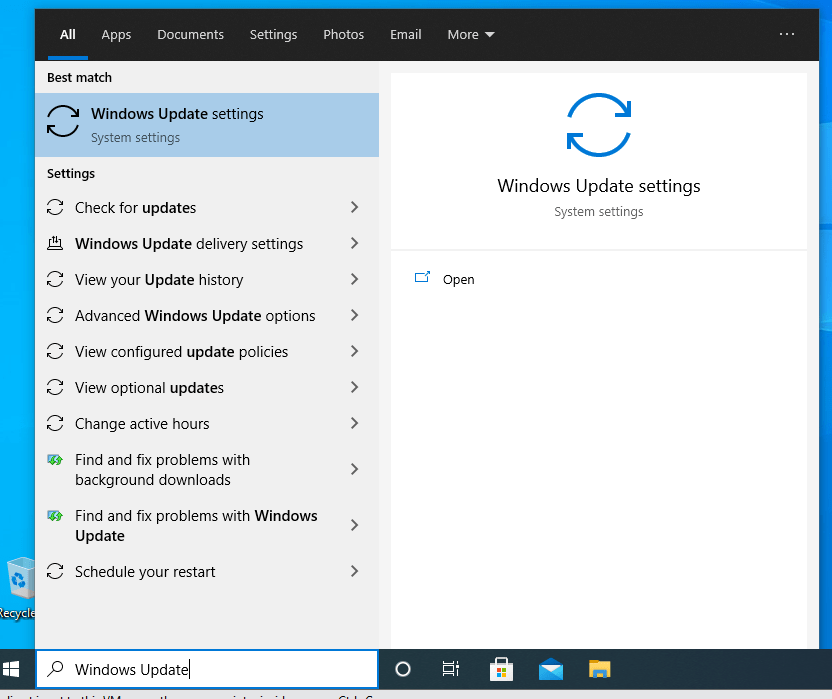
To update your PC, go to the Start menu, type “update,” and click “Check for updates.” Allow Windows to download every available update, including optional updates.
If you use the web version of Skype, make sure your browser is up to date, as the video calling function will not work on older browsers.
7. Close Other Programs That Could Be Using the Webcam
Multiple applications cannot use your camera at once. If another program is currently using it, Skype won’t be able to access it. In this case, you may get a prompt telling you that another application is currently using the camera.
You can resolve this problem by closing the program. Go to the Task Manager (right-click the Start button and select Task Manager), click the program, and select End Task.
Sometimes, a background application that starts when Windows boots may be the problem. As such, try closing all your start-up apps and check if that will resolve the problem. Follow these steps:
- Launch the Settings app (press Window+I).
- Click the Apps once Settings appears.
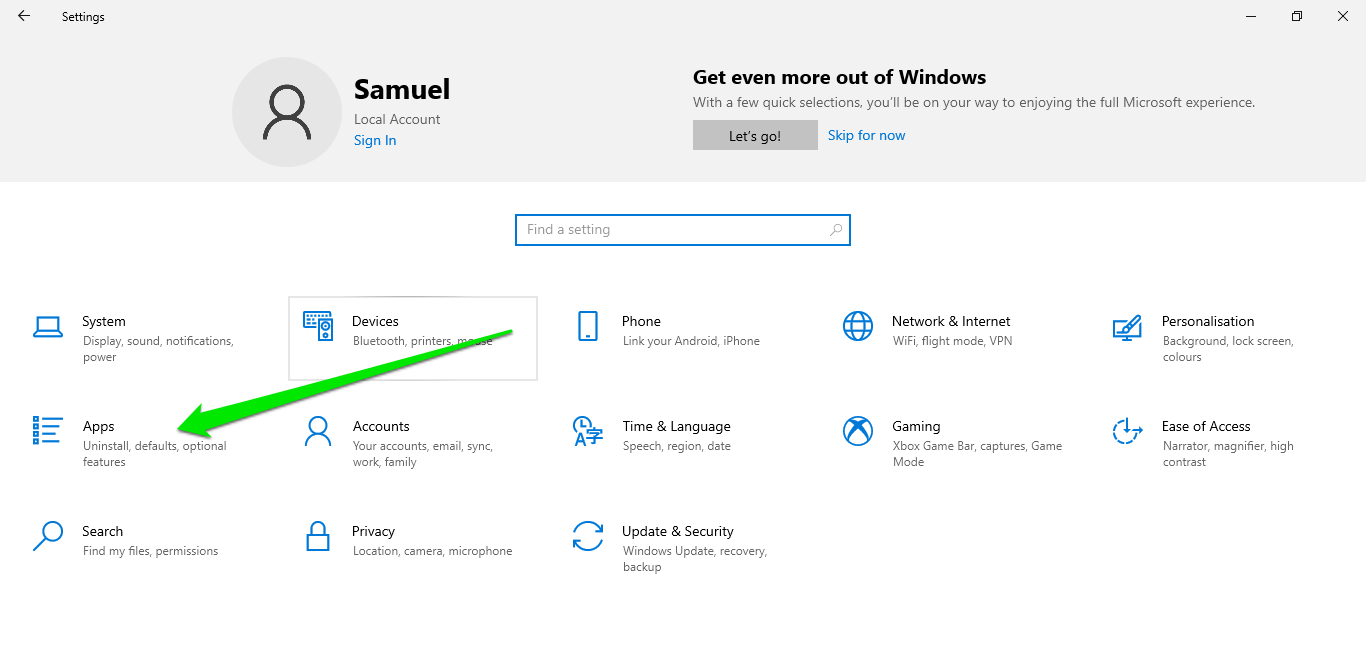
- Go to the left sidebar and select Startups.
- Now, go to the main Startup page and toggle off the switches next to every app under the Startup Apps list except Skype.
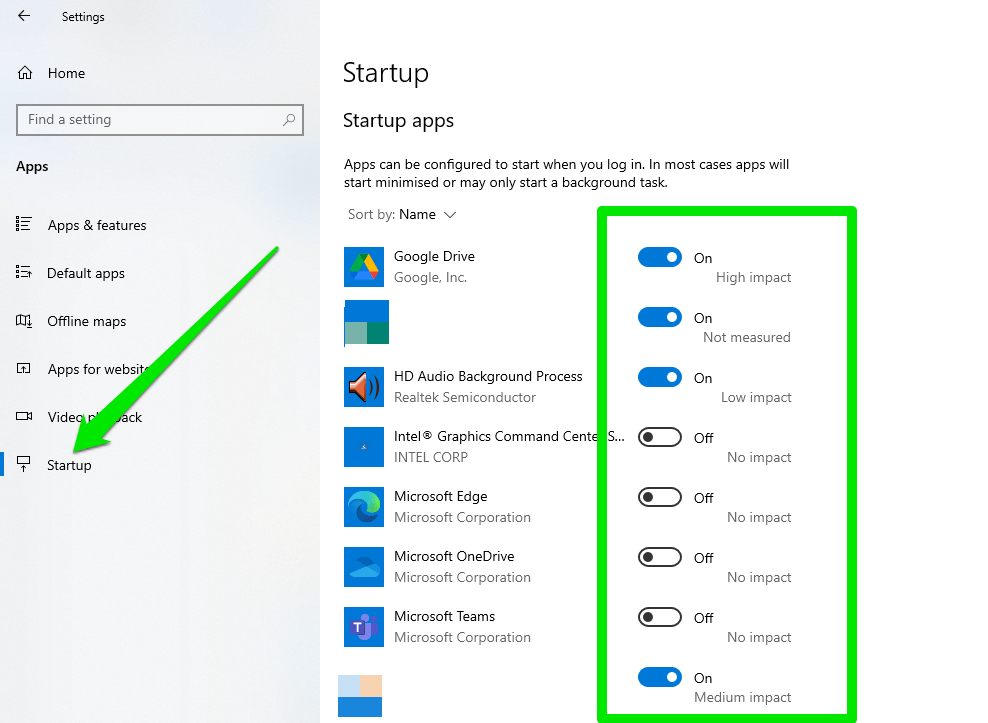
- Restart your computer and launch Skype.
Also Read: Quick Tips: How to Disable Startup Programs in Windows 10
On Windows 11:
- Launch Settings and click Apps in the left sidebar.
- Go to the Apps page and select Startup.

- Now, toggle off the switches next to every app under the Startup Apps list except Skype.
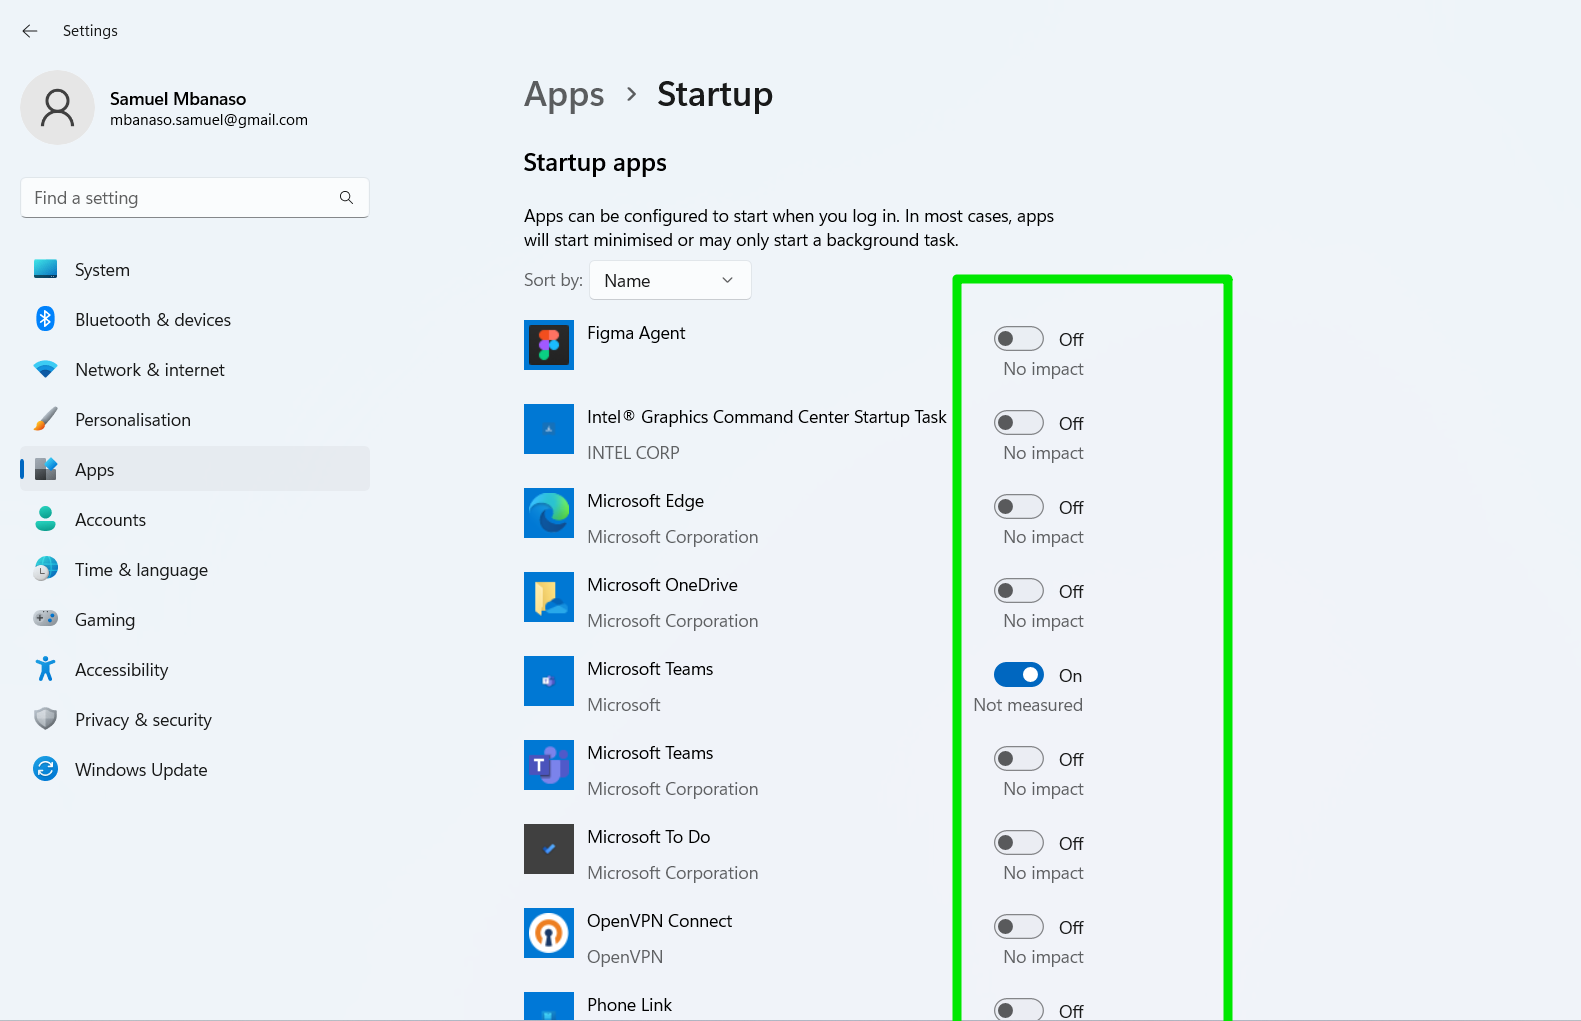
- Restart your PC and check for the problem.
8. Disable and Enable Your Webcam
Restarting your device can resolve the issue if the camera’s driver is stuck or encountering another common glitch.
The Windows Device Manager can help you out:
- Press Win+X and select Device Manager.
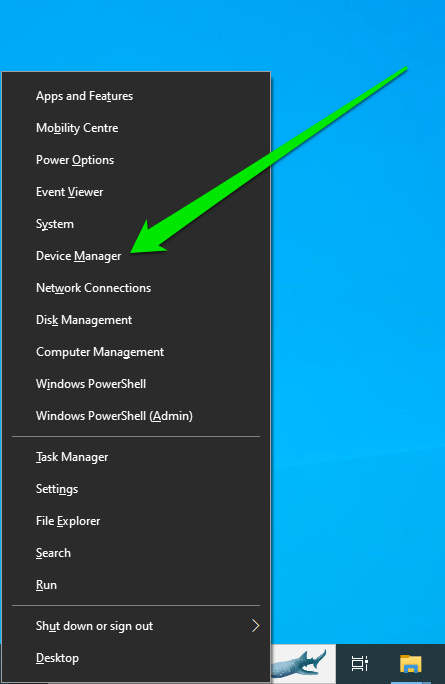
- Go to Imaging Devices or Cameras once the Device Manager window appears.

- Locate your webcam, right-click it, and select Disable device.

- Click Yes on the confirmation prompt.
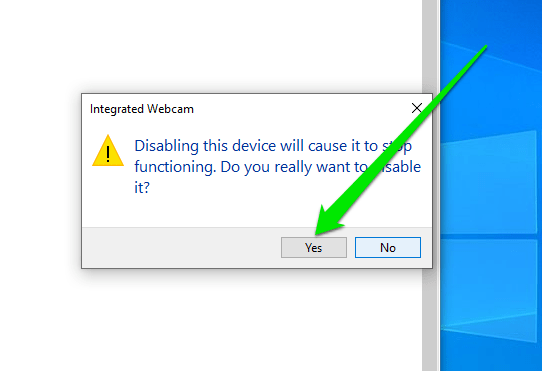
- Right-click on your webcam again and select Enable device.
- Close Device Manager.
Check whether your webcam is OK now.
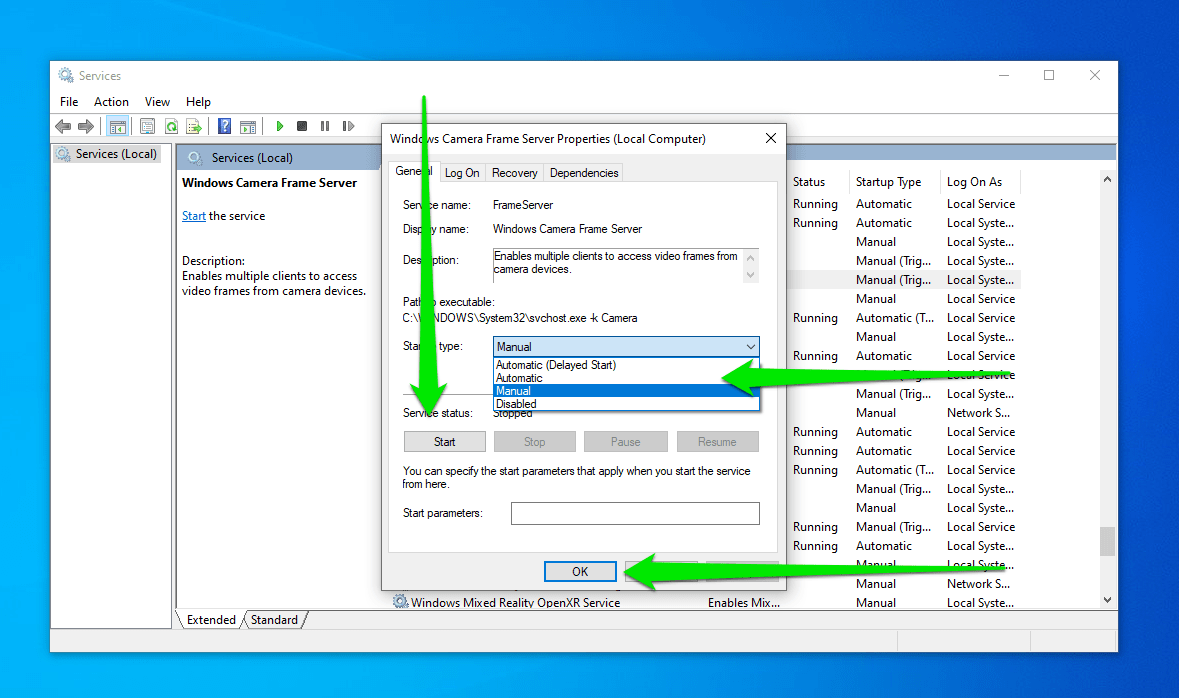
9. Set the Windows Camera Frame Server Service to Automatic
This service is responsible for feeding pictures to different clients on your computer from your camera devices. The “Skype couldn’t find a webcam” problem could be happening because the service is either not running or set to manual.
Follow these steps to activate it and set it to automatic:
- Launch the Start menu and type “Services.”
- Click on Services in the search results.
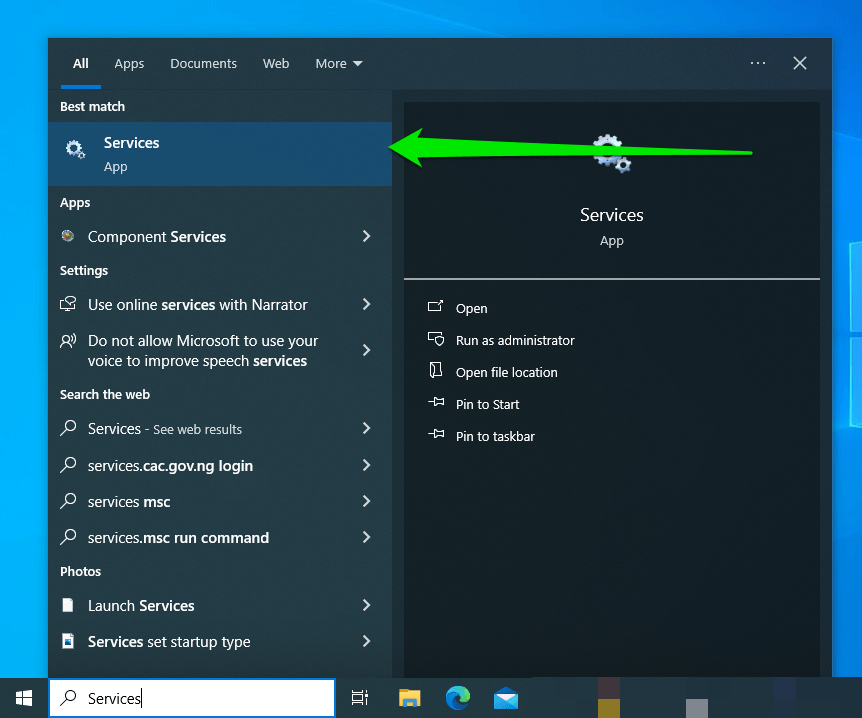
- After the Services window opens, scroll down and double-click the Windows Camera Frame Server.
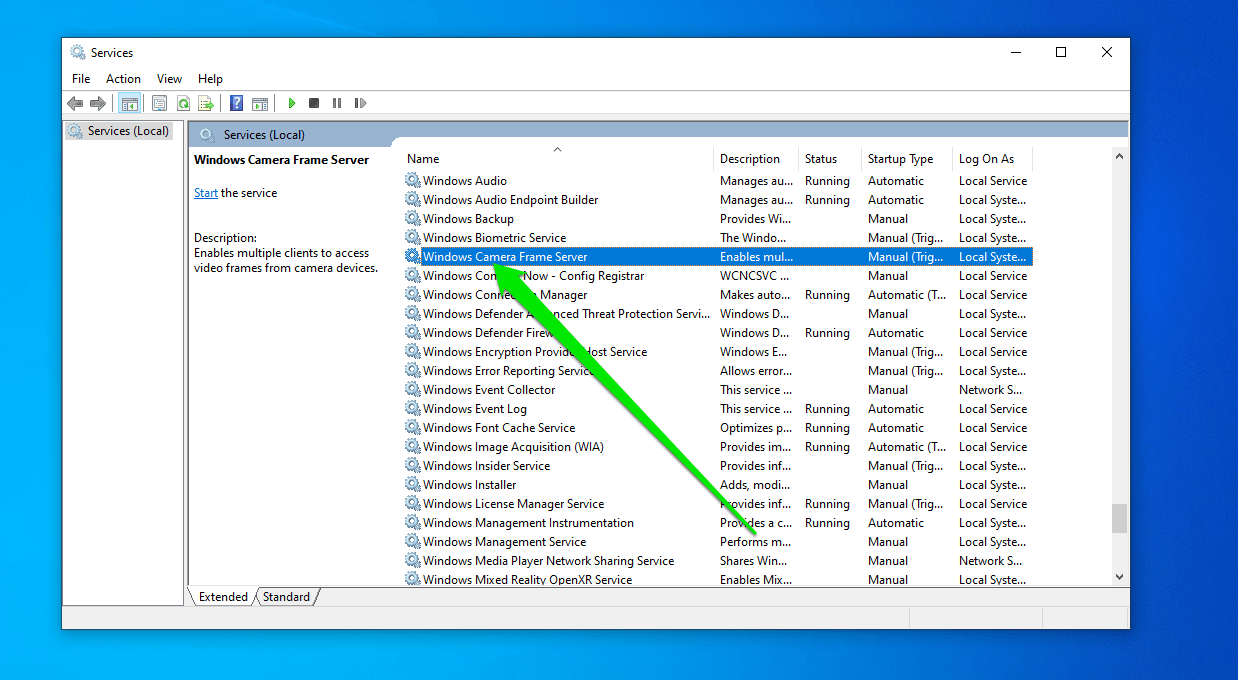
- Go to the Startup Type drop-down menu and select Automatic.
- Click the Start button.
- Click OK.
10. Make Sure Your Internet Connection is Working Properly
Skype may be cutting off the camera because of poor Internet connection. So, ensure you’re properly connected and try again. You can try opening a webpage on your browser to confirm that your internet connection is working properly.
You can do the following to ensure you’re getting adequate Internet connection:
- Restart your computer and internet connection device (router and WiFi)
- Go to the Task Manager and check the Network column to identify background apps and process that may be hugging all your bandwidth.
- Go closer to your WiFi device, as walls, doors, and other elements may be affecting your signal.
Also Read: Tips on How to Speed Up Your Internet Connection
11. Reinstall Your Webcam Drivers
Hardware devices on Windows, including webcams, rely on their software drivers to communicate with the operating system and the programs installed on the computer.
When you connect any device to your PC, Windows installs its driver software if it is available. Only then can the device start working. If the driver is defective, the webcam will have issues.
Reinstalling your webcam drivers is the same as reinstalling the device. This action can help you to fix the “Skype video call not working” issue.
Follow these steps:
- Press Win + X and select Device Manager
- Go to Imaging Devices or Cameras once the Device Manager window appears.
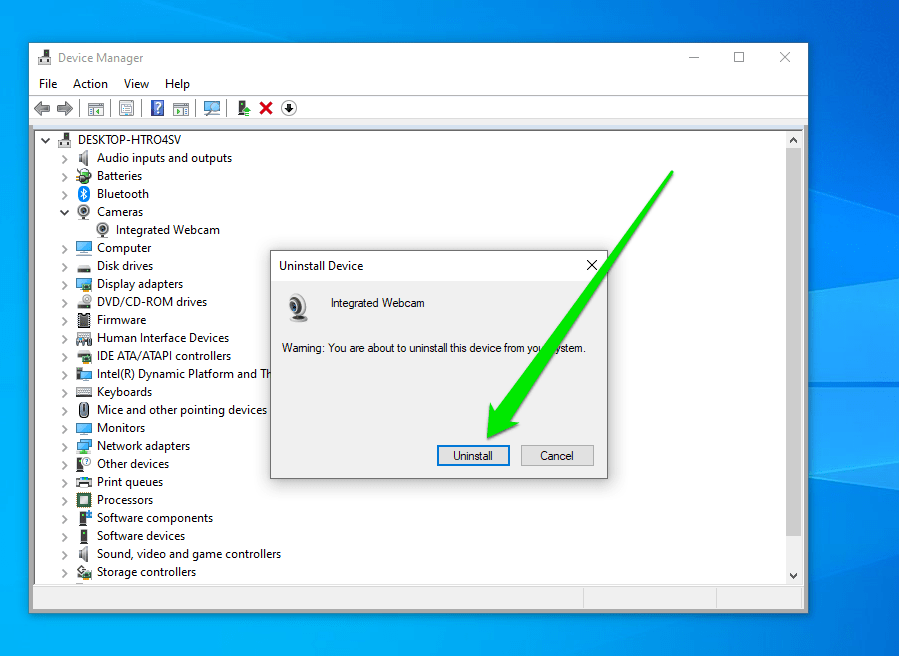
- Locate your webcam, right-click it, and select Uninstall Device.
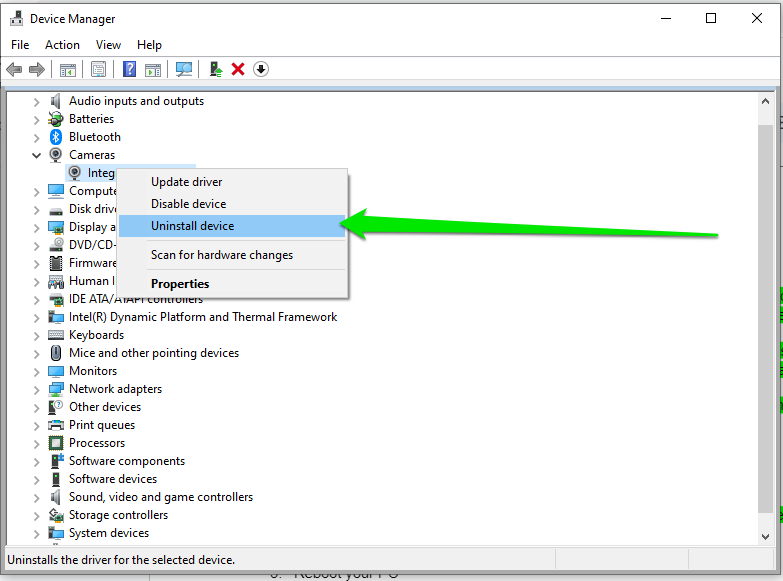
- Click Uninstall in the confirmation prompt.
- Reboot your PC
- Your webcam drivers will be installed automatically
Check whether your webcam is working with Skype again.
12. Update the Webcam Drivers
cc
If reinstalling the driver fails to solve the problem, updating it is the next step to take. The current driver might be out of date and incompatible with your OS. It might also be corrupt.
Issues with drivers could cause a break in communication between the device and the operating system, which could potentially affect how Skype detects the camera
You can learn how to update your webcam drivers using different methods, then check if it resolves your problem.
Other methods that may help you include using the Windows Update client and a special third-party tool.
Use Windows Updater
The first step is running the Windows Update Client. It is responsible for installing the latest software components for Windows and can fix and update underlying software that support your webcam.
You can also use the Driver Update option in Windows Update to update your webcam driver.
Follow these steps:
- Open the search window (press Windows logo+S), type “update” and click “Check for updates.”
- As mentioned earlier, it will be ideal to allow Windows to download and install every update it finds.
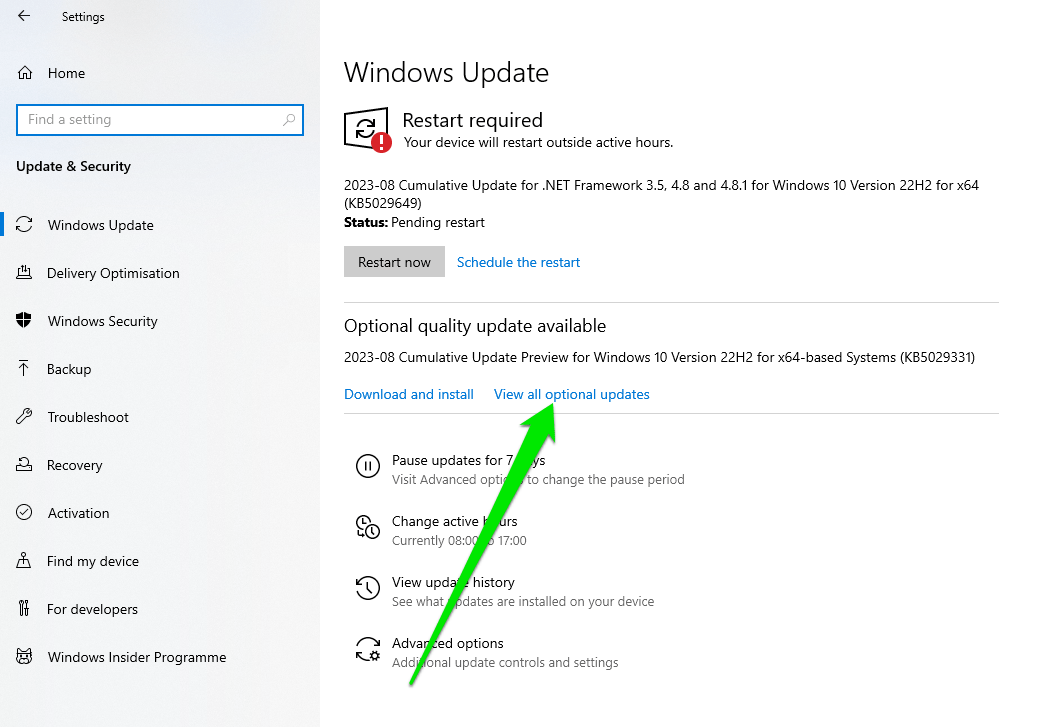
- After that, go to the Optional Updates section and download your webcam driver. Follow these steps to open the driver section, depending on your OS:
Windows 10: Select “View all optional Updates.”
Windows 11: Under More Options, click Advanced Options and select Optional Updates on the next page.
- Now, expand Driver Updates, check for the webcam driver and select it.
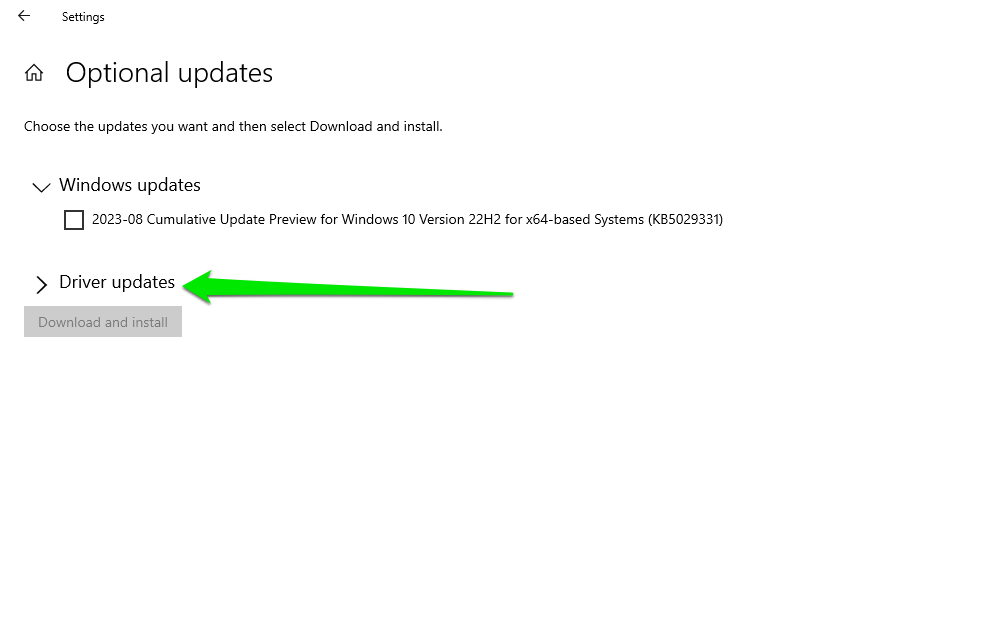
- After selecting your driver, click the Download button.
Use a Special Tool
You can easily update your webcam driver – and other device drivers – all in one click using a special tool, known as Auslogics Driver Updater. It will save you time and ensure you download and install the correct driver.
13. Try Using Generic Drivers for Your Webcam
Unfortunately, some issues may prevent you from updating your webcam drivers in a traditional way.
They are:
- A really old webcam;
- A webcam manufacturer that is out of business;
- Unavailability of drivers for your device from your computer’s or device’s manufacturer;
In any of those scenarios, you might be unable to install or update your webcam driver.
That said, you can still try to use the generic “USB Video Device” drivers for your webcam and see what happens.
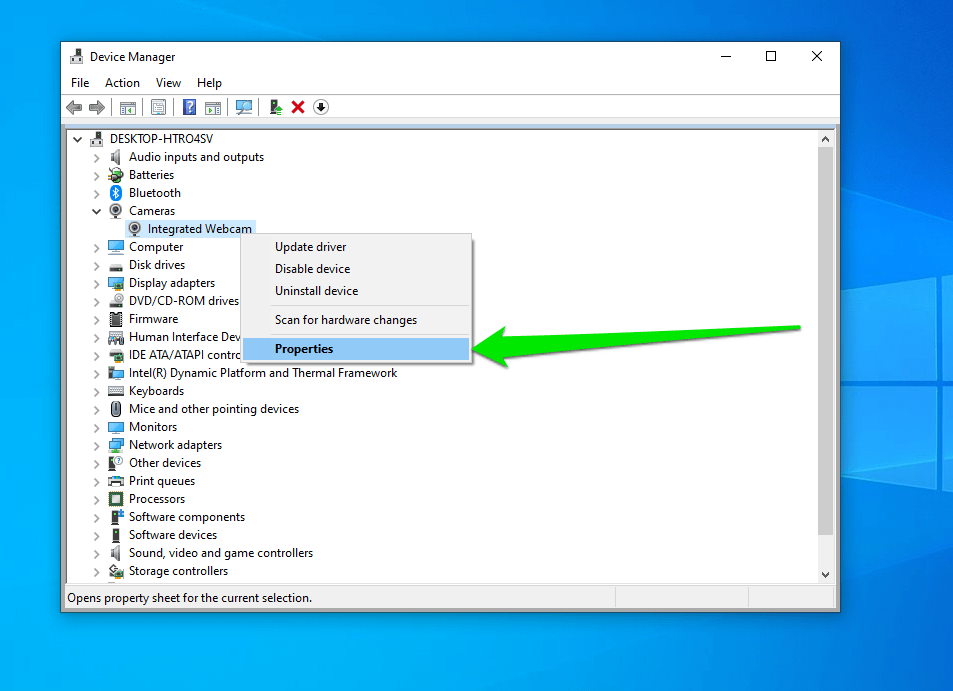
You’ll have to go through Device Manager:
- Press Win + X and select Device Manager.
- Go to Imaging Devices or Cameras once the Device Manager window appears.
- Locate your webcam, right-click it, and select Properties.
- Go to the Driver tab in Properties and click Update Driver.
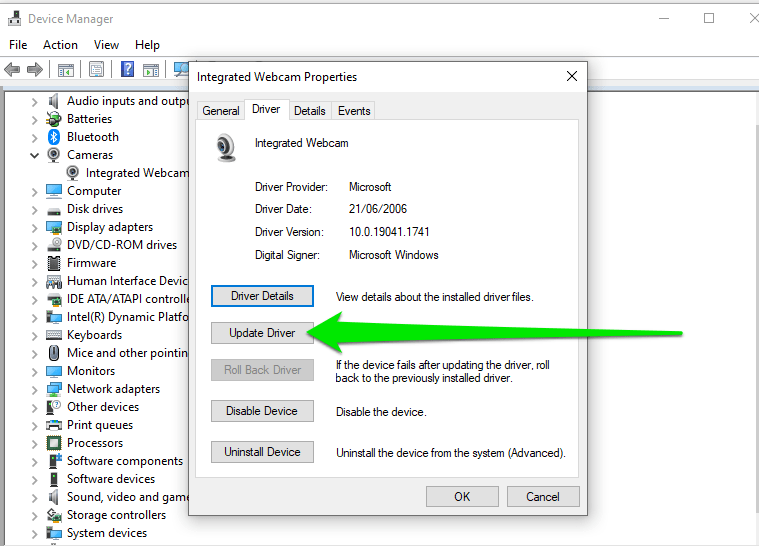
- Choose “Browse my computer for drivers” and select “Let me pick from a list of available drivers on my computer”
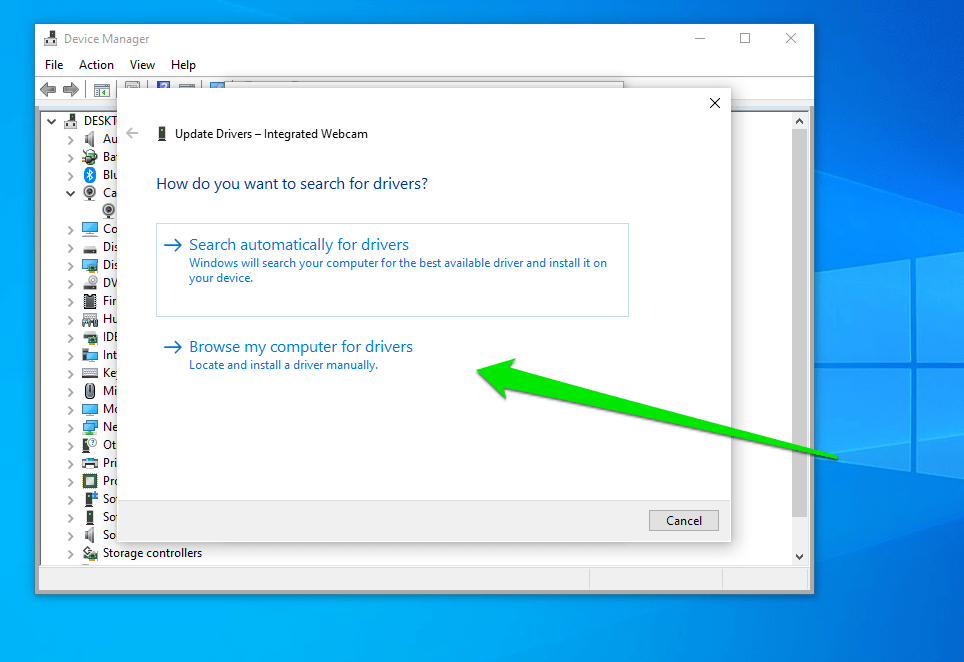
- Select USB Video Device and click Next.
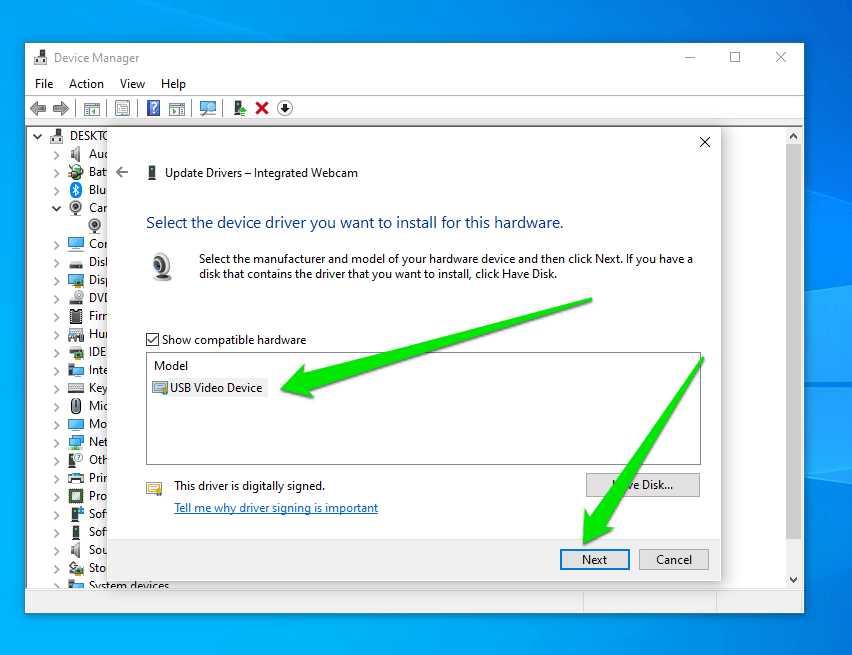
- Wait for the installation process to finish, then close the Window.
- Reboot your computer.
Check if Skype can now work with your webcam.
14. Update Skype
If you have run into the “Skype couldn’t find the webcam” trouble, make sure you are using the latest version of Skype – older versions might be unable to ensure smooth performance.
Microsoft rolls out new versions of Skype from time to time, and the Microsoft Store automatically updates most of its apps, including Skype. That said, you can check for updates and downloads by following these steps:
- Launch Skype, click on the three dots beside your name and select Settings.

- After that, go to Help & Feedback on the left.
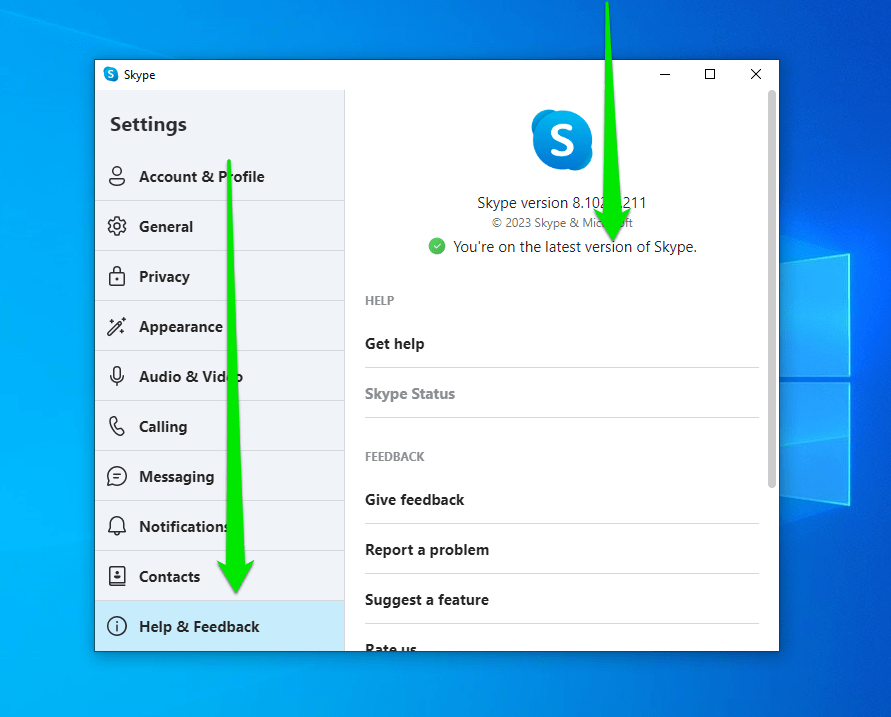
- Skype will tell you whether the app is up to date.
- You can also go to the Microsoft Store, search for Skype, and click the Update button if the app isn’t up to date.
Another option is going to Skype’s official official website and downloading the app’s latest version.
After updating the app, check whether Skype can now detect your webcam.
15. Run the Windows Store Apps Troubleshooter
You can try running the Windows Store Apps troubleshooter to find and fix the problem if updating the app does not work. Follow these steps:
For Windows 10:
- Launch Settings.
- Click on Update & Security.
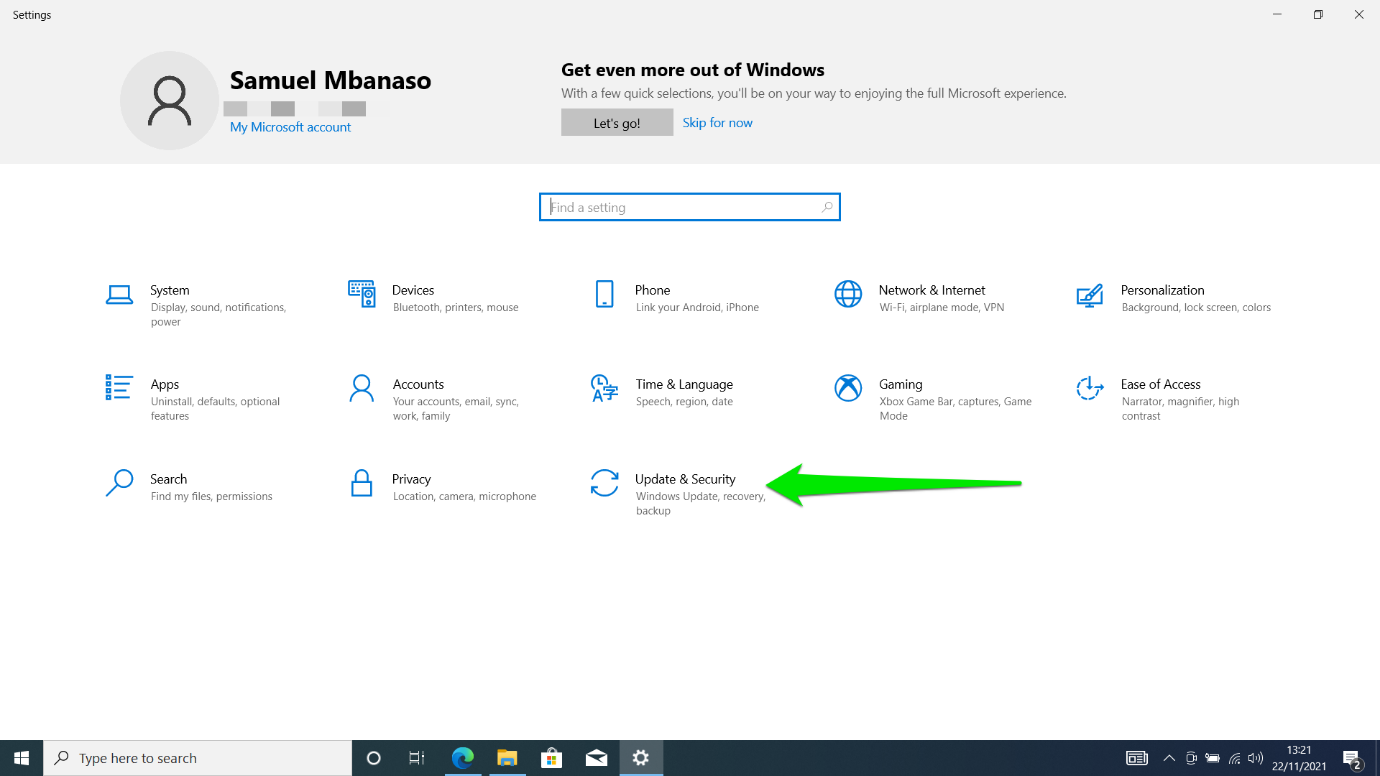
- Go to the left side of the screen and select Troubleshoot.
- Click Additional Troubleshooters.
- Scroll down to the bottom of the screen, click Windows Store Apps, and select Run the Troubleshooter.
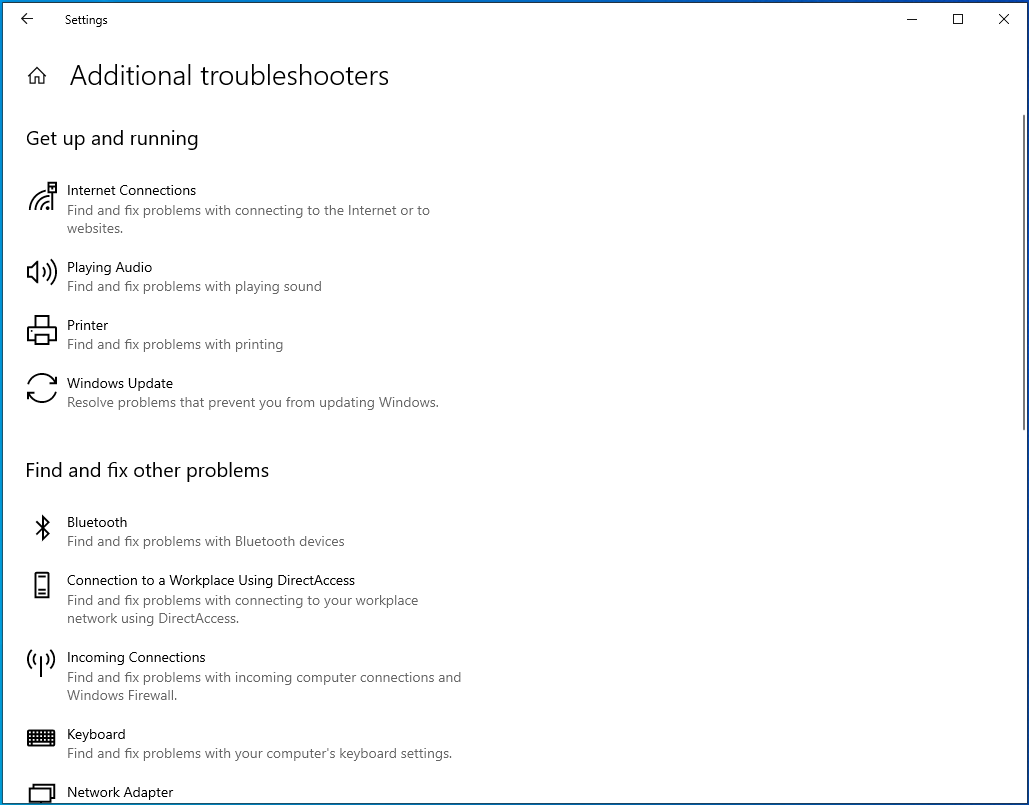
- Allow the troubleshooter to run and attempt to fix the issue.
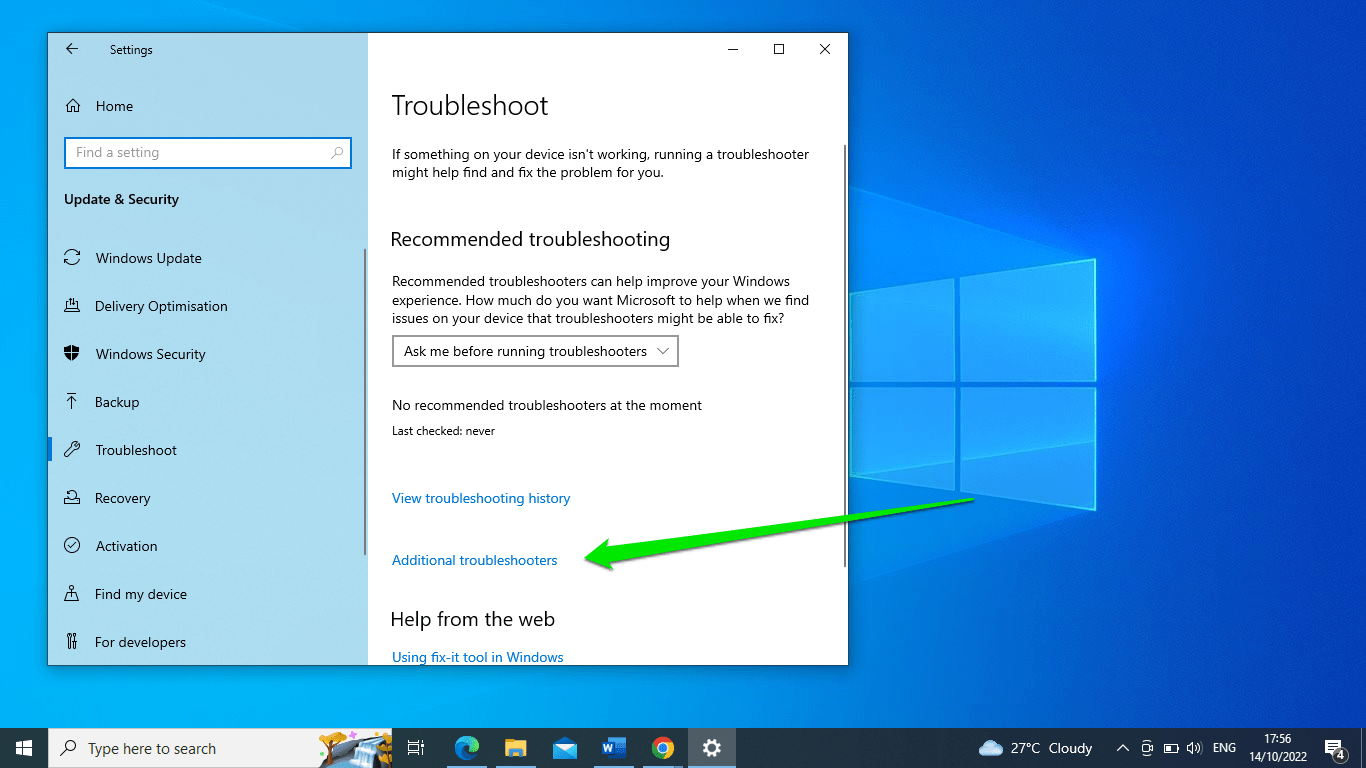
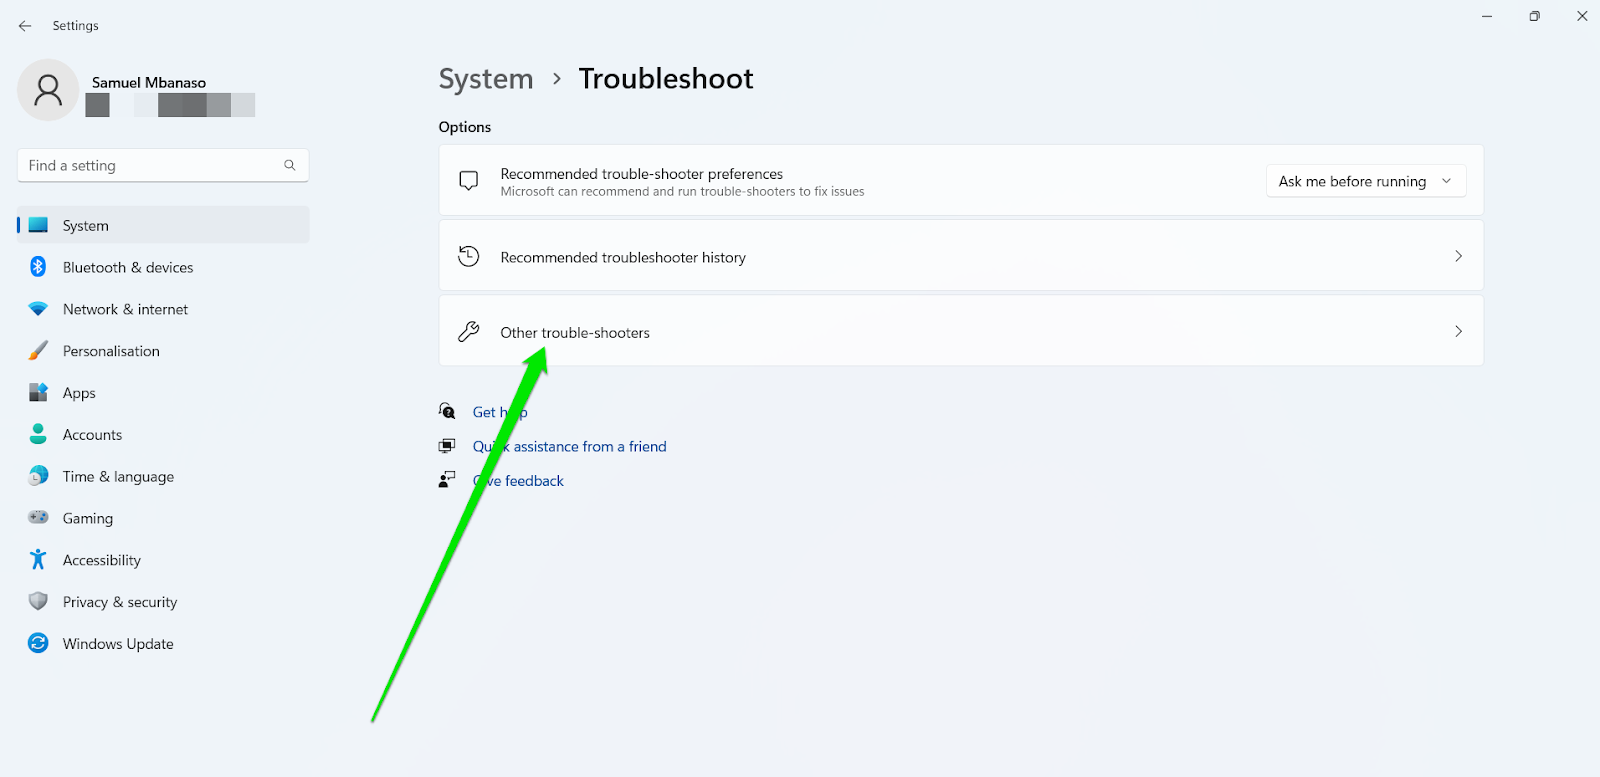
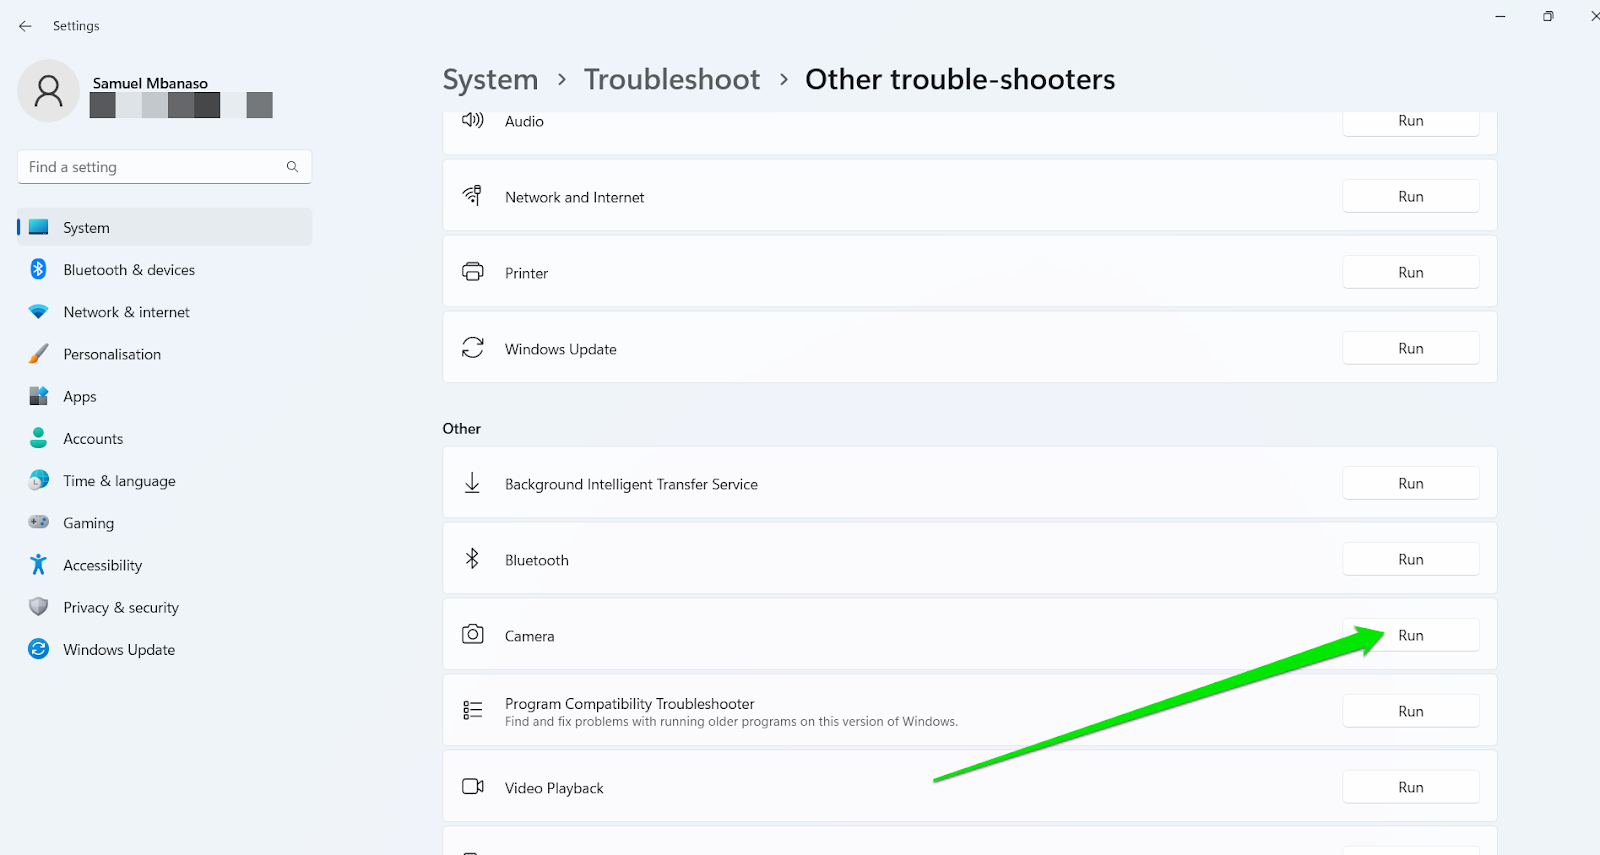
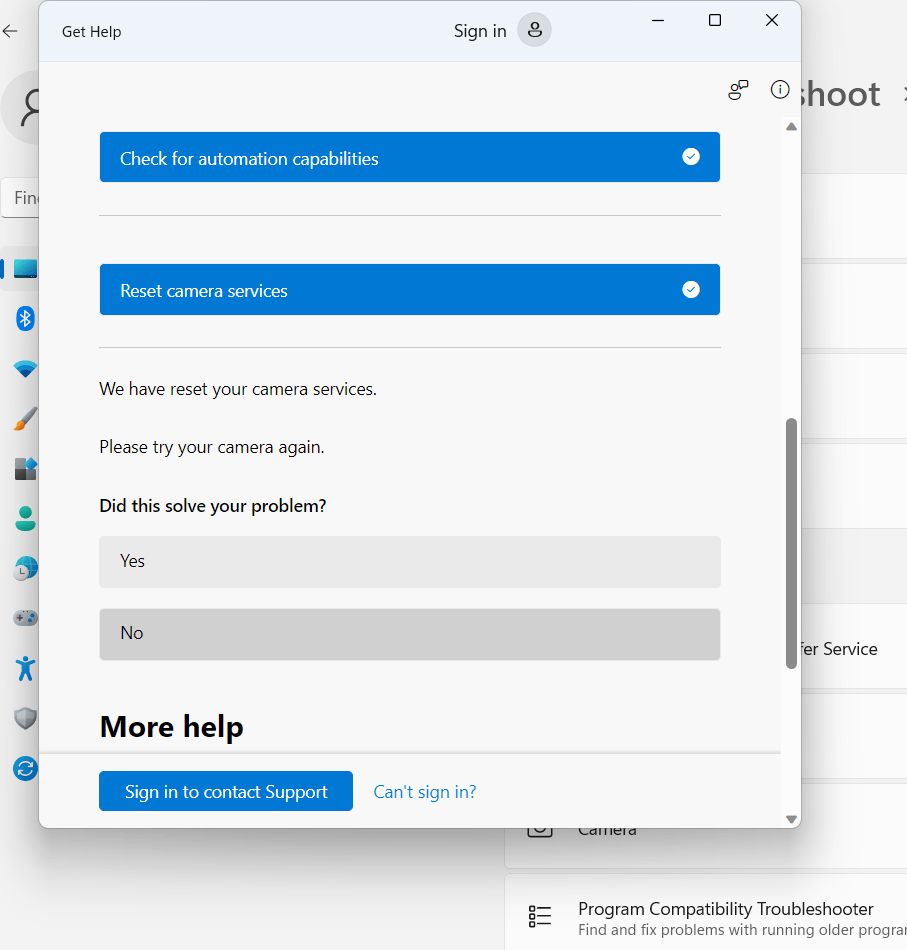
If you use a Windows 11 PC, you’ll be running the Camera Troibleshooter instead. Follow these steps:
- Launch the Settings application.
- Scroll through the System options and click Troubleshoot.
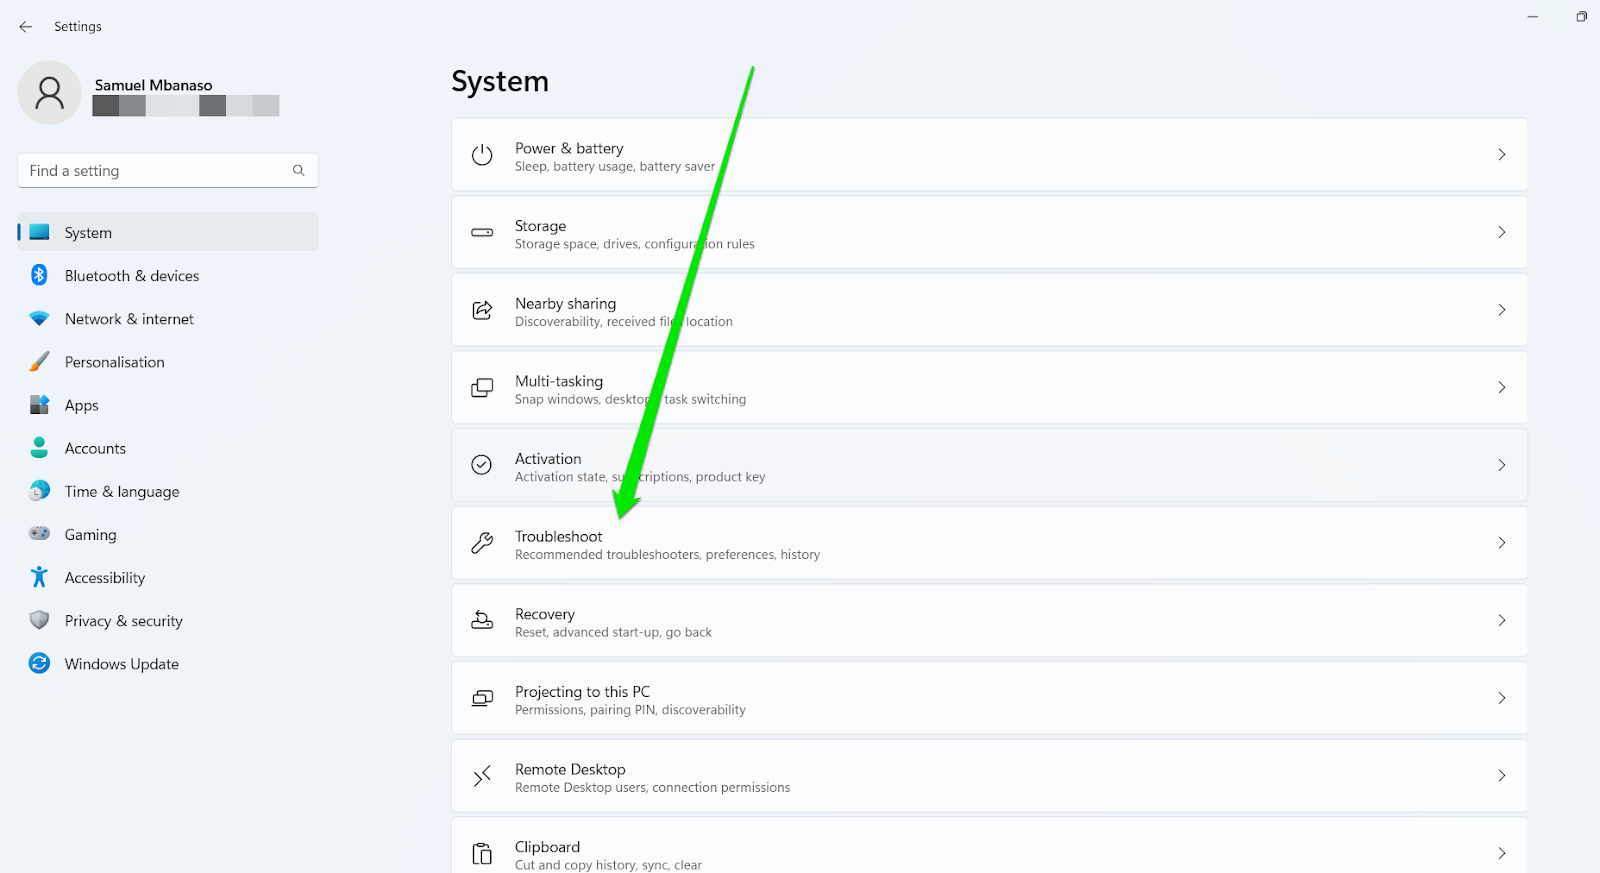
- Select Other Troubleshooters on the System > Troubleshoot page.
- Click Run beside Camera.
- The Get Help window will now appear. It may ask you to sign in, but you can continue without providing your credentials.
- Click Yes to consent to Windows running diagnostics on your computer.
- The utility will now check for problems with the camera. It will reset the camera services first and ask you to check if the problem has been resolved.
- If the issue persists, select No.
- Continue going through the different troubleshooting steps until the problem goes away.
16. Reinstall Skype
If Skype can’t connect to your webcam after your tries so far, you might need to reinstall the app. You do not have to worry about your chat history as everything is saved to the cloud and you can always continue where you stopped.
To uninstall Skype, do the following:
- Quit Skype.
- Press the Windows logo key + I combination to launch Settings.
- Go to Apps and search for Skype.
- Once Skype shows up, click it and select Uninstall.
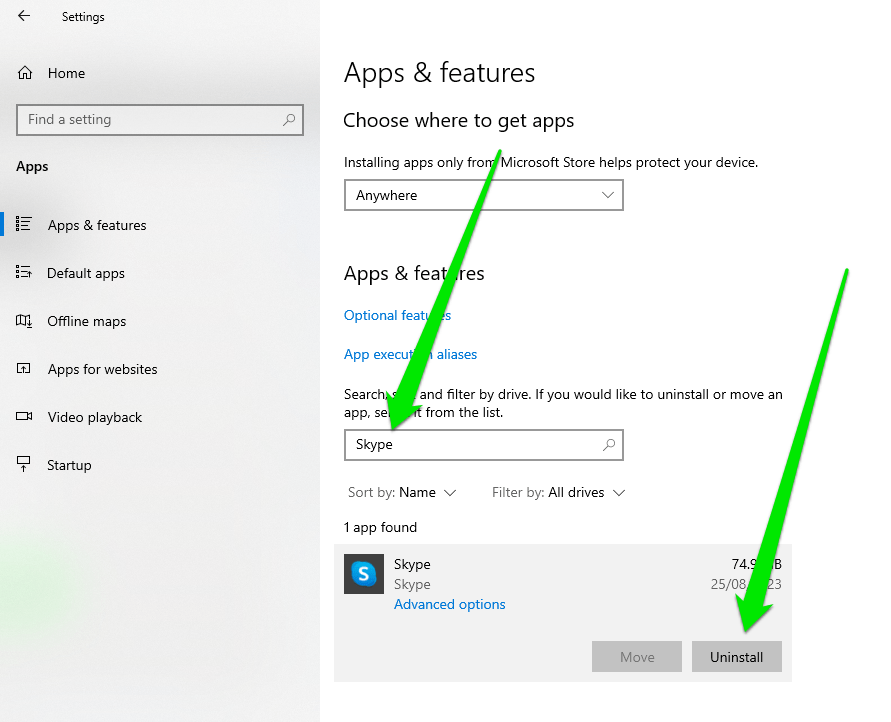
- Follow the subsequent prompts to confirm your decision and remove the application.
- Restart Windows and install Skype again from the Microsoft Store.
Follow these steps to remove Skype if you use a Windows 11 PC:
- Open the Settings app and click Apps in the left pane.
- Select Installed Apps on the Apps page.

- Go to the search box and type “Skype.”
- Click the three dots beside Skype and select Uninstall.
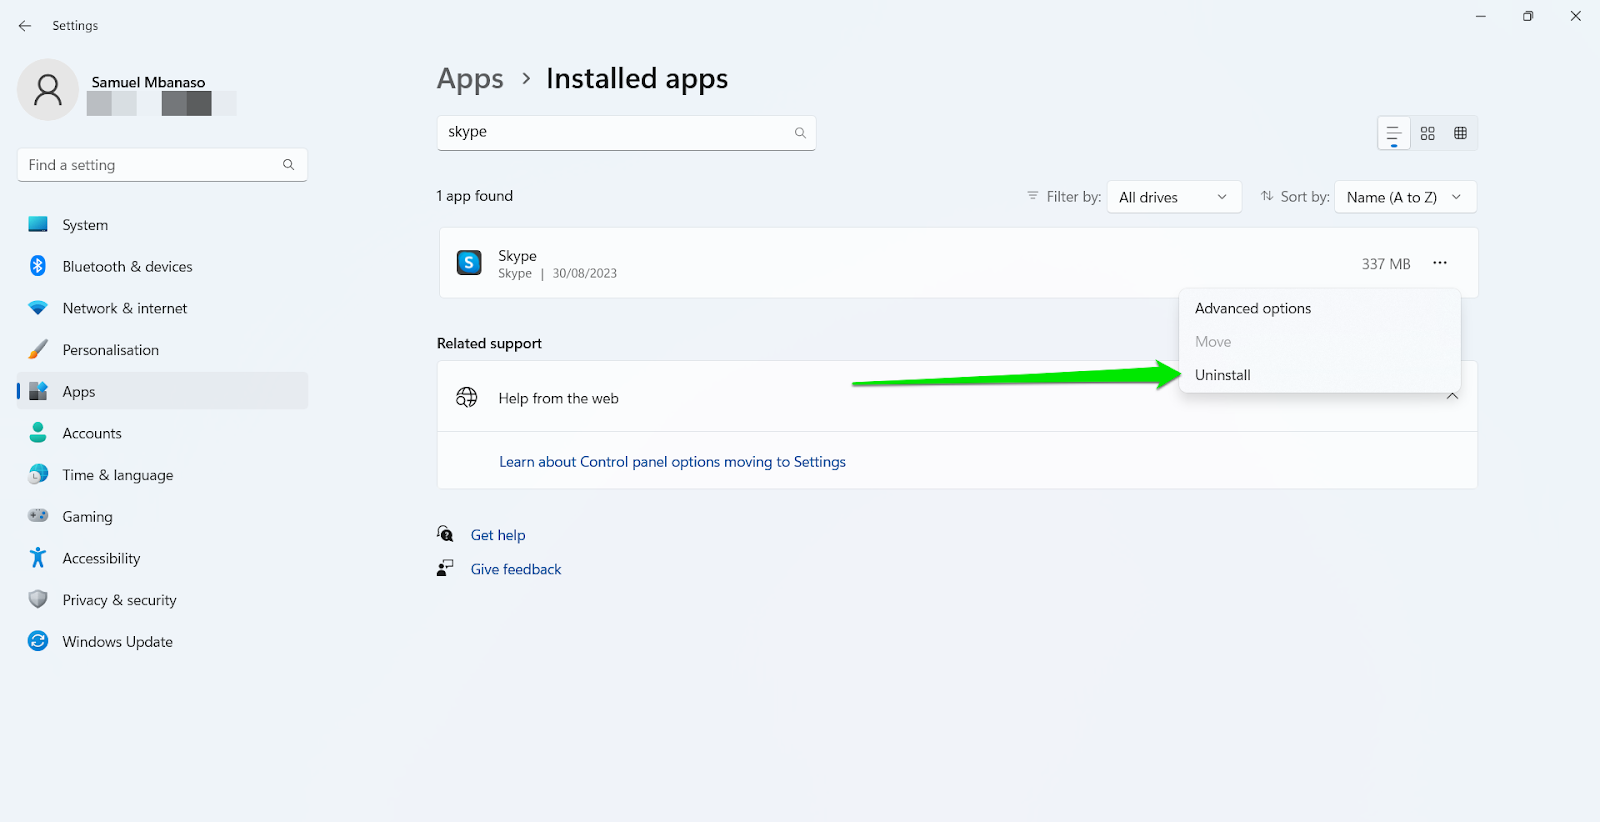
- Complete the uninstallation by following the subsequent prompts.
17. Perform a System Restore
If the webcam issue started recently, it means some changes you made to your computer might be responsible for Skype’s failure to make video calls.
Thankfully, Windows, through the System Restore utility, can help you roll back your computer to an earlier state when Skype video calls worked without problems.
Follow these steps to restore your computer:
- Launch the search menu by tapping Windows+S.
- Type “restore” and click Create a Restore Point.
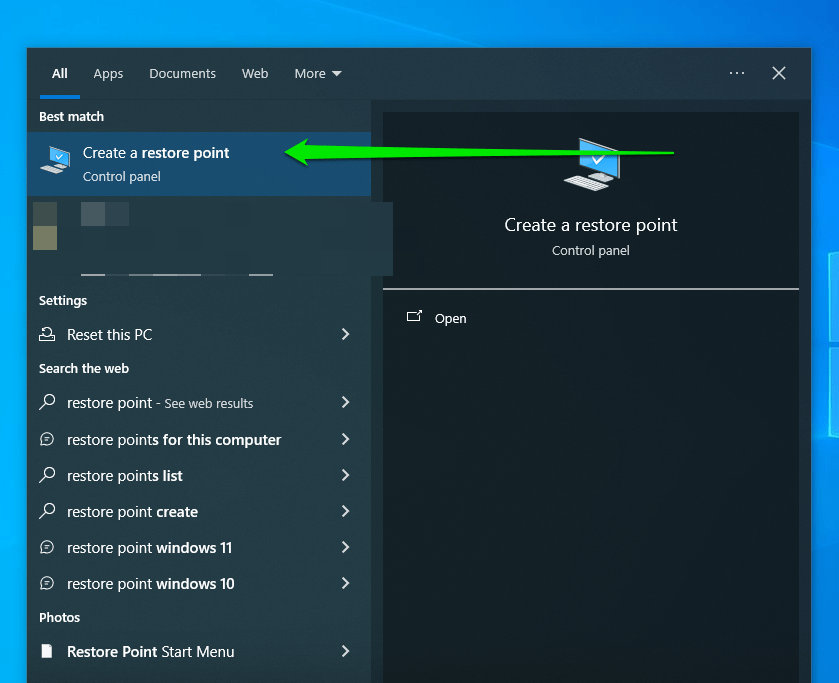
- Click the System Restore button in the System Properties window.
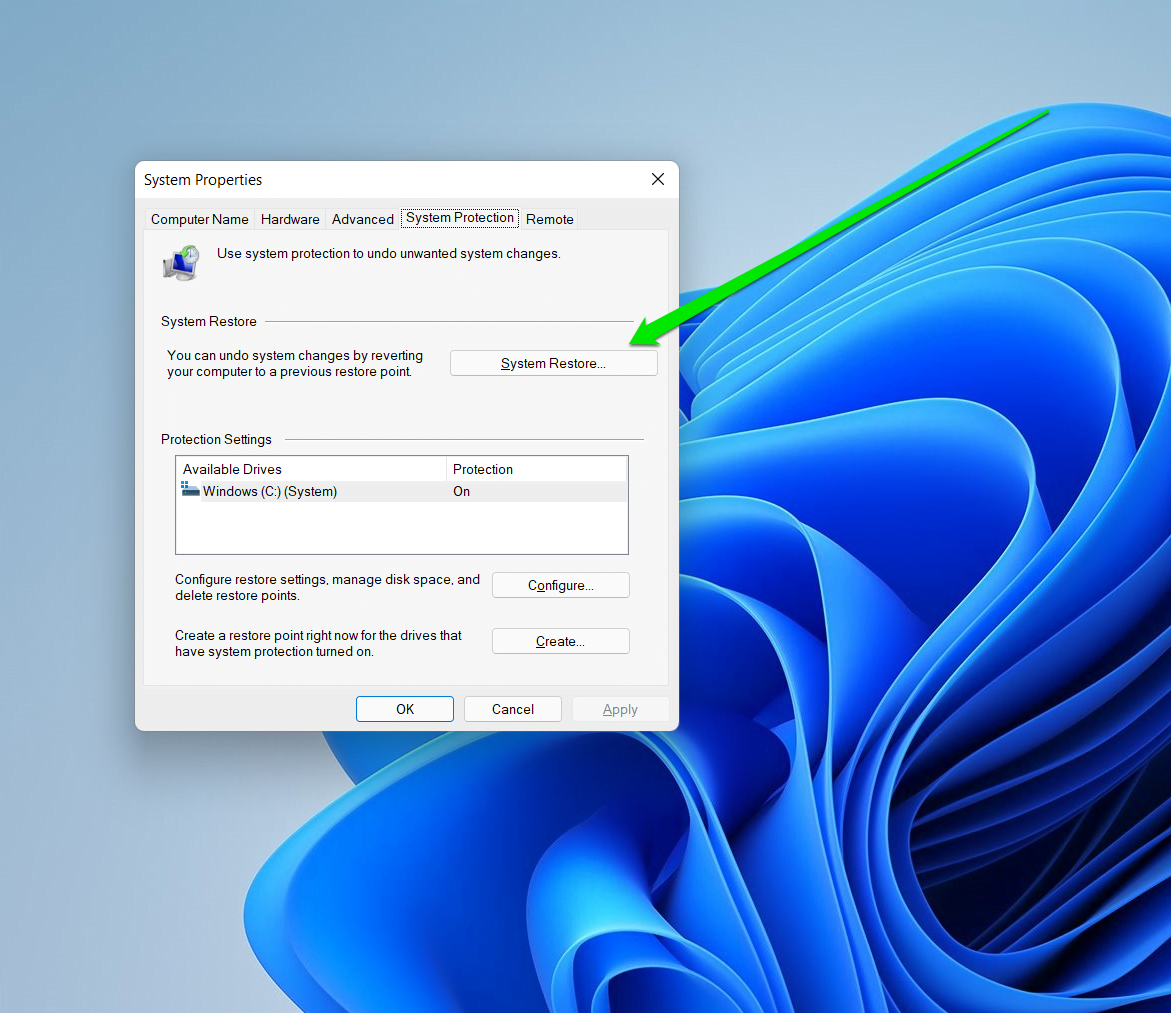
- You can select the Windows Recommended restore point if it will roll back your computer to a date when Skype worked correctly. If not, click Next.
- Choose a Restore Point and click the Next button. You can click “Scan for affected programs” to see what the restore process will remove from your computer.
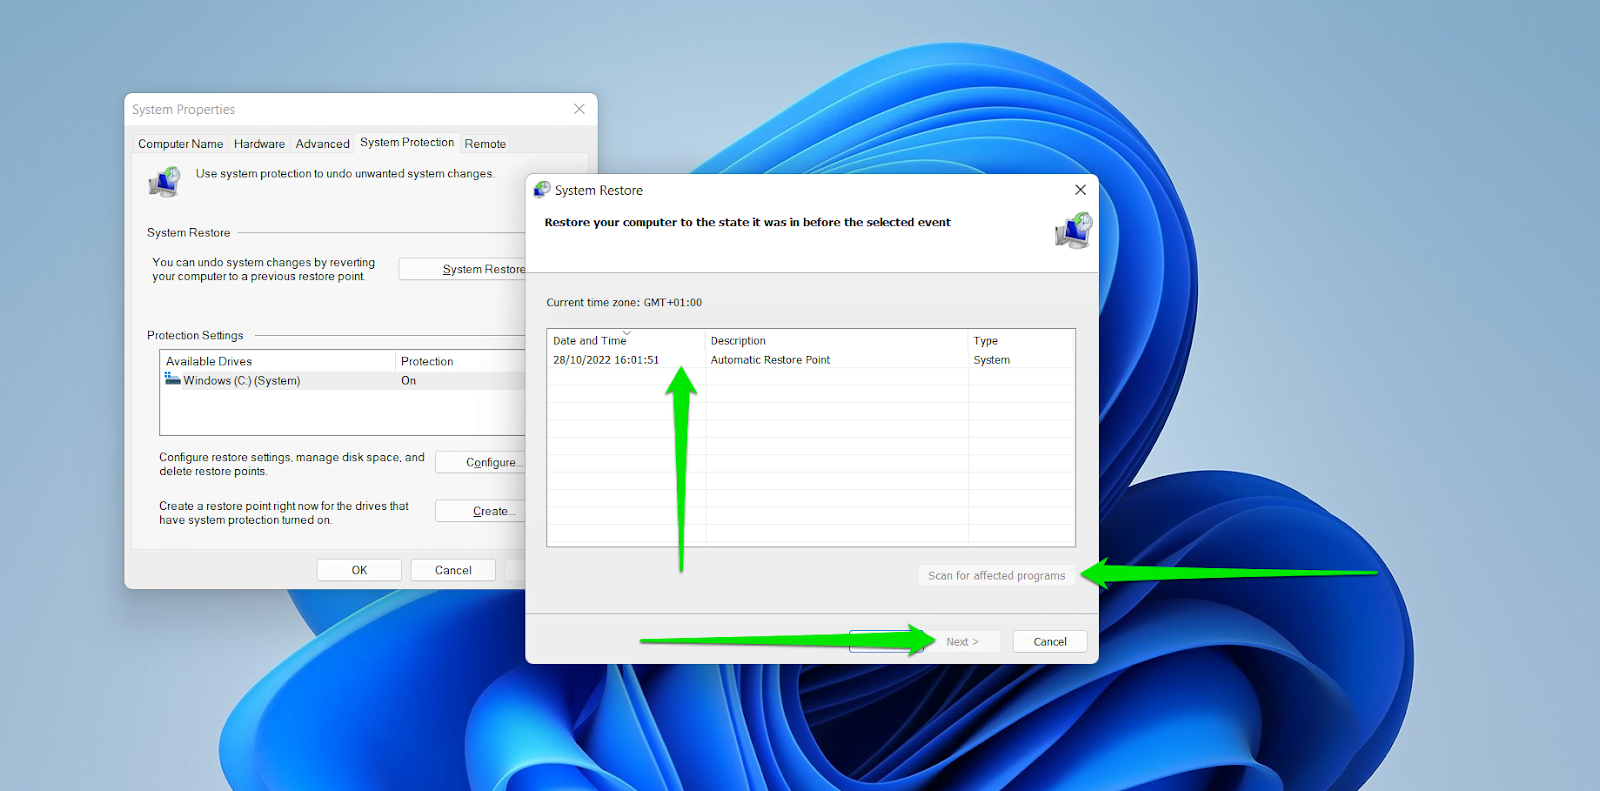
- Click Finish.
Also Read: [FIXED] System Restore Not Working in Windows 10
18. Delete the StructuredQuerySchema.bin file
We recommend you use this trick if you:
- Have recently upgraded from Windows 8 to Windows 10;
- Are using the Skype Preview app.
Here are the steps to follow:
- Tap the Windows logo key + R combo to open Run.
- Type %localappdata%\Microsoft\Windows\1033 into the Run box and click OK.
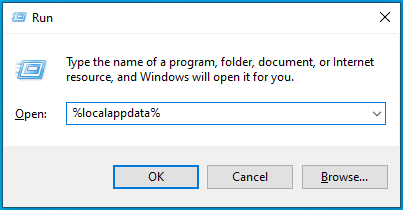
- After File Explorer opens, go to File Explorer and open the 1033 folder.
- Right-click the StructuredQuerySchema.bin file and Delete it.
- Restart your computer.
Your webcam is supposed to be detectable now. If it keeps playing up or you don’t see the folder, head to the next solution.
19. Check Your Manufacturer’s Website
Your webcam model might cause issues in its own unique way. So, it won’t hurt to visit your webcam/laptop manufacturer’s website and check whether other users are having the same issue.
Besides, you can report the “Skype cannot detect my webcam” issue to receive tailored assistance from the support team. Keep in mind that you might be asked for your laptop serial number/service tag.
To find it, follow these steps:
- Right-click the Start button and select PowerShell (Admin).

- Type Get-WmiObject win32_bios into the PowerShell window and hit Enter.

- Now, find your Serial Number/Service Tag.
20. Reseat Your Webcam Connector
Not all answers are hidden in plain sight – in some cases, you have to dig deep to find the solution.
For example, if Skype is having difficulty accessing your integrated camera, you might need to get underneath your computer.
If your laptop:
- has been recently dropped;
- sustained some other mechanical damage;
- survived a bumpy activity like moving to a new house or your all-night party;
Chances are your built-in webcam has got loose.
It’s also possible that:
- Your webcam connector might have been loosely attached by your vendor or service manager.
- Your camera might be loose due to a long period of repeatedly closing and opening the laptop lid.
Resolving the issue in this case involves opening your PC and inspecting your webcam connector. Its exact location depends on your laptop model.
Unplug the webcam connector and then plug it back. If it seems broken, there is no need to despair – it can be repaired or replaced at a reasonable cost.
Bear in mind that this particular fix should be performed only by a technician who knows their way around the internals of a laptop or desktop.
21. Reset Your PC
Resetting your PC might sound like quite a drastic procedure. Well, in truth, it is an easy way to give your machine a fresh start.
The good thing is that Windows allows you to reset your computer without losing your personal files – you will only have to reinstall your non-Windows apps.
To reset your computer, follow these steps:
For Windows 10:
- Launch the Settings app and click on Update & Security.
- Go to the left side of the screen and select Recovery.
- Click on Get Started under Reset this PC.

- Choose the “Keep my files” option and follow the subsequent instructions.
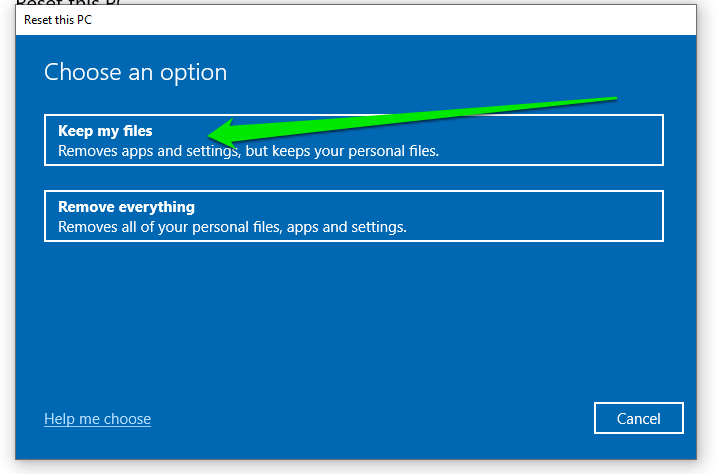
For Windows 11:
- Launch the Settings app.
- Scroll down under System and click Recovery.
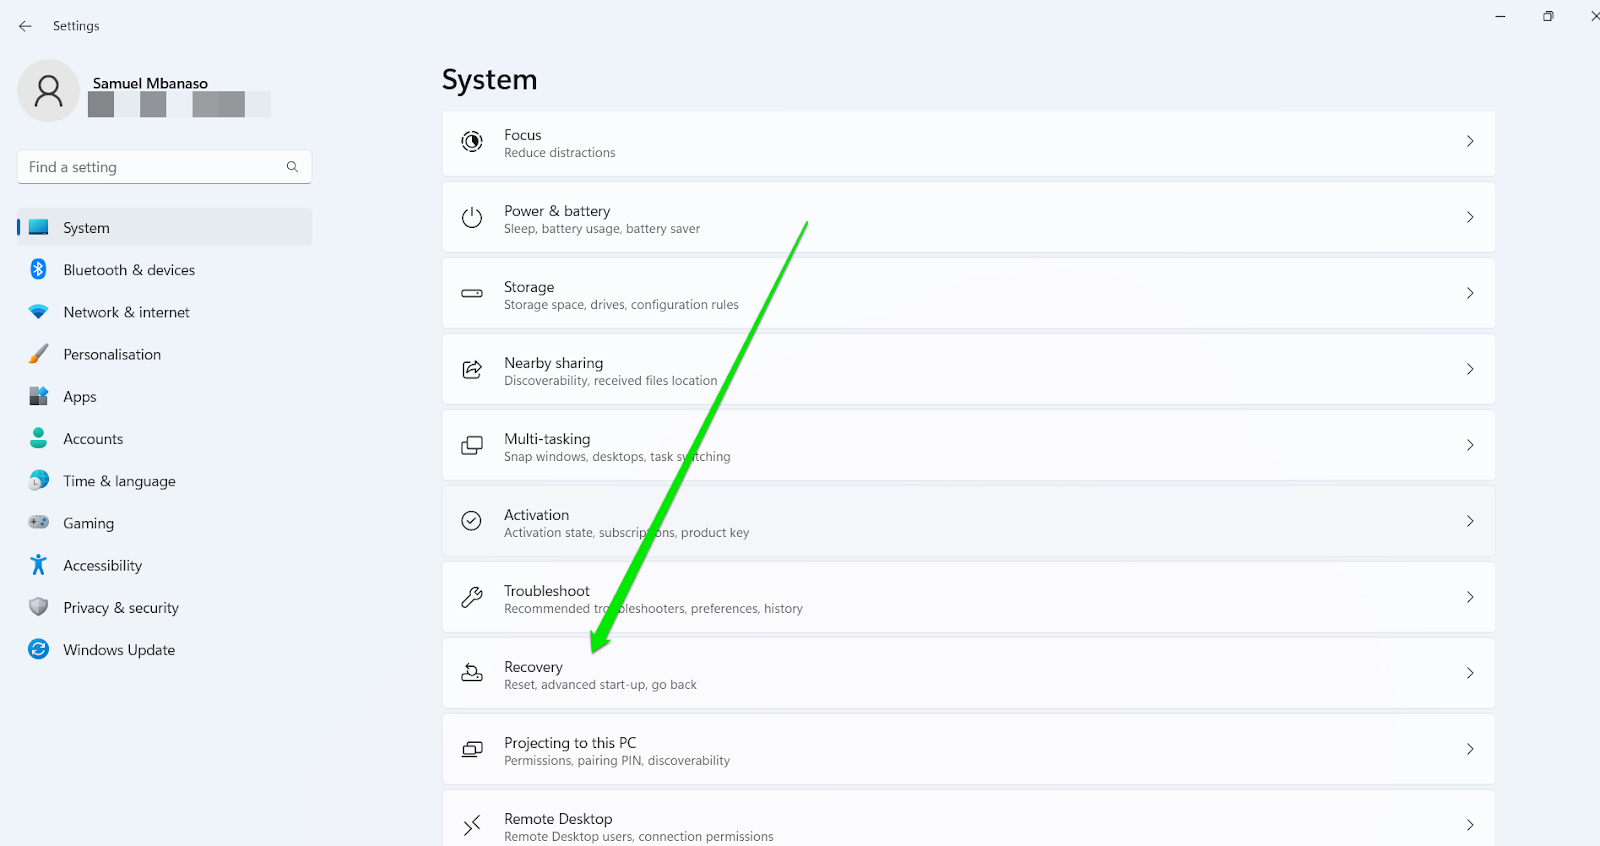
- Click the “Reset PC” button next to Reset this PC.
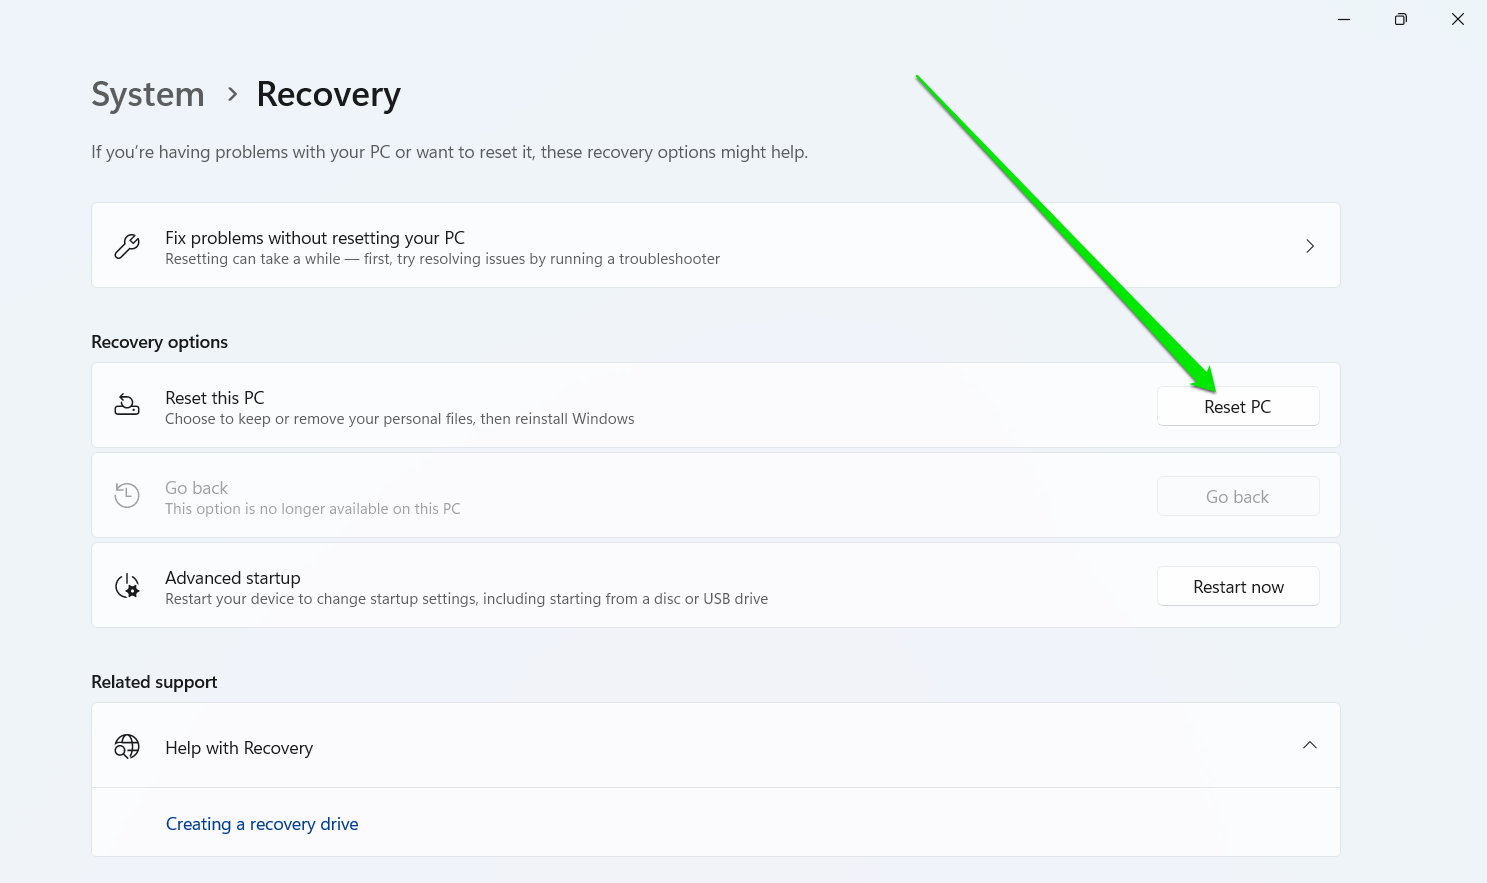
- Select Keep My Files and continue.
In most cases, factory-resetting your computer is the best way to go because you’ll get to recover the drivers shipped with your PC. You can learn how to factory reset your HP laptop if that is the device you use.
22. Replace the Webcam
If all the above fixes have been to no avail, you have nothing to do but invest in a new device.
When choosing a new webcam, opt for the one that is reported to be on good terms with Skype. Therefore, we recommend you look through the list of the best USB headsets and webcams to use with Skype.
Conclusion
Skype camera issues are always confusing and often frustrating. However, the trick is to know the right steps. We believe one of the solutions in this article helped you resolve the problem for good. Remember to always update your drivers and the Skype application to avoid future glitches.
FAQ
How to Switch to Front Camera on Skype?
If your PC has two cameras, Skype will always provide a switching toggle that allows you to change cameras.
How to Test Your Camera on Skype?
You can use the test feature in Skype to check if your camera is working. Once you open Skype, click the three dots beside your name and select Settings. Click Audio & Video on the left side of the Settings page. You will now see a camera preview. You can scroll down the page and click “Make a free test call” to confirm that everything is working as it should.
How to Turn On Your Camera On Skype?
Your camera will automatically turn on as long as the camera permission setting on Windows is turned on.
One reply on “Solving Skype Camera Not Working Problem: Quick Solutions”
Сool article