
![[FIXED] Windows 10/11 PC Is Stuttering Every Few Seconds](https://www.auslogics.com/en/articles/wp-content/uploads/2023/11/FIXED-Windows-1011-PC-Is-Stuttering-Every-Few-Seconds-scaled.jpg)
- Why Is My PC Stuttering All of a Sudden?
- How to Fix Computer Stuttering on Windows 10
- Solution 2: Update Your Graphics Card Driver
- Solution 3: Close Background Applications
- Solution 4: Uninstall the Problematic Software
- Solution 5: Check Your PC’s Power Management Settings
- Solution 6: Scan Your System for Malware
- Solution 7: Scan Your System Files for Corruption
- Solution 8: Update Your Windows.
- Solution 9: Keep Apps and Programs Updated
- Solution 10: Disable Wallpaper Slideshow
- Solution 11: Disable the Notification and Action Center
- Solution 12: Disable Your System’s High Precision Event Timer Device
- Solution 13: Reduce Thermal Throttling
- Solution 14: Disable the CD/DVD Drive
- How to Fix Computer Stuttering While Playing Games
- Conclusion
- FAQ
Thankfully, PC stuttering is a common problem many Windows users face, whether they use hard disk drives (HDD) or solid-state drives (SSD).
That means there are several solutions to fix the problem. We’ll explore different factors that cause computer stuttering and offer ways to resolve them.
Let’s begin.
Why Is My PC Stuttering All of a Sudden?
Many factors could cause PC stutters every few seconds, each unique to the Windows OS.
It doesn’t matter if you’re using an SSD or HDD. And it doesn’t depend on your processor’s speed.
The stuttering issue can affect any system and can be quite irritating. So, why does a Windows 10 PC stutter randomly?
The most common reasons are as follows:
1. Outdated Drivers: Usually, outdated drivers are to blame for a slow computer. Your device drivers could also be faulty or corrupted, and this can cause your computer to stutter.
2. Windows Updates: Windows updates don’t always fix bugs and system glitches. Sometimes, updates create PC issues, causing the system to freeze every few seconds.
3. Faulty Hardware: Faulty hardware could also be responsible for this problem. One of your hard drives or memory sticks could be having issues, causing the system to freeze.
4. Background Applications: If many apps are running in the background simultaneously, your system may be unable to handle all those processes, which affects the PC’s performance.
5. Malicious Programs or Files: You may have unknowingly downloaded a malicious app or file, causing random freezes or crashes.
6. Incompatible Program: If your computer stutters randomly, especially in demanding applications, your system specifications may not meet the requirements for the program you’re running.
7. Operating System Upgrade: This could be the issue if you recently upgraded your PC to Windows 10, as the operating system may not support some programs, drivers, or even hardware.
So, if you’re wondering, “Why is my PC stuttering?” these are the several causes you need to consider.
However, regardless of the reasons for this abnormal PC behavior, the following solutions should help you resolve it.
How to Fix Computer Stuttering on Windows 10
If your PC stutters every few seconds, there are different ways to fix the problem on your computer, depending on the root cause.
You can start from the first fix and check for the problem. Move on to the next solution if the issue persists.
Every troubleshooting step is detailed, and you’ll find the solution for your operating system.
You may not have to complete the article to get your answer to “Why does a Windows 11 PC stutter randomly?”
Solution 1: Check If Your System Meets the Minimum Requirements For Running Your Software
If you’re running a particularly resource-intensive program, like Photoshop, or are playing a PC game, your PC has to meet specific requirements to support the program. Otherwise, the PC will freeze or lag since it can’t handle all that pressure from the software you’re trying to run. Therefore, visit the program publisher’s website to check if your system meets all the requirements to support it. If your system is well capable, then the issue lies elsewhere.
Check the Graphics Card.
Most resource-intensive software programs depend on your graphics card. So, you have to confirm that your graphics card meets the program’s requirements.
Moreover, you may think you’re using the right Intel chipset when using one from the wrong generation.
You can check your GPU’s details and chipset make and model in the Windows’ DirectX Diagnostic Tool.
Here’s how to do it:
- Press “Windows key + R” to launch the Run dialog box.
- After Run appears, go to the text box and type
dxdiag,then hit “Enter.”
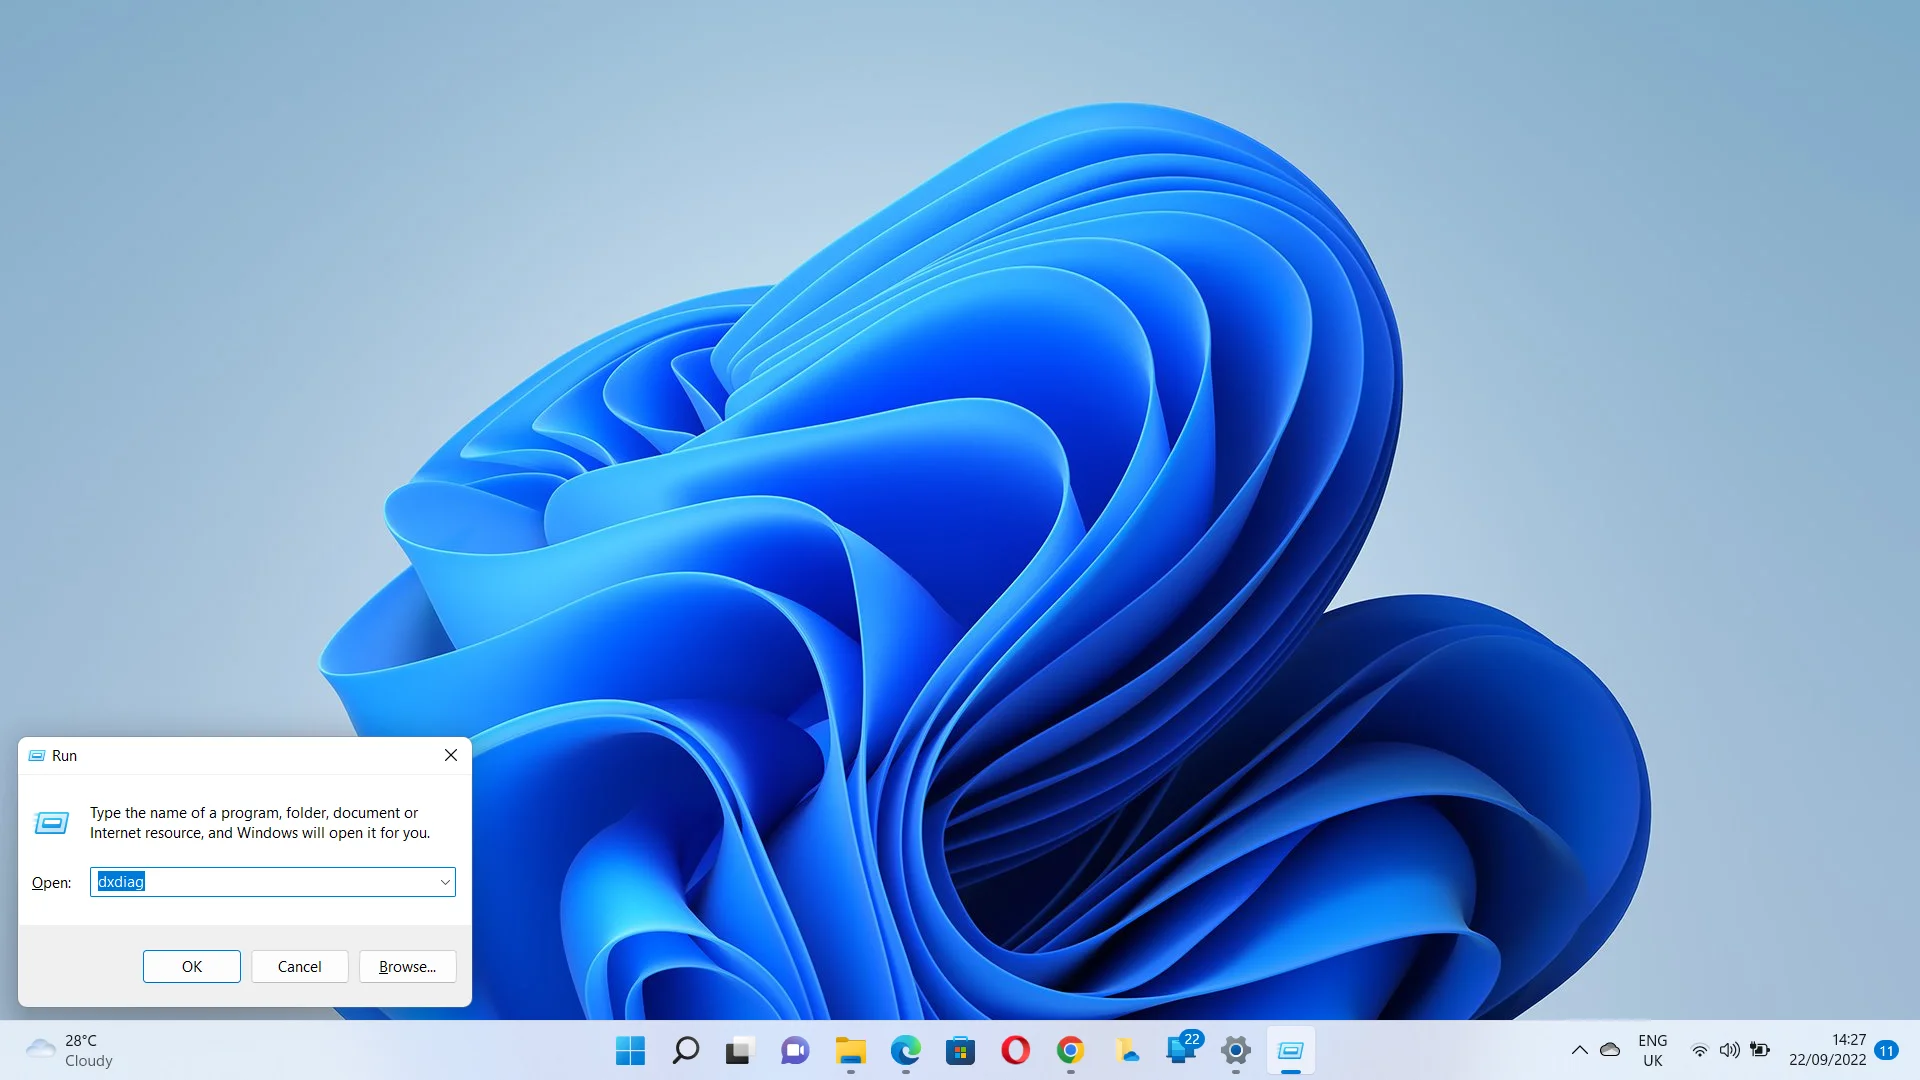
- Click on “Yes” if you see a pop-up dialog.
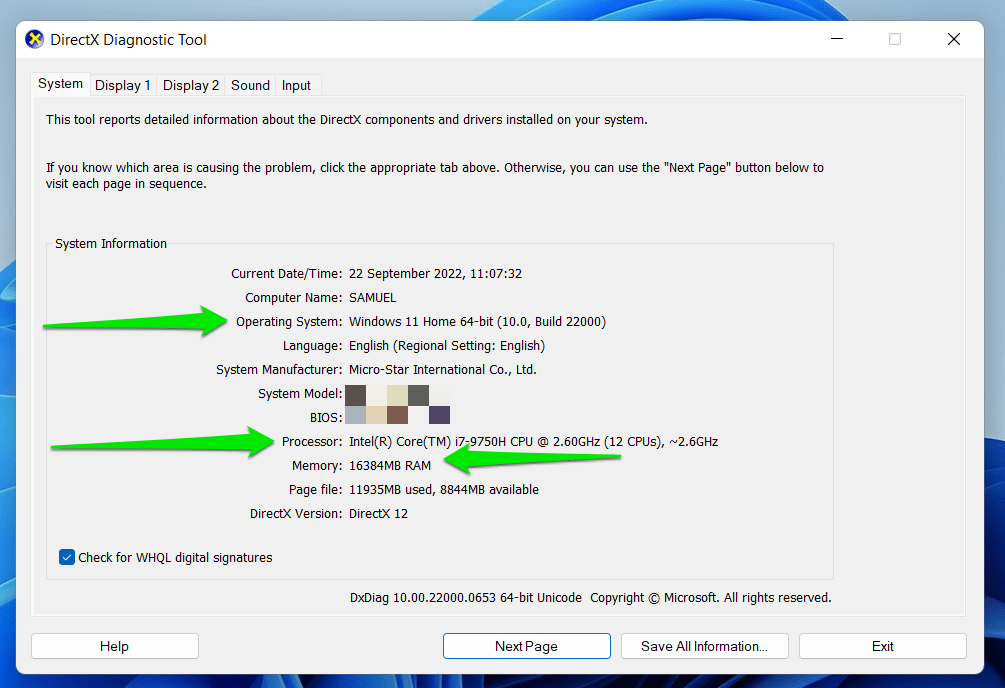
- Go to the “System Information” section under the “System” tab to check your PC’s details. You’ll find your processor’s information (including generation) next to the “Processor.”
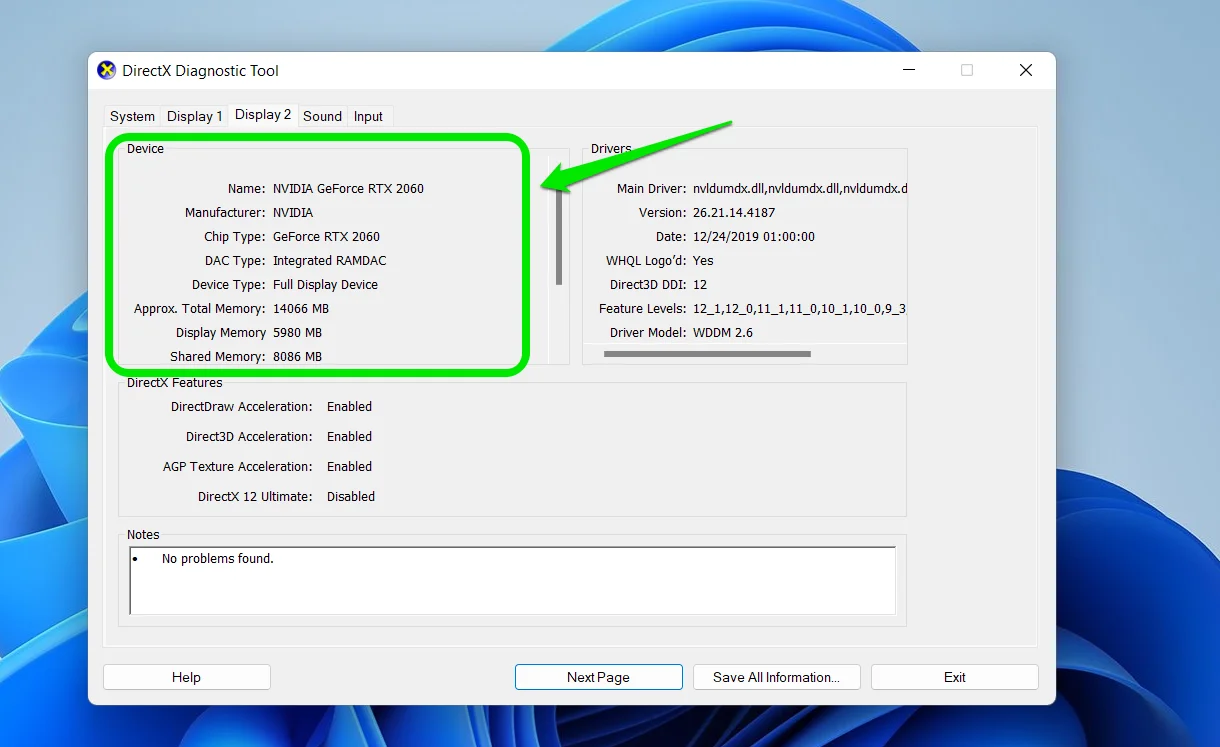
- You’ll see two display tabs if you use a dedicated graphics card. Display 1 is usually for your system’s integrated chip, while Display 2 shows details of your dedicated graphics card, whether an NVIDIA or AMD GPU.
Related: Your Graphics Card Does Not Support DirectX 11 Features
Solution 2: Update Your Graphics Card Driver
Outdated device drivers are among the most common causes of slow performance, freezing, and PC stuttering on Windows 10.
The display drivers are specifically to blame if your PC is stuttering every two seconds with audio and video issues or your game starts to lag.
Installing your PC’s latest graphics card drivers is the only way out. You can do that manually or automatically.
Manually updating your device drivers entails checking the currently installed drivers to determine their model and version.
You’ll then need to visit the hardware manufacturer’s website and download the correct drivers compatible with your operating system.
After installing the drivers, check if the Windows 10 stutters every few seconds. If it doesn’t, then the problem has been resolved.
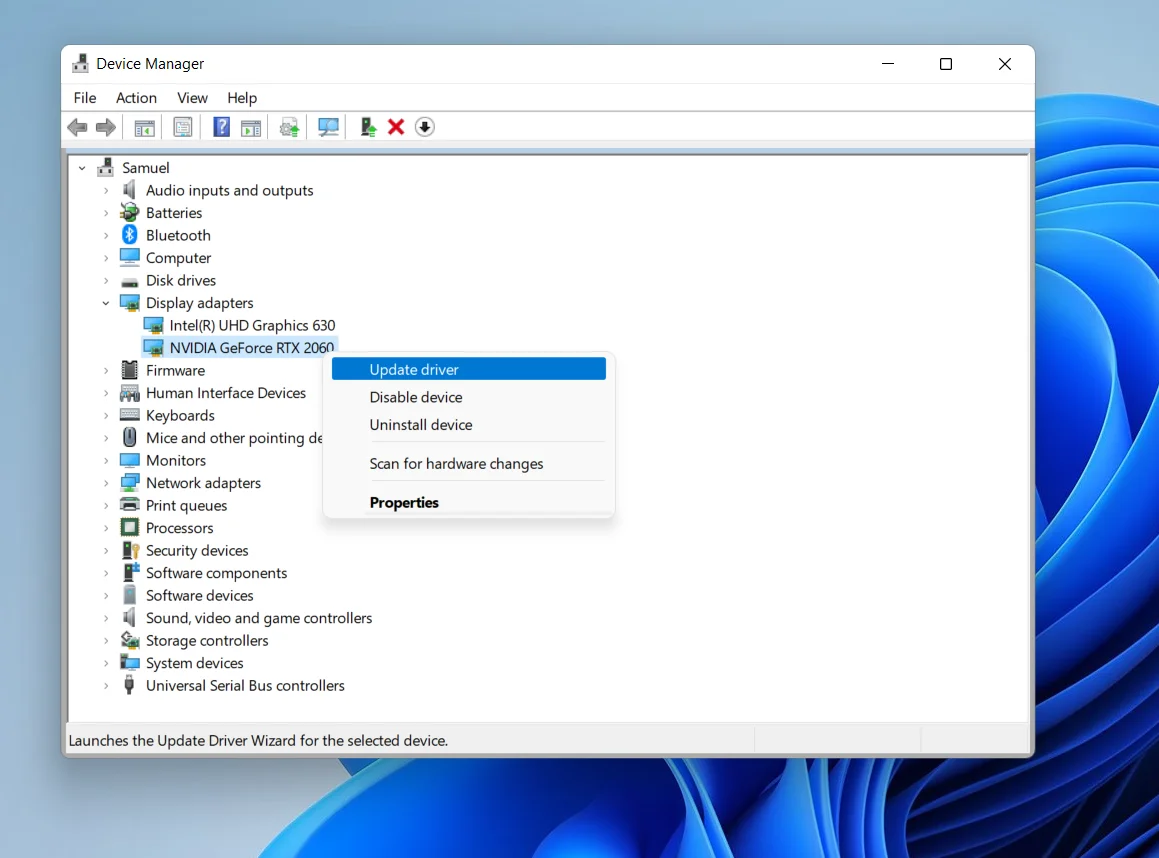
You can also use the Device Manager to update the graphics card driver. Here is how to do that:
- Press “Windows key + X” and select “Device Manager” from the Quick Access menu.
- Find and expand “Display adapters,” right-click on your display adapter, and click “Update driver.”
You’ll be presented with two options. Select “Browse my computer for drivers” and click “Let me pick from the list of available drivers on my computer.”

- Select “Microsoft Basic Display Adapter.”
- Click on “Next” and follow the prompts.
- If this doesn’t work, return to the “Display adapters” section, right-click your device, and select “Update driver.”
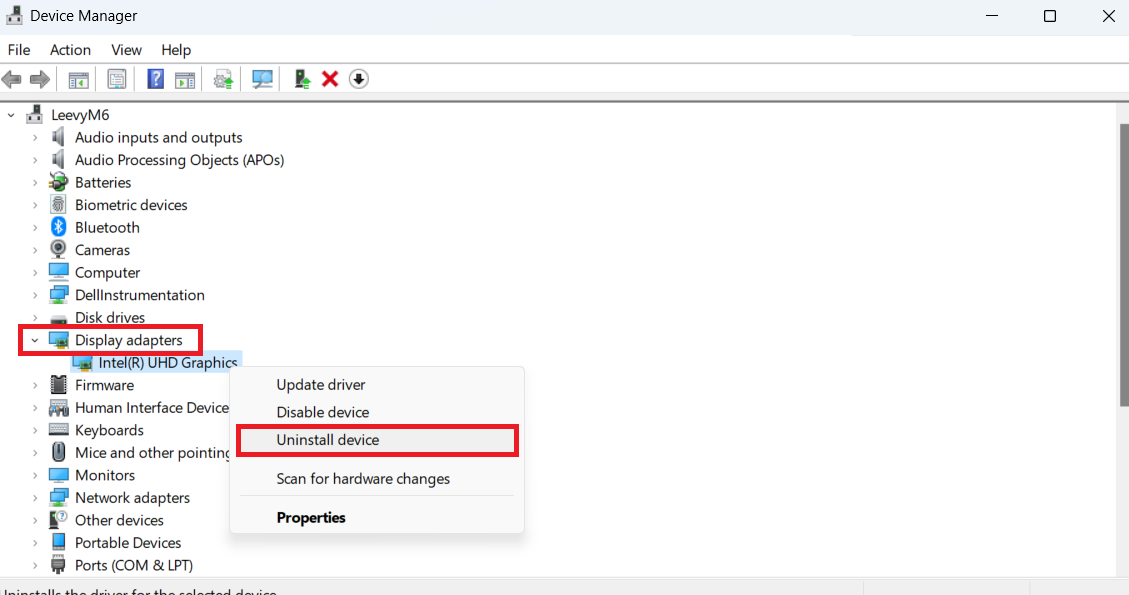
- This time, select the first option to let Windows attempt to find the latest driver version online and automatically install it on your PC.

Typically, Windows will tell you that it has detected that the latest driver has already been installed.
Use the Windows Update Client
The next method involves going through the Windows Update client. You can use the client to download available updates.
Here’s how to do this on Windows 10:
- Use the “Windows + I” shortcut to open the “Settings” application and click on “Update & Security.”
- After the Windows Update page appears, click “View all Optional Updates.”
- Once the “Optional Updates” interface shows up, expand the “Driver Updates” section and select your graphics card driver.
- Click on the “Download” and “Install” button.
Steps for Windows 11
Follow these steps if you use Windows 11:
- Press the “Windows + I” to open the “Settings” app.
- Click on “Windows Update” in the top-right corner of the “Settings” window or click on the “Windows Update” tab at the bottom of the left pane.
- Click “More Options” and “Advanced Options.”
- Click “Optional Updates” after the “Advanced Options” screen appears.
- Next, head to expand the “Driver Updates” list and tick the checkbox for your graphics card driver.
- After checking the right box, click the “Download and Install” button.
If you’re asking, “Why is my computer stuttering,” check if this method fixes the problem.
Use Auslogics Driver Updater

A more reliable method would be to use a third-party driver updating tool like Auslogics Driver Updater.
This intuitive program scans your system for driver-related issues, such as outdated or corrupted device drivers, and fixes them.
Once Driver Updater has detected faulty drivers, all it takes to install the newest available driver versions is one click of a button.
You no longer have to invest time in looking up the driver models and versions on your PC.
Moreover, you don’t have to worry about incompatibility issues since only the correct drivers for your system are installed.
The program also lets you schedule automatic scans to ensure driver updates are installed as soon as they are released.
If the new drivers cause issues, you can quickly revert to the previous versions.
Auslogics Driver Updater supports Windows 10 and 11, so you don’t have to worry about whether the tool will work on your system.
It also downloads and installs drivers that are compatible with your operating system.
Once all the updates have been installed, restart your computer and check if the PC stuttering issue persists.
Related: Auslogics Driver Updater: New Drivers in One Click!
Solution 3: Close Background Applications
Your system can’t operate optimally when many background apps are running simultaneously.
If several applications are running in the background, it may cause Windows 10 to stutter every few seconds.
Additionally, other programs or systems may lag due to all the resources the background apps use. Try closing the background apps to see if this resolves the issue.
Here is how to do that:
- Press the “Ctrl + Shift + Esc” shortcut to launch the Task Manager.
- Locate all the running background applications and processes and close them one by one by clicking “End task.”
- You can also go through the “Settings” application to disable apps configured to run in the background when your PC starts.
If your Windows 10 stutters every few seconds, use this method to see if that fixes the problem.
How to Stop Background Apps in Windows 10
Follow these steps for Windows 10:
- Press “Windows + I” to use the “Settings” app.
- Click on “Privacy” and then “Settings” fully opens.
- Head to the left pane, scroll past “App Permissions,” and click “Background Apps.”
- Go to the main screen and head to the list under “Select which apps to run in the background.”
- Toggle off the switch beside the apps you want to disable and restart your computer.
You should also disable some Startup apps that automatically start running when you log into Windows. Follow these steps:
- Go to the Settings home page and click on “Apps.”
- After the Apps page shows up, go to the left pane and click on Startup.
- Now, head to the Startup Apps list and disable programs you want to prevent from launching at startup.
More information: How to Stop Apps from Running in the Background on Windows 10 PC?
How to Stop Background Apps in Windows 11
Follow these steps for Windows 11:
- Press “Windows + I” to use the “Settings” app.

- Click on “Apps” in the left pane of the window.
- Next, click on “Startup.”

- Now, disable apps you don’t want to start automatically once you sign in.
Restart your PC and check if the computer stutters randomly. If the Windows PC keeps stuttering even with background applications disabled, try the next fix.
Solution 4: Uninstall the Problematic Software
This fix is applicable if you started experiencing the error after installing a particular program. The software may not be compatible with your system.
Or it might be glitchy, hence the reason it’s consuming a lot of your system resources and causing the PC stuttering problem.
To identify the problematic application, launch the Task Manager and check if the suspicious program is the one causing a spike in system resources.
If it is, uninstall via the “Programs and Features” section in the “Settings” app or Control Panel.
Note that when using the Settings app, there are different ways to uninstall Windows 10 and 11 programs.
Here’s how to remove apps from Windows 10:
- Launch the “Settings” application and click on “Apps.”
- Use the search feature on the “Apps & Features” page to look for the program you want to uninstall.
- After it shows up, click on it and select “Uninstall.”
- Click “Uninstall” again and follow the subsequent instructions.
How to Remove Apps from Windows 11
Follow these steps to remove apps from Windows 11:
- Launch the “Settings” app and click “Apps” on the left side of the window.
- Click “Installed Apps” on the right side of the next screen and go to the App List section.

- You can use the search box to find the app you want to remove.
- Once you get to the program, click on the three dots (next to the program’s size) and select “Uninstall.”
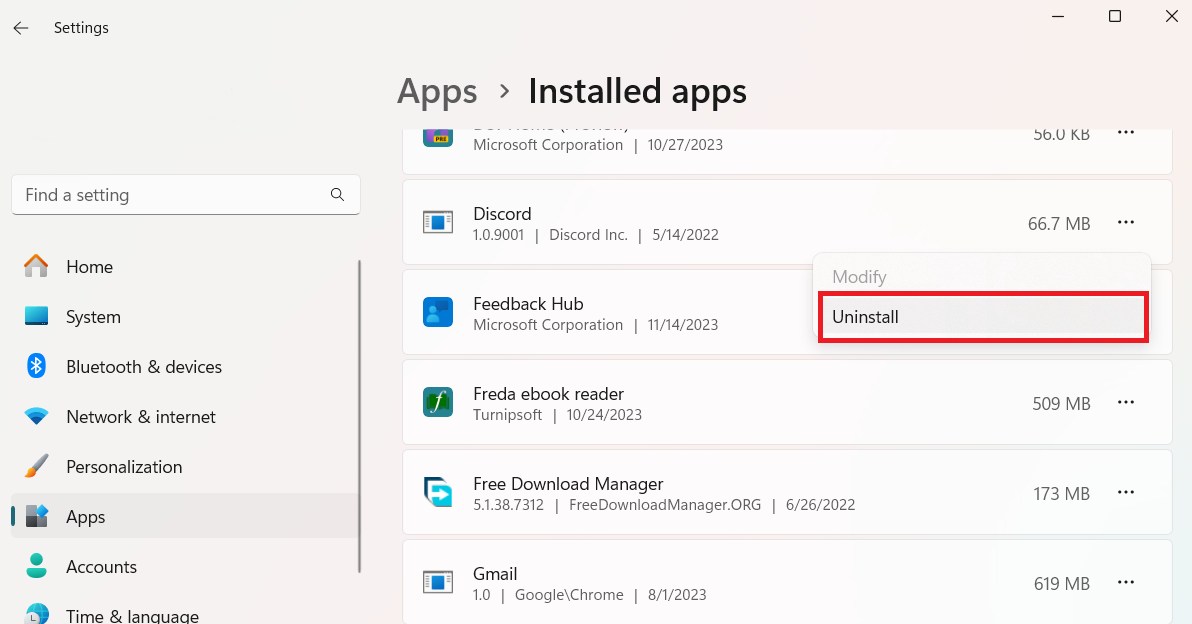
- Click on Uninstall again in the confirmation box and follow the prompts to complete the process.
Check whether your PC stutters every few seconds. If not, proceed with the next solution.
Related: How to Uninstall Programs on Windows 10/11?
Solution 5: Check Your PC’s Power Management Settings
Your computer system has a feature that lets you customize your power plan to control how it consumes power.
Your system may not function optimally if you’ve selected an incorrect power plan. Instead, it’ll start to lag.
Resetting the power plan to its default settings might resolve the error. Here’s how to do it:
- Type “Control Panel” in the search bar and click to open.
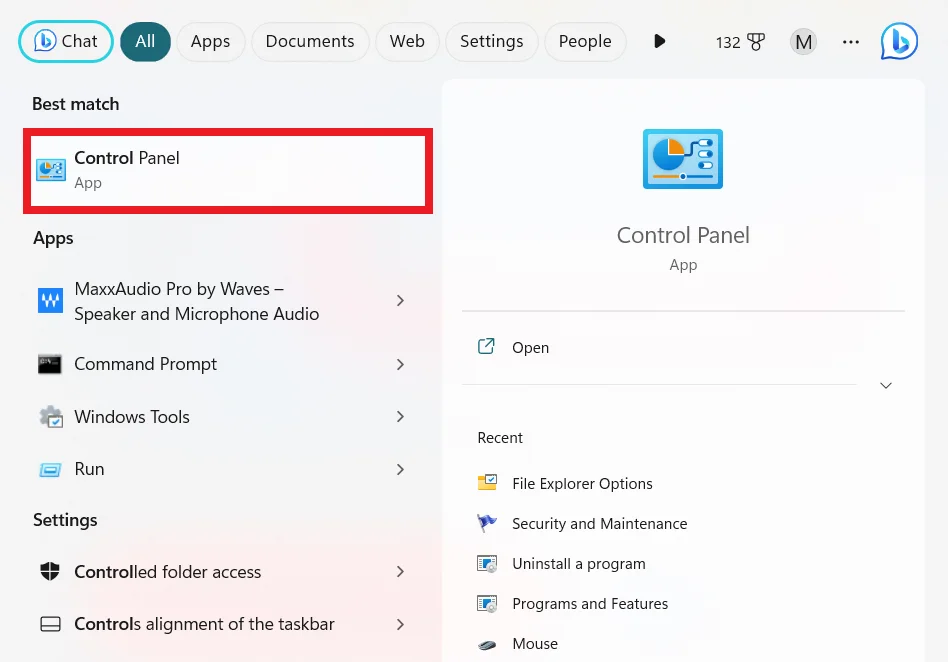
- Select “Hardware and Sound,”

- Click “Choose a power plan” under “Power Options.”

- Click “Change plan settings”,

- Click the “Change advanced power settings” link.

- Click on the “Restore plan defaults” button at the bottom of the page. If you have several customized plans, select each from the drop-down list and click “Restore plan defaults.”

- Click “OK” to confirm your choice.
- Once done, restart your Windows PC and check if the PC stuttering issue has been resolved.
Related: Windows 10 Control Panel: Where to Find It
Solution 6: Scan Your System for Malware
A malware infection can corrupt system and application files and cause the computer stuttering issue on your Windows PC.
If the error persists, it’s worth trying a malware scan. You can use a built-in Windows tool called Windows Security or install a more advanced malware removal tool like Auslogics Anti-Malware.
You see, the problem with malware is that your ordinary antivirus program might not be able to detect all kinds of threats, especially those disguised as genuine system files or applications.
That’s why you need powerful anti-malware software capable of detecting the malware hiding on your computer.
If the tool finds any malicious items, it’ll quarantine them, allowing you to safely delete them.
If the scan comes back clean, then the issue lies elsewhere. Using Auslogics Anti-Malware is one of the easiest ways to answer the question, “Why is my PC stuttering all of a sudden?”
Related: Auslogics Anti-Malware: Features and Reviews
Solution 7: Scan Your System Files for Corruption
If the malware removal tool found malware in your system, then there is a high chance some system files have been corrupted or damaged.
In that case, running a System File Checker (SFC) scan will help repair all the corrupted files.
To run an SFC scan, follow the instructions below:
- Type “Command Prompt” in the search bar, right-click, and select “Run as administrator.”

- In the Command Prompt with administrator rights, execute the command
sfc /scannow.Give the tool a few moments to check for issues and attempt to fix them.
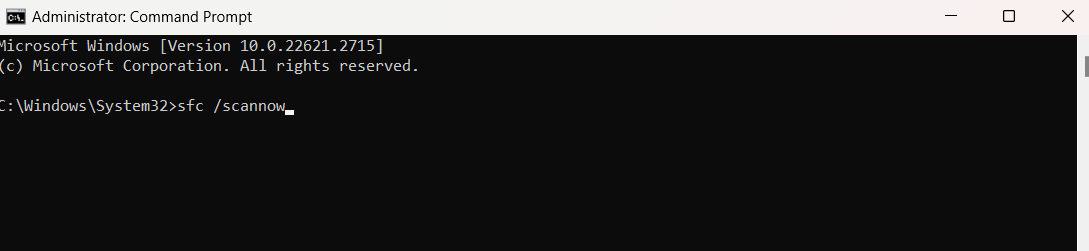
Once done, reboot Windows and check if Windows 10 stutters every few seconds.
Related: How to Find and Fix Corrupted Files in Windows 10?
Solution 8: Update Your Windows.
Windows updates are required to keep your system functioning properly. The updates usually introduce new features, security updates, and enhancements to your OS.
Typically, Windows updates are automatically installed whenever they are available. However, you can manually check for updates and install them.
How to Update on Windows 10
Here is how to do that on Windows 10:
- Press the “Windows key + I” to open the “Settings” app.
- Type “Updates” into the “Find a setting” field, and select “Check for updates.”
- In the next window, check if any pending updates are waiting to be installed and install them. If there are none, click the “Check for updates” button and wait for Windows to search for and install all available updates.
- You may be required to click the “Download & Install” button for feature or quality updates.
- After downloading updates, restart your computer to complete the installation.
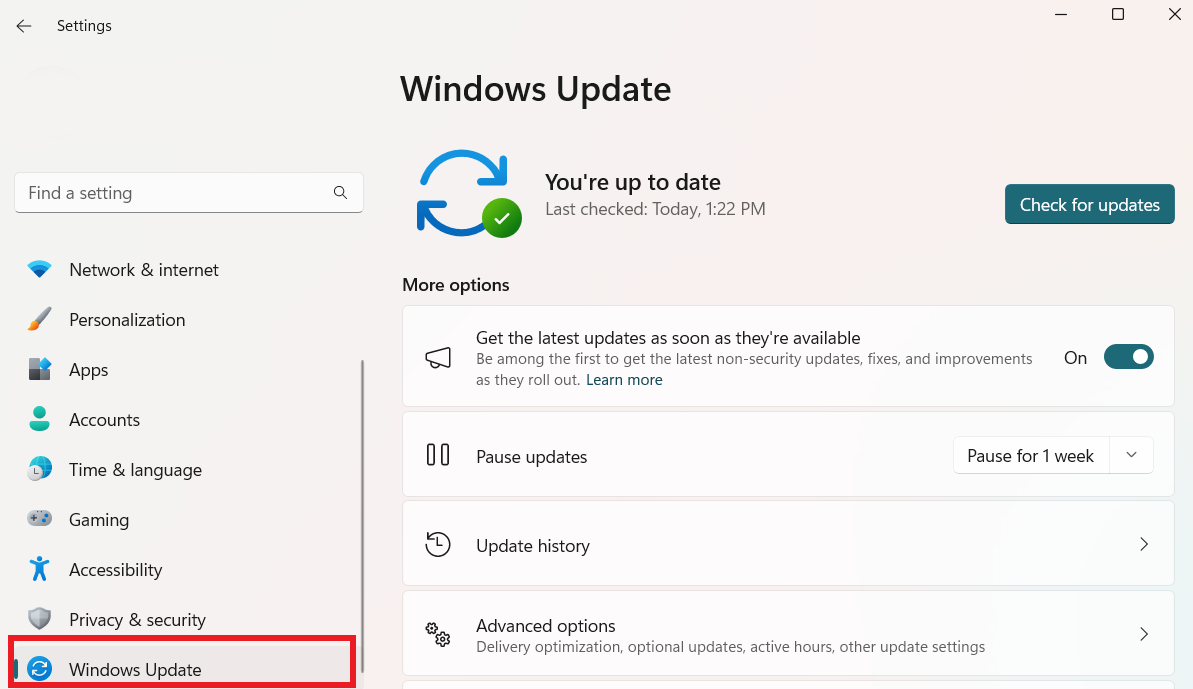
How to Update Windows on Windows 11
Follow these steps for Windows 11:
- Press the “Windows key + I” to open the “Settings” app.
- Click on “Windows Update” in the top-right corner of the Settings window or click on the Windows Update tab at the bottom of the left pane.
- Click the “Check for Updates” button once you see the “Windows Update” page.
- You can also click the “Download & Install” button next to a cumulative quality or feature update.
- Restart your computer to complete the installation.
Sometimes, updates could be responsible for PC issues like random freezes and crashes. If that’s the case, then uninstalling the problematic update should fix the problem.
For instance, one of the Windows 10 April updates caused PC games to stutter randomly. Users reported that the issue had stopped after uninstalling the cumulative patch of the update.
How to Uninstall a Windows Cumulative Update
To uninstall a Windows cumulative update, follow these instructions:
- Press the “Windows key + I,” type “Update history” (without quotes) into the “Find a setting” text box, and select “View update history.”

- You can see a list of all the recently installed Windows updates. Click on the “Uninstall updates” link to open the “Installed updates” page in the Control Panel.

- Select the problematic update from the list and click “Uninstall.” After uninstalling, check to see if your computer stutters randomly. Check the next solution if the problem persists.
Related: Windows Update Troubleshooter: Fixing Windows Update Issues
Solution 9: Keep Apps and Programs Updated
All your applications, including Windows apps and third-party apps, should always be up to date to keep working correctly.
If the PC is stuttering every two seconds with audio and video issues when using a browser, update the browser to the latest version.
If this doesn’t work, try disabling all the browser extensions, add-ons, and plugins to check if they are causing the issue.
Alternatively, try using another browser to see if the computer stuttering gets resolved.
Related: How to Keep Your Software Up to Date
Solution 10: Disable Wallpaper Slideshow
Wallpaper Slideshow feature may cause a brief system freeze that can cause the Windows 10 stutter, especially when gaming or watching videos.
To fix this, turn off the background slideshow or change the interval to make it happen less frequently.
If you want to keep the feature, think about adjusting the interval to once per day to reduce interruptions. Here’s how to disable the feature:
- Right-click on your desktop and choose “Personalization.”

- Select “Background.”
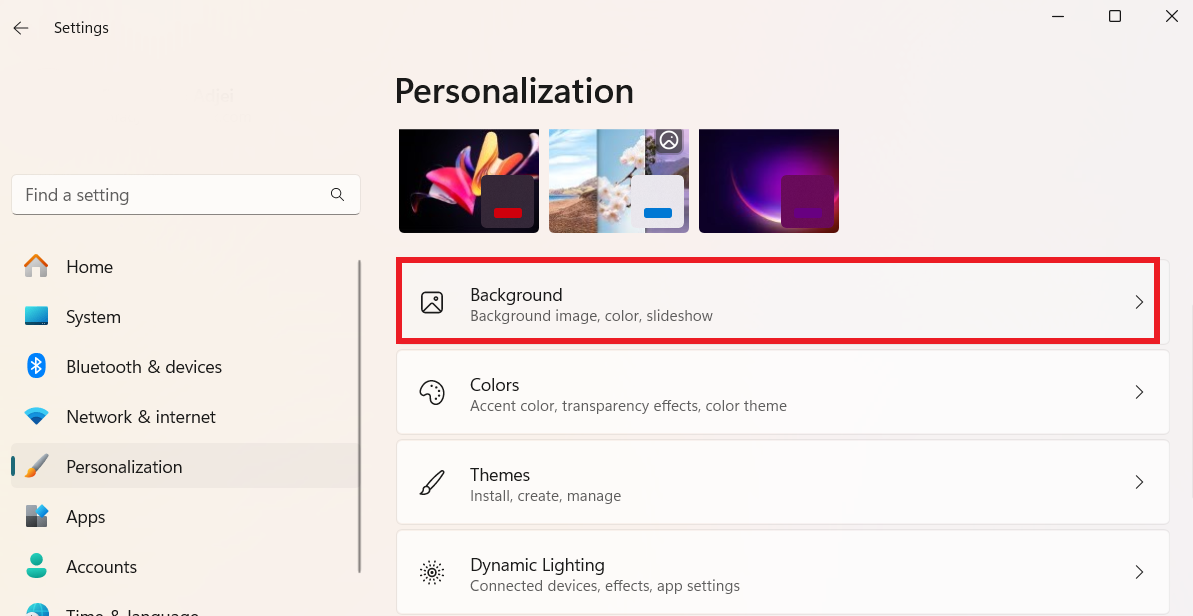
- Select “Slideshow” beside “Personalize your background.”
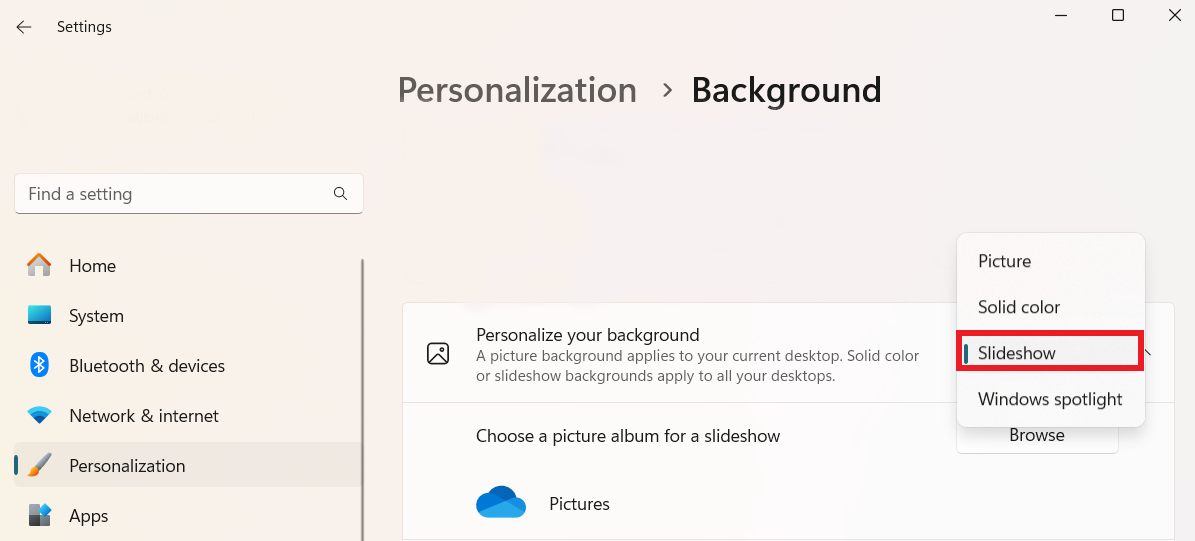
- Use the dropdown menu beside “change picture every” to change the interval.
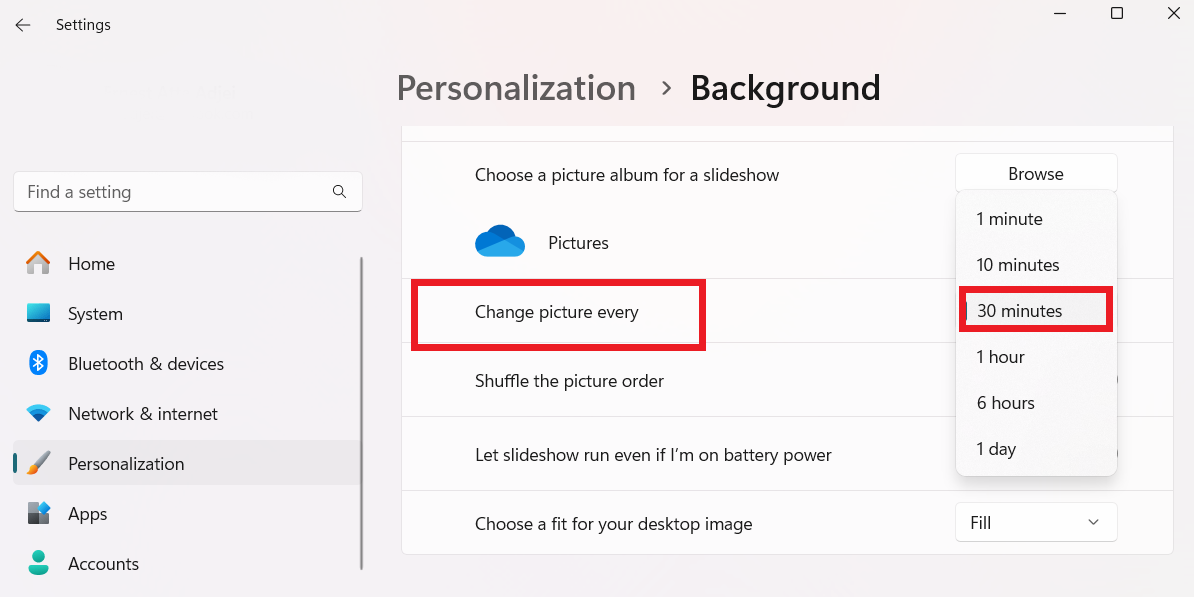
Restart the PC to see whether it resolves the problem.
Solution 11: Disable the Notification and Action Center
According to several users, disabling the notification area and Action Center fixed the stuttering issue on their Windows PCs.
To try this solution, follow these steps:
- Press the “Windows + R” and type
gpedit.mscinto the “Run” text box, and hit the “Enter” key.

- In the Group Policy Editor window, navigate to this path: “User Configuration” > “Administrative Templates” > “Start Menu and Taskbar.”
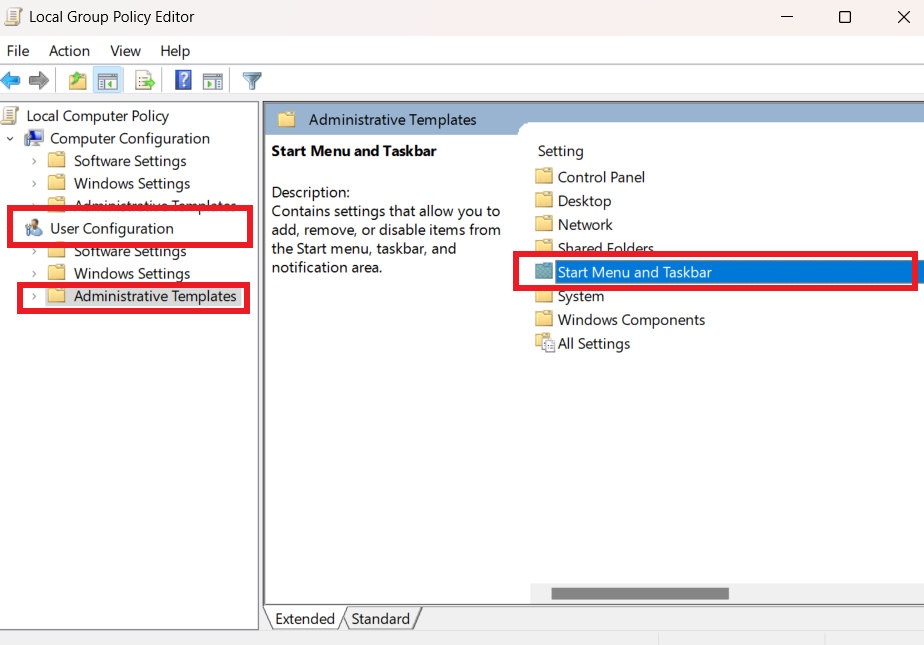
- In the right sidebar, locate the “Remove Notifications and Action Center” policy and double-click it.
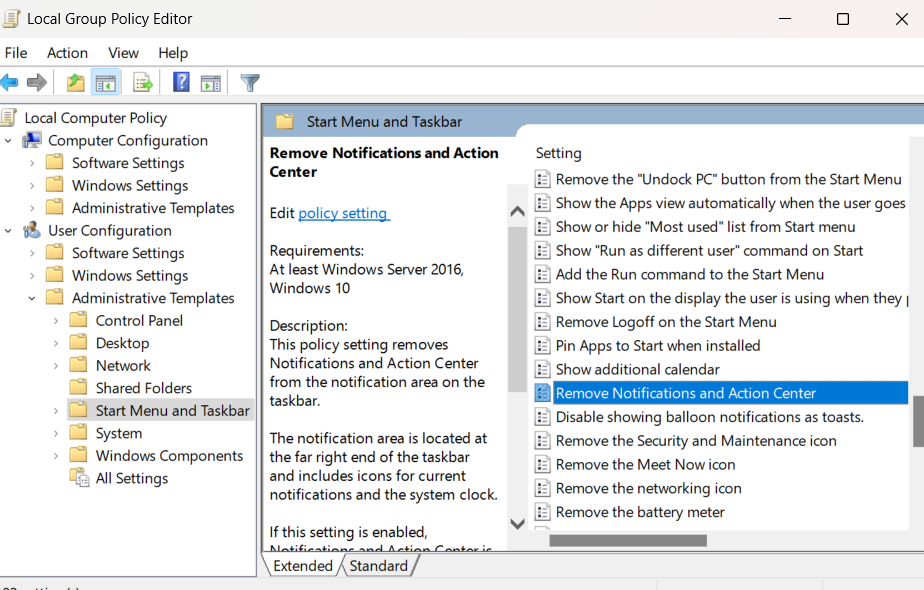
- On the next screen, click the “Enabled” radio button. This removes the Notifications and Action Center, and you won’t be able to review any notifications that you’ve missed.

- Click on “Apply,” select “OK,” and restart your system for the changes to take effect.
Solution 12: Disable Your System’s High Precision Event Timer Device
The High Precision Event Timer, HPET for short, is a Windows device used to synchronize multimedia streams to reduce the need for unnecessary timestamp calculations.
The device is designed to smooth your system’s playback. The tool can indeed increase PC performance and facilitate an impressive playback experience.
It can cause latency issues and FPS losses when you start playing games. Disabling it can remove the PC stuttering issues you experience when gaming.
Follow these steps:
- Launch the Device Manager via the Quick Access menu (Win + X). Alternatively, press the Win + R shortcut, type
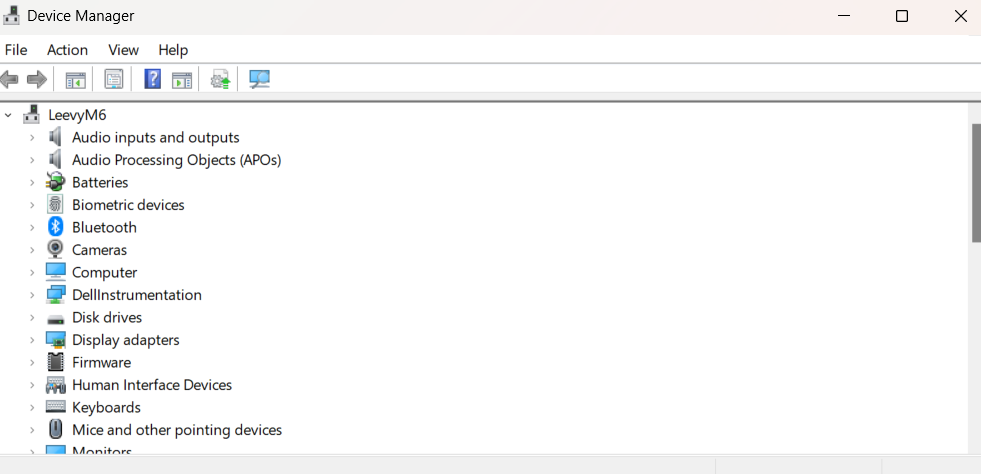
mscinto the “Run” box, and hit the “Enter” key. - Once the Device Manager appears, go to the “System Devices” category and expand it.
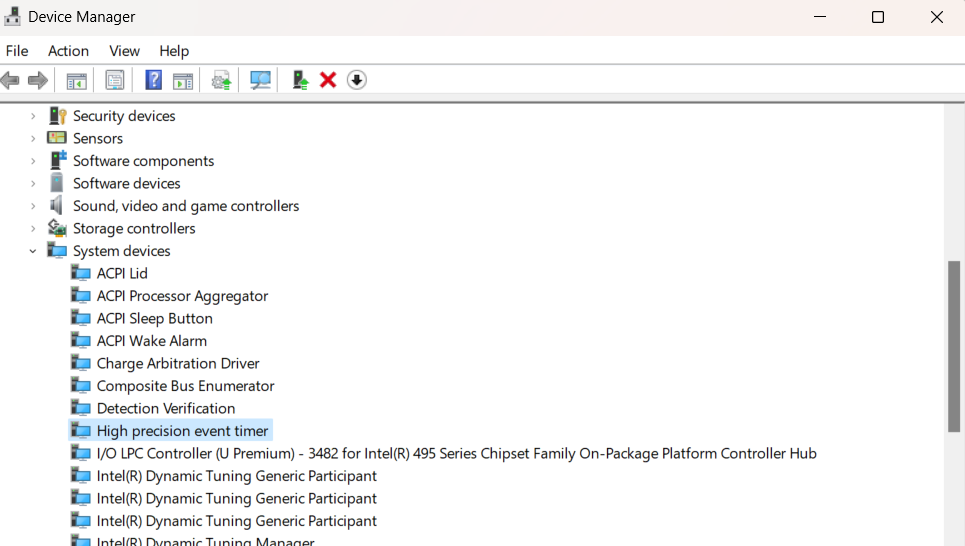
- Next, locate and right-click on the “High precision event timer.”
- Select “Disable Device” from the context menu.

- Click “Yes” in the confirmation pop-up.
Check to see if the Windows 10 stutters every few seconds issue has been resolved.
Solution 13: Reduce Thermal Throttling
When a computer’s CPU overheats, it experiences thermal throttling, which lowers its speed below the specified performance level to avoid harm.
This is a precautionary step to prevent emergencies before the computer turns off. The processor often slows down, cools down, speeds back up, etc.
This can cause PC stutters every few seconds and be less seamless, which makes troubleshooting difficult.
Use a stress test such as Prime 95 for CPUs or FurMark for GPUs to resolve this, and keep an eye on the temperature.
Thermal throttling can be happening if it gets close to the manufacturer’s maximum specified limit.
To fix this, you must clean your computer and ensure that your cooling system and thermal paste are functioning correctly.
If you’ve overclocked your system, revert it to its original settings.
Solution 14: Disable the CD/DVD Drive
If your laptop has a CD/DVD drive, try disabling and re-enabling it to see if this works.
Some users reported that this had fixed their problem and may also work for you. To do that, follow these steps:
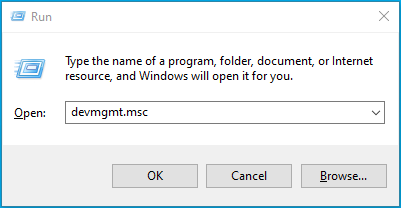
- Press “Windows key + X” and click “Device Manager” to launch. Alternatively, press the “Windows + R” and type
devmgmt.msc, and hit the “Enter” key.
- Locate “CD/DVD ROM drives” and expand it. Right-click on the drive and select “Properties.”
- Go to the “Driver” tab and click the “Disable Device” button.
- Click “Yes” and select “OK” to save your changes. This action disables the CD/DVD drive.
- To re-enable it, repeat the steps above but select “Enable Device” this time.
- Click “OK” to save your changes and check if this helps fix the PC stuttering problem.
Also Read: How to Fix Choppy And Lagging Video on Windows 10?
How to Fix Computer Stuttering While Playing Games
Lower all settings (except from resolution) if PC stutters every few seconds when playing games like Fallout, Stray, or Elden Ring.
If you meet the minimal requirements, but the problem still occurs, increase the settings little by little until the stutter stops.
Choose the maximum settings that your PC can handle.
The shader compilation stutter, usually seen in DirectX 12 games, might not be fixed unless the game permits shader pre-compilation or provides a DirectX 11 substitute.
As a workaround, think about turning the game mode on or off in Windows 10 or 11 as a workaround.
Another reason for Windows 10 stuttering is unlocked frame rates.
You can fix this by using the software tool on your GPU, the game’s limiter, or a frame limiter like VSync offered in the menus.
This removes the computer stuttering by ensuring a steady frame delivery.
Also Read: Winning Strategies: How to Optimize Your PC for High-Performance Gaming
Conclusion
If you’ve been asking, “Why is my PC stuttering all of a sudden?” carefully go through this article and implement the solutions discussed.
Windows 10 stuttering can be a frustrating and persistent problem.
We’ve looked into several possible causes, including out-of-date drivers, troublesome Windows updates, defective hardware, and malicious software.
The solutions offered here give you a detailed how-to for fixing these problems and getting your PC back up and running smoothly.
By implementing these solutions, you can stop the annoying stutter and have a more seamless computing experience on your PC.