
‘Everything is a test’
Terry Pratchett
Since Microsoft engineers are fully aware that their brainchildren have issues every now and then, you operating system (if it’s not intolerably ancient) is therefore properly equipped to deal with the most common misfortunes that happen to it. The ping command on Windows is actually a case in point. Read this article to learn how to use the ping command in Windows 10 to troubleshoot network issues.
What is ‘Ping’?
Ping, which stands for Packet Internet Groper, is a helpful tool developed to test the points of your network and troubleshoot your network problems in a simple and effective way. Ping checks if you can transmit a network data packet to some destination, be it a remote server, a website, a domain, a host, an IP address, a PC or a router. In a nutshell, the ping tool allows you to quickly verify if your PC is capable of communicating over the network.
How does the ping command work?
The ping command works by sending Internet Control Message Protocol (ICMP) Echo Request messages and getting responses. After that it tells you how many packets have come through, how many packets have been lost, the time it took them to make the round trip, and if there were any errors related to the process or if there was no reply at all.
When is it helpful to use the ping command?
Thanks to the ping technology, you can find what causes your network problems and decide on how to resolve them. For instance, a failed ping indicates a problem with the network segment it is trying to test. Using this command, you can figure out if your local network is to blame for your connection problems or it is something beyond it that is the actual culprit. The information derived from the results of pinging also allows to identify a slow connection or a packet loss. All things considered, the ping command is surely worth mastering.
How to ping in Windows 10?
Network testing with the ping command in Windows 10 is not rocket science, and yet it is important to understand the details of the procedure in question. Pinging is done via the command prompt of your operating system and is available on Windows 10, 8, 7, Vista, XP, 98, and 95. To use the ping option, you need to know the exact URL or IP address of the object you wish to reach.
And here’s where things get practical:
- Invoke your command prompt. For this purpose, press the Windows logo + R shortcut on your keyboard. Then type cmd into the Run bar. Press Enter or click OK to proceed.
- Once you are in the command prompt window, type “ping” (without quotes) along with the address you wish to ping. Hit Enter to execute the command. See if the ping is successful and what response you are getting.
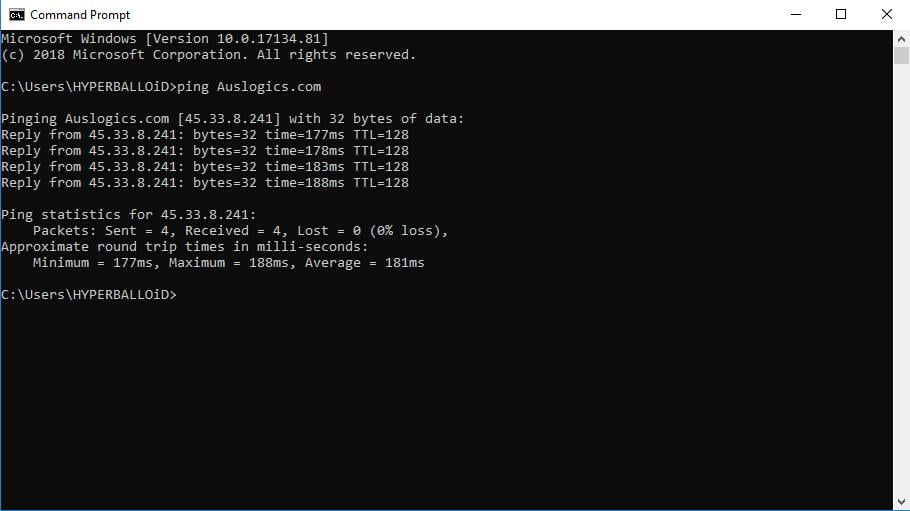
The first line of the response shows the URL which is being pinged, the IP address which is associated with the URL in question, and the size of the packets you are sending. Below you can see the replies from each of the packets. There you can find the so-called latency – the time it took for you to get the response. In addition, you get the TTL (time-to-live) data, which is the time that passes before the packet gets discarded. At the bottom, there are some helpful statistics: the number of the packets sent and their minimum, maximum, and average round trip times.
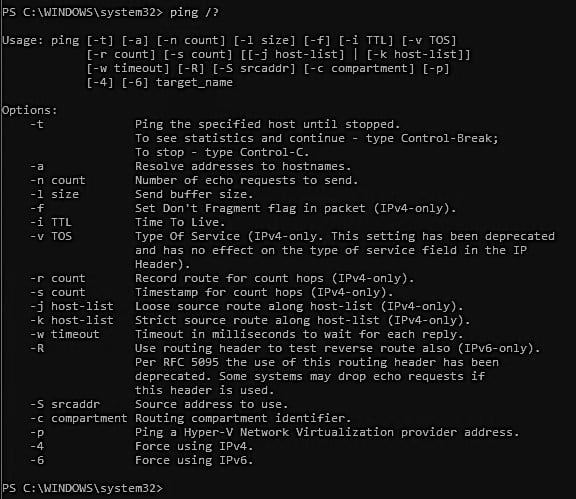
To learn more about the ping tool, type ping /? into the command prompt. You will be provided with the list of ping options. Examine them carefully and pick up the one that meets your needs.
What if there is no reply for your ping?
A successful ping response is a sign that your network adapter and router work well. If there is no response from the object that is being pinged, you will be notified of that. This means there might be an issue with some of your devices. Ping your router to see if it is reachable. For this, you need its IP address. If you get a successful response, then your router is not the culprit.
You should also check your network adapter: the chances are it is acting up, which causes your pings to fail. To check the device, ping your loopback address, which is 127.0.0.1. If this ping fails, your network adapter is having issues. Out-of-date network adapter drivers are often behind the problem, so we recommend that you update them without further delay.
There are 3 ways to update drivers in Windows 10:
Use a special tool
The easiest and the least time-consuming way to get your drivers back on track is by utilizing special software. It is important that you choose a reliable and reputable product. That is why we advise opting for Auslogics Driver Updater: this intuitive tool will get all your drivers up and running in just one click.

Use the Device Manager utility
This tool comes as part of your Windows 10 and can search for the drivers you need online. Here is how you can make use of it:
- Press the Windows logo + X keyboard shortcut.
- Select Device Manager from the quick access menu.
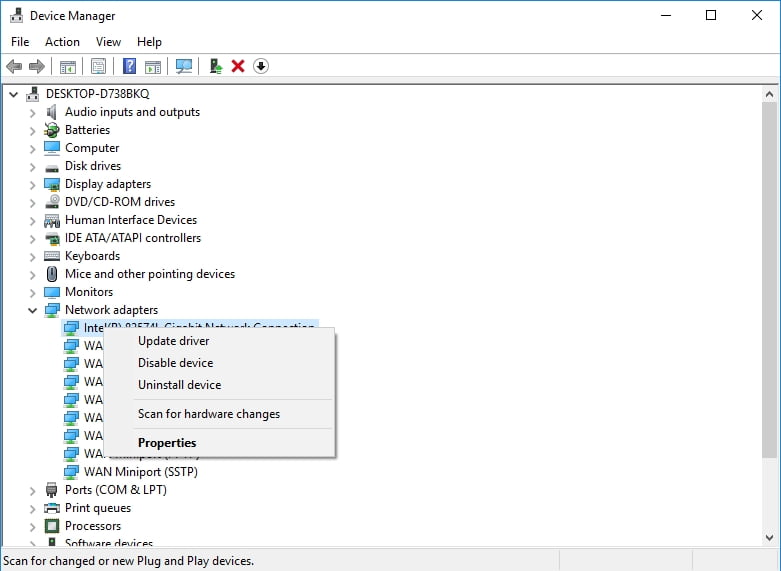
- Locate your network adapter.
- Right-click on it.
- Click the Update driver option.
![Update your network adapter drivers.]()
- Select ‘Search automatically for updated driver software’.
The Device Manager will start a search, but it won’t necessarily be a success. If the Device Manager fails to find what is needed, consider trying another option.
Update your driver manually
That is actually the most complicated method because it requires you to know the exact model of your network adapter and what software it needs to function. Besides, you should search online for that software and manually install it on your PC. Keep in mind that you should be really careful when looking for new drivers since you are running the risk of installing an incompatible product and therefore harming your system.
Now you know how to use the ping command in Windows 10 to fix network problems.
Have you tried to ping any URL or IP yet? You are welcome to ask any questions regarding the issue.