
![[FIXED] Why Is My Bluetooth Not Working in Windows 10/11 PC?](https://www.auslogics.com/en/articles/wp-content/uploads/2023/09/admin-ajax.jpg)
- Scenarios Related to Bluetooth Device Not Connecting
- How to fix the “Bluetooth Device Not Connecting” Issue?
- Method 1: Remove and add the Bluetooth device again
- Method 2: Make the device discoverable
- Method 3: Reinstall your Bluetooth device and update Its drivers
- Method 3: Update your Windows
- Method 4: Run the Bluetooth troubleshooter
- Method 6: Restart the Bluetooth Support Service
- Method 7: Prevent your computer’s power saving mode from turning off your Bluetooth
- Method 8: Ensure that your devices are properly paired to your PC
- Method 9: Remove Bluetooth devices
- Method 10: Use a different USB Port for the Bluetooth adapter
- Method 11: Disable Wi-Fi
- Conclusion
- FAQ
Is your Bluetooth not working? Many users have complained about this issue. Luckily, there are easy ways to resolve this problem. This article will walk you through fixes that you can apply to get rid of the “Windows Bluetooth not working” issue.
Go through the solutions discussed in this guide and implement the one that works best for you.
Let’s begin.
Scenarios Related to Bluetooth Device Not Connecting
Many people use Bluetooth technology on a daily basis. As for those users, they cannot go through their daily tasks without using peripherals connected by Bluetooth.
However, what if Bluetooth does not discover devices?
In some cases, the instructions for Windows 10 will differ from the instructions for Windows 11. In those situations, we will first provide the steps for Windows 10 and then explain how to do the same thing on Windows 11.
Before we discuss how to fix Bluetooth not finding devices or Bluetooth not working on PC issues on Windows 10 and Windows 11, it is best to discuss scenarios related to the problem.
This way, you will get a better understanding of how to deal with it.
- Bluetooth not working on Windows 10/11: Many users reported that they could not get Bluetooth to work on their computers. The best way to fix this is to reinstall the Bluetooth device and update its driver. We’ll show you how to reinstall the Bluetooth drivers later on.
- Bluetooth does not recognize or detect devices on Windows 10/11: If you encounter this issue, restart Bluetooth Support Service and check if that fixes the issue.
- Bluetooth not finding headphones or keyboard: This issue can happen with different devices. To fix it, make sure that you are pairing the device properly with your computer.
- Bluetooth not connecting: If Bluetooth does not seem to connect, the problem has probably something to do with your Wi-Fi. In some devices, Bluetooth and Wi-Fi are contained in a single card. This can be resolved by temporarily disabling the Wi-Fi.
- Bluetooth does not discover devices: After an upgrade to Windows 10 or Windows 11, you will possibly encounter this issue. However, you will be able to resolve this by running the Bluetooth troubleshooter.
While we’ve recommended specific fixes for some situations, you should start with those fixes rather than focus solely on them.
In some cases, you need to try more than one troubleshooting method, whether you’re facing the “Bluetooth not working on laptop” or “Bluetooth can’t find devices on PC” issue.
Related: [FIXED] Bluetooth Connected But No Sound in Windows 10/11
How to fix the “Bluetooth Device Not Connecting” Issue?
Follow the steps below to fix the Bluetooth device not working issue:
Method 1: Remove and add the Bluetooth device again
Removing the device and adding it again allows you to reinitialize the connection. These troubleshooting steps work in most cases.
Follow these steps if you’re on Windows 10:
- On your keyboard, press
Windows Key + S. - Type control panel, then hit Enter.
- Click Hardware and Sound.
- Select Devices.
- Look for the malfunctioning device and remove it.
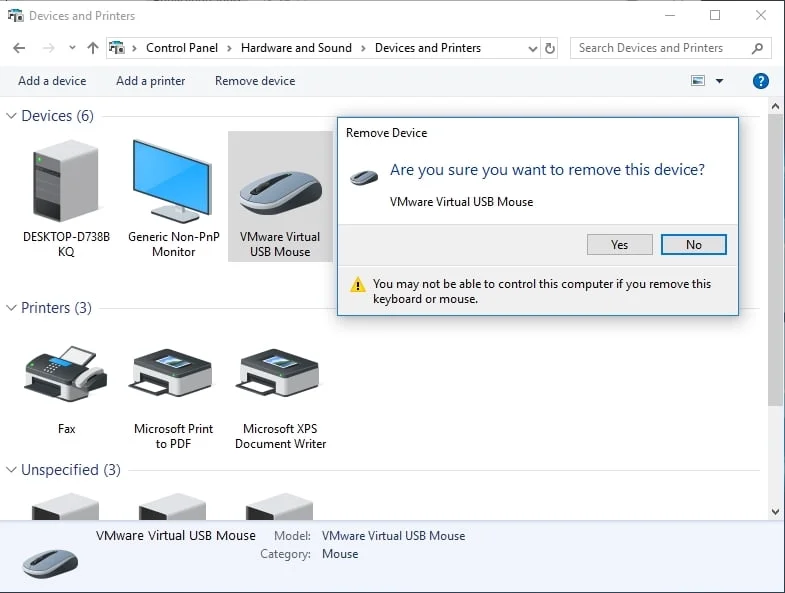
- Now, you have to click Add to bring back the device again.
On Windows 11:
- Go to your taskbar and click the arrow to expand the system tray.
- Click the Bluetooth icon and select Show Bluetooth Devices.
- You will find your malfunctioning device here.
- Click the three vertical dots on the problematic device and select Remove Device.

- Wait for a few seconds and then click Add Device.
- When the Add a Device window shows up, select Bluetooth.
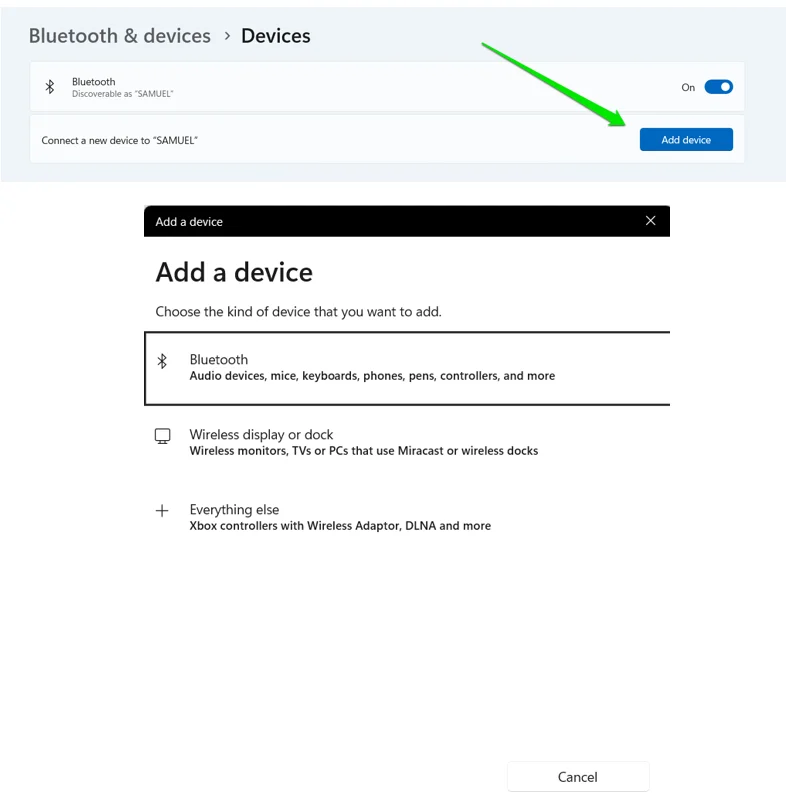
- Make sure Bluetooth is active on the device and your PC. Your device should show up here. Then, finish pairing it with your PC.
Once you’ve performed those changes, check if the issue has been resolved.
Related: How to Download, Install, and Update Bluetooth Drivers on a Windows 10 PC
Method 2: Make the device discoverable
Windows 10 and Windows 11 do not discover your PC’s Bluetooth by default. You must enter the advanced Bluetooth settings to change this option.
Since it allows other devices to see your computer’s name, you can always turn it back off.
Follow these steps to turn on Discovery on Windows 10:
- Start the Settings application and click Devices.
- On the Bluetooth & Other Devices page, go to the Related Settings section and click More Bluetooth Options.
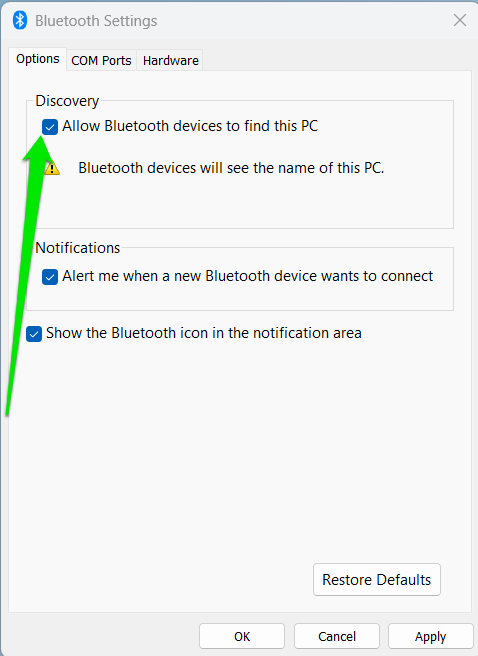
- After the Bluetooth Settings page appears, check the box next to Allow Bluetooth devices to find this PC.
- Click the OK button.
- Now, check if the connection issue is resolved.
Follow these steps if you use a Windows 11 PC:
- Tap the
Windows + Ikeyboard combo to launch the Settings app. - Go to the left sidebar and select Bluetooth & Devices.
- Go to the right side of the screen and click Devices.
- Once the Bluetooth > Devices page opens, scroll down to Related Settings and click More Bluetooth Settings.
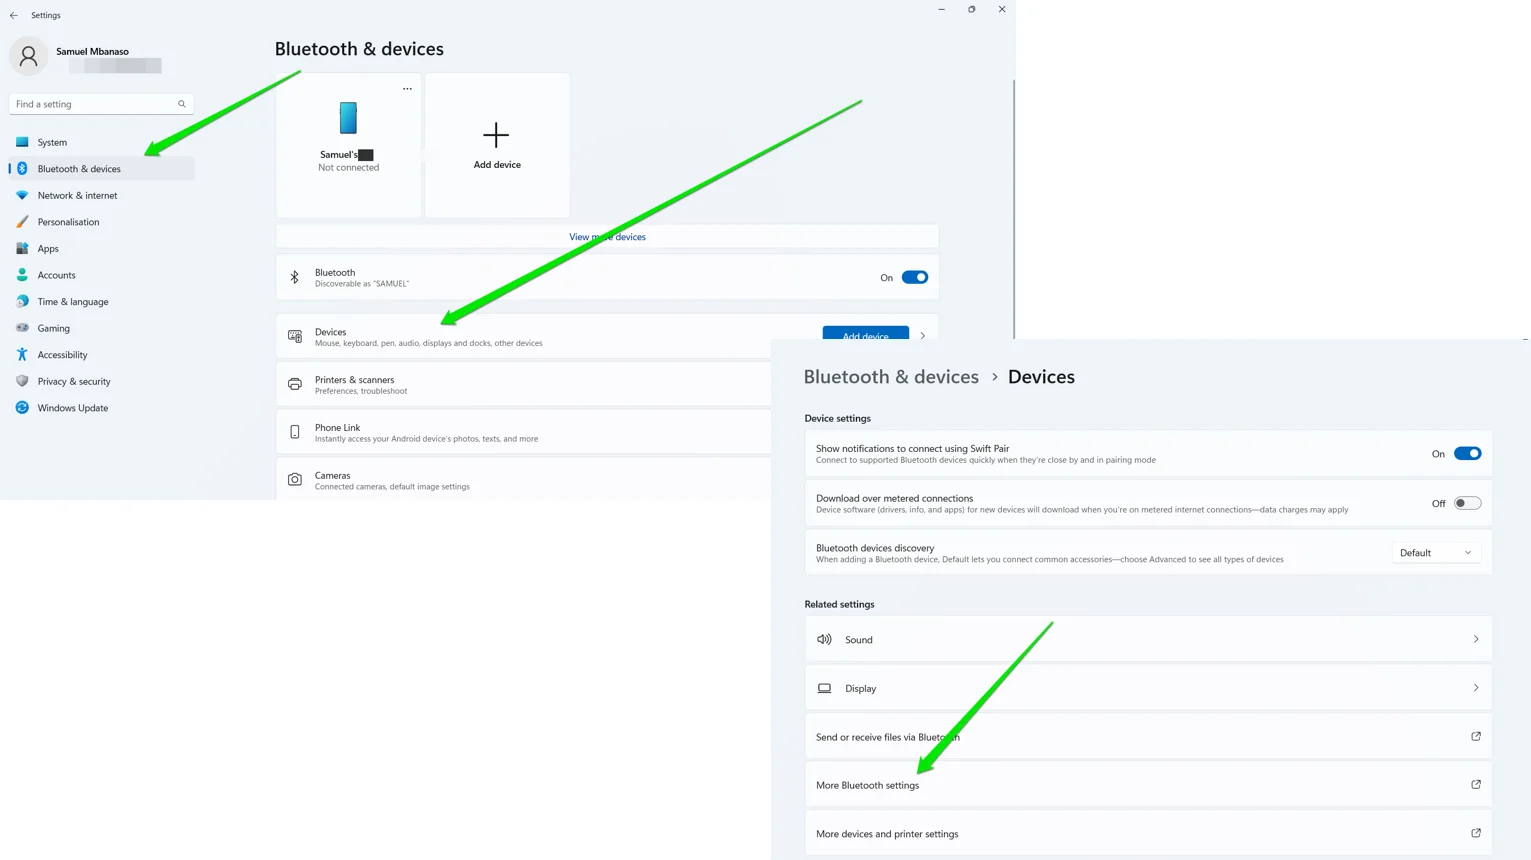
- Bluetooth and devices More Bluetooth Settings
You should also turn the Bluetooth Devices Discovery option in Windows 11 to Advanced to allow it to view more devices.
Go to the Bluetooth & Devices > Devices page and select Advanced in the drop-down menu next to Bluetooth Devices Discovery.

- You can now check for the Bluetooth error.
Method 3: Reinstall your Bluetooth device and update Its drivers
If your Bluetooth does not seem to discover your devices, then it is likely that the problem has something to do with your drivers. To fix this issue, we recommend reinstalling your Bluetooth drivers.
This fix can also work for other Bluetooth issues, such as the “Bluetooth not working on PC” problem.
The steps below will show you how to uninstall the device whether you’re running Windows 10 or Windows 11:
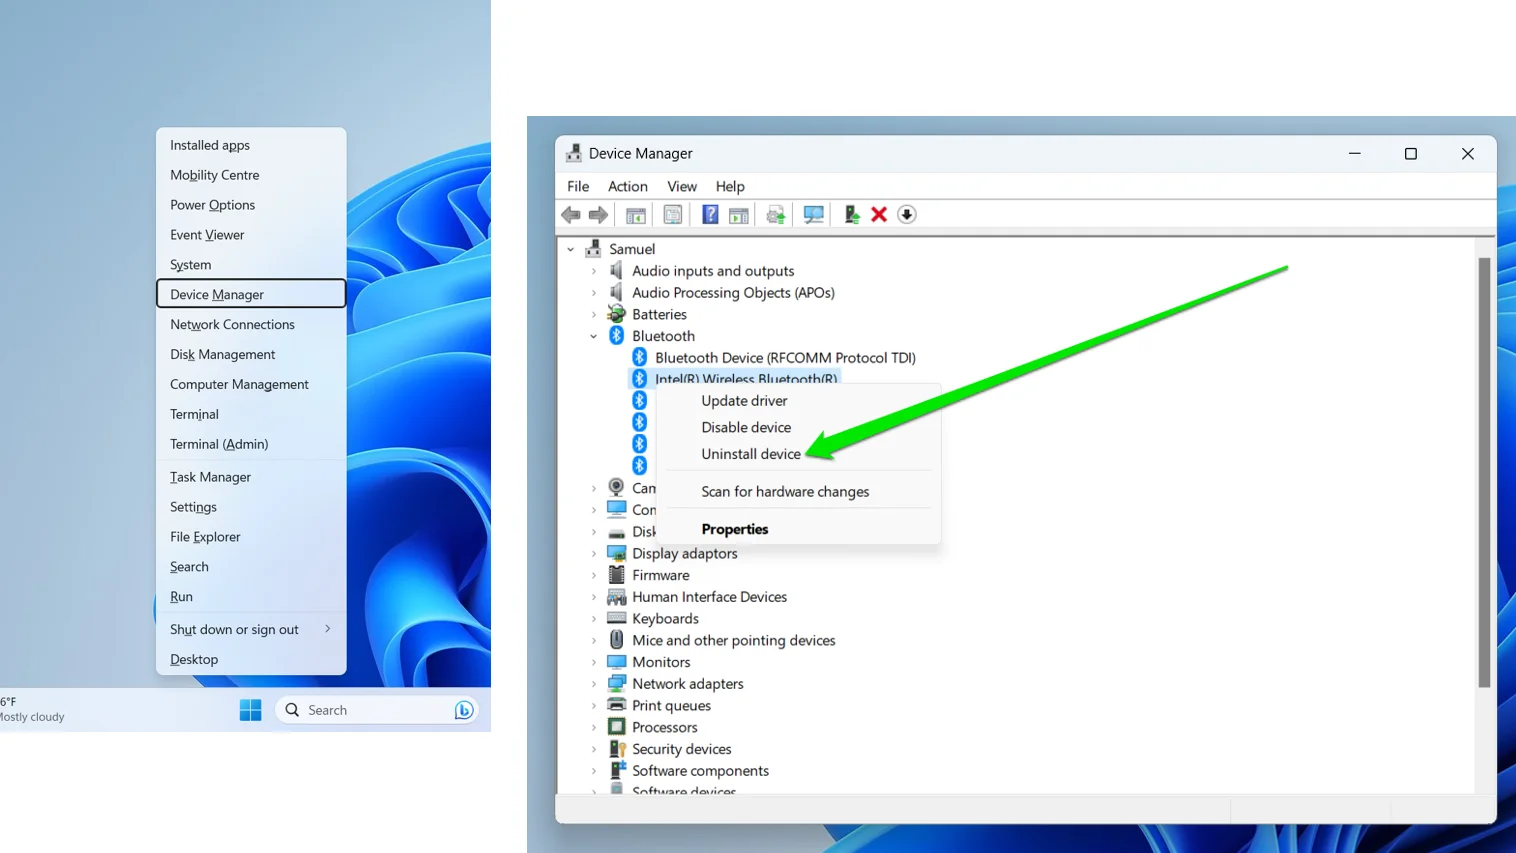
- Go to your taskbar, then right-click the Windows icon.
- From the list, select Device Manager.
- Look for the problematic device, then right-click it.
- Select Uninstall Device from the options.
- Once you see the confirmation dialog box, click Uninstall.
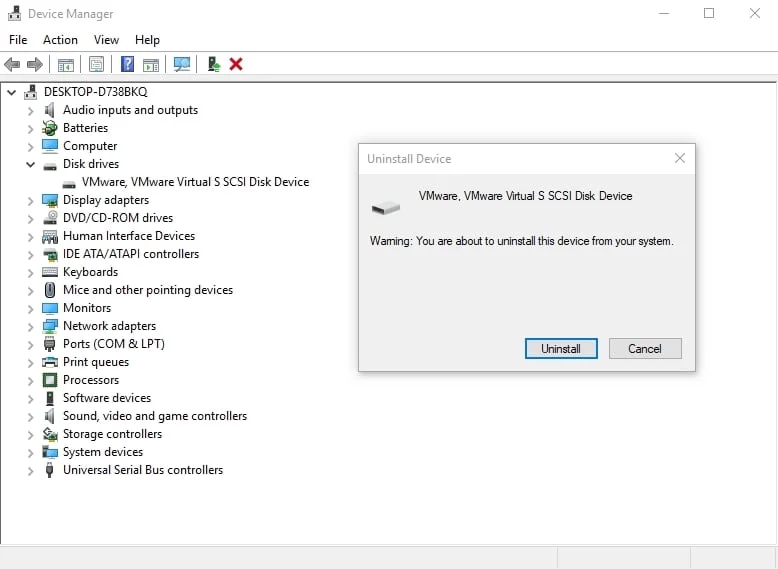
- Click the Scan for Hardware Changes icon. Your system should install the missing drivers automatically.
Ideally, reinstalling your Bluetooth device should resolve the issue.
However, if the problem persists, you should change the driver. So, this time, uninstall the device again and install the latest driver from the device’s manufacturer.
We recommend using the Bluetooth device’s official manufacturer driver to prevent other potential problems from happening.
You can go to their website, search for your Bluetooth device model, and download the driver. Make sure you find the one compatible with your operating system.
Otherwise, you might cause instability issues because of installing the wrong drivers.
Update your Bluetooth using Auslogics Driver Updater
If you do not have the patience and tech skills to update your drivers manually, we recommend using Auslogics Driver Updater instead.
Once you’ve installed and activated this tool, it will start scanning your computer for corrupted, missing, or outdated drivers.
After the scan is complete, it will look for the latest manufacturer-recommended drivers for your computer.
The best part is that this program will take care of all your driver-related issues—not just the one that caused the Bluetooth problem.
So, once the process is done, you can expect an improvement in your computer’s performance.
Also Read: Auslogics Driver Updater: Update Your Drivers in One Click!
Method 3: Update your Windows
Updating your operating system is one of the first troubleshooting steps any technician worth their salt would recommend. That’s because hotfixes and system improvements are deployed through the Windows Update client.
These updates can help resolve issues currently affecting your Bluetooth device and connections. Whenever you update your computer, you should also allow it to download and install quality updates.
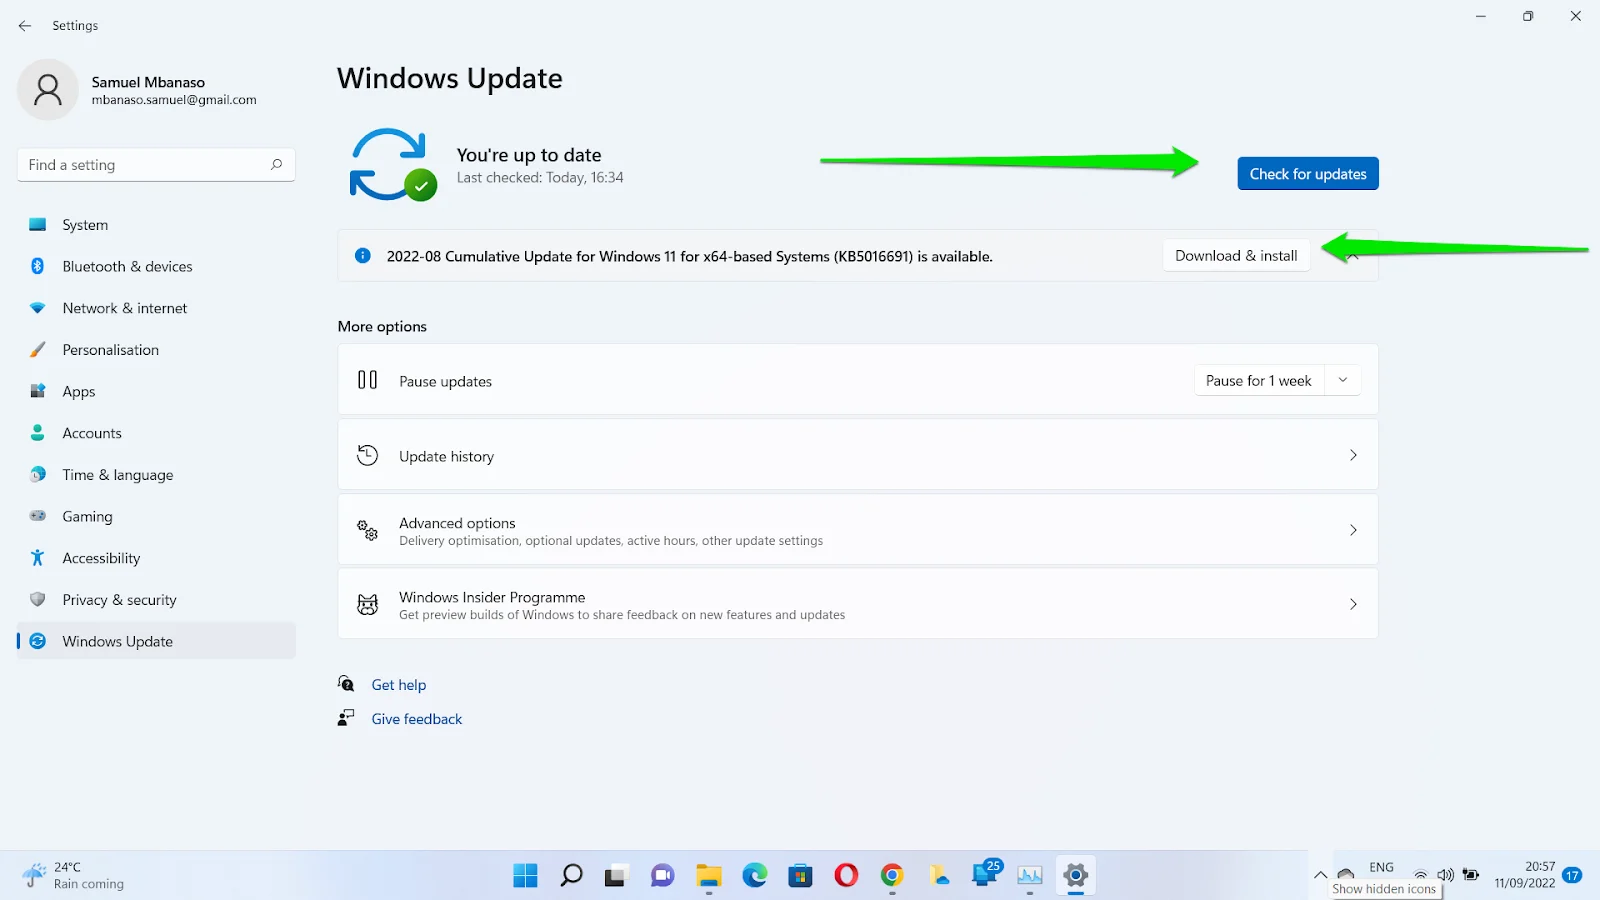
So, head to the Windows Update client by typing “update” in the Start menu and selecting Check for Updates.
Uninstalling updates
If you started experiencing the Bluetooth connection problem after installing Windows Updates, consider uninstalling the last update you installed.
That said, make sure you confirm that there are currently no available updates before uninstalling the recently installed software.
You can follow these steps to uninstall the update:
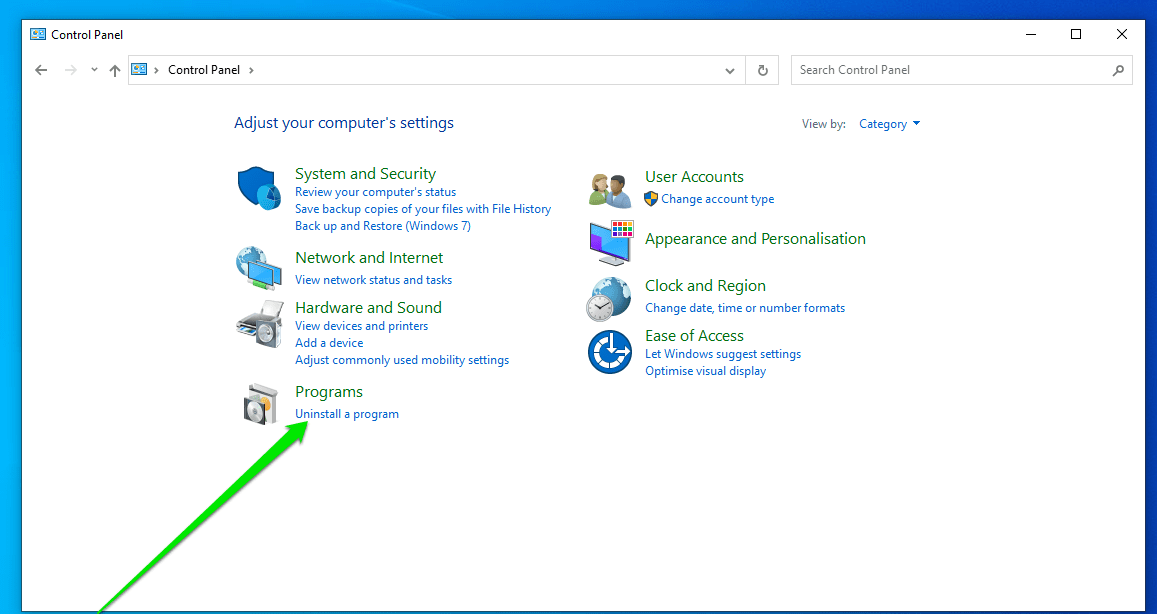
- Press
Win+R, typecontrol.exein the Run text box, and click OK.
- Click the Uninstall a Program option when the Control Panel opens.
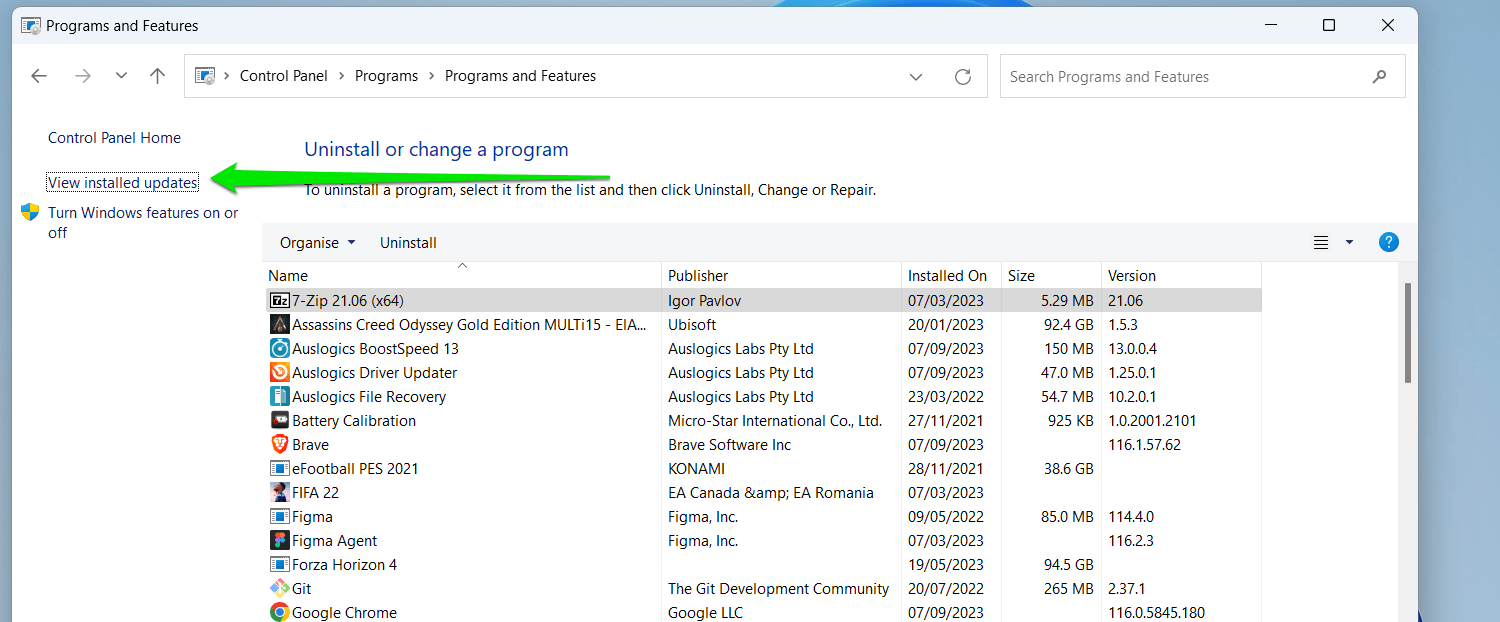
- Now, go to the left sidebar of the Programs & Features window and click View Installed Updates.
- If you’re on Windows 11, you’ll be redirected to the Settings page, which lists your recently installed updates and the date you installed them.
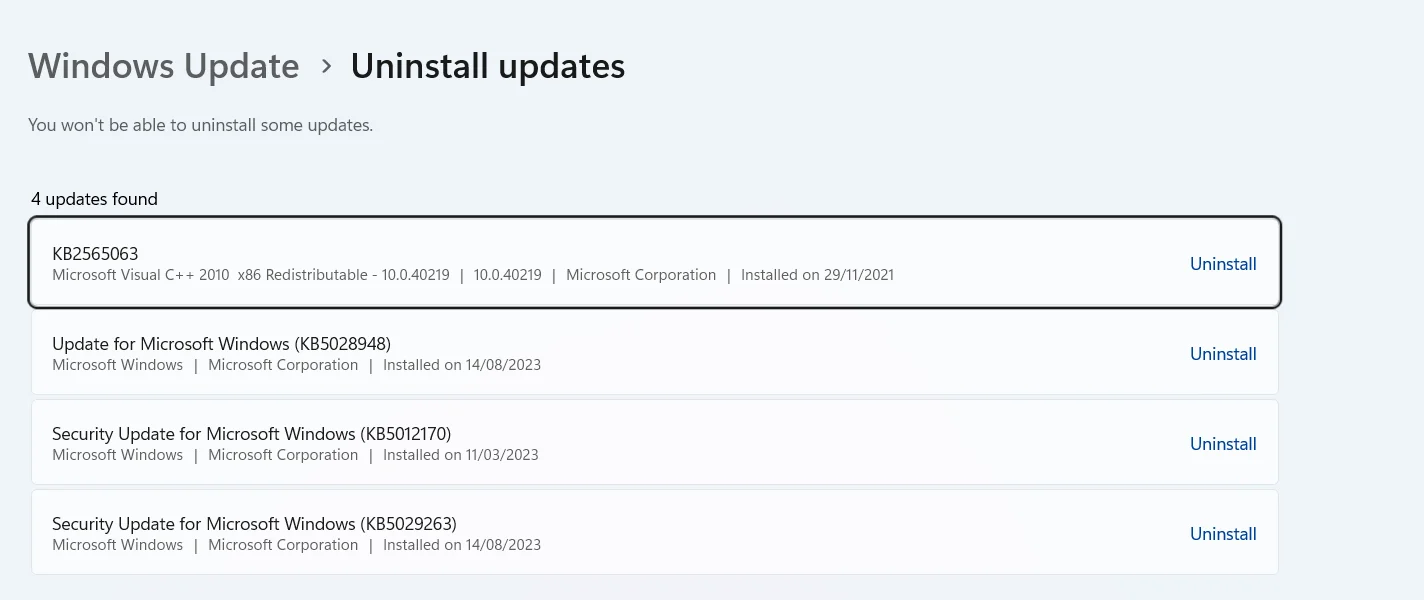
- Click the Uninstall button and follow the instructions that come up.
Also Read: The Ultimate Reset Guide for Windows Update: Fixing Update Problems
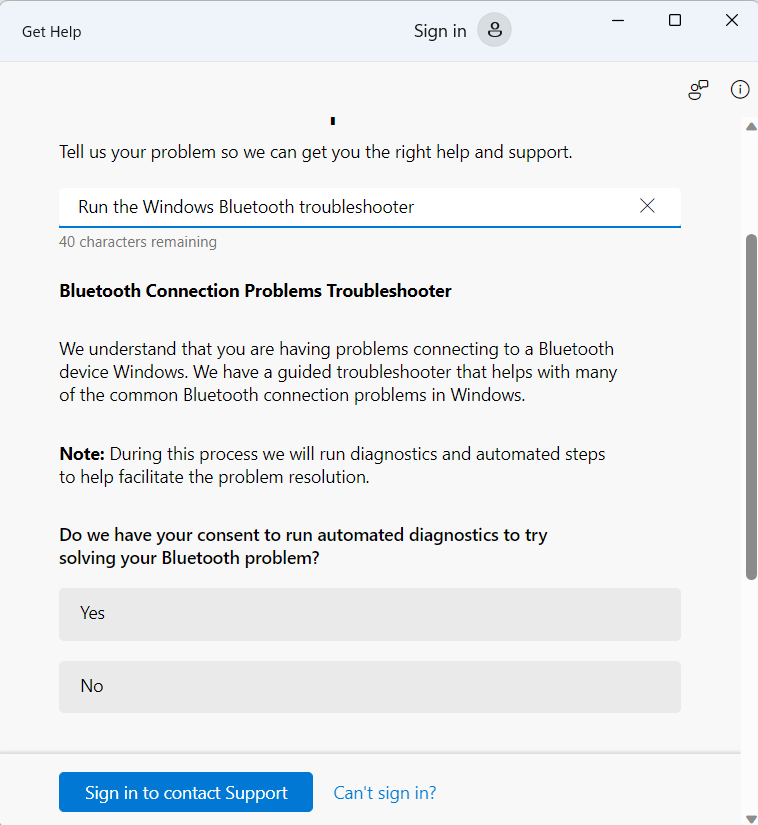
Method 4: Run the Bluetooth troubleshooter
The Bluetooth troubleshooter is one such utility. It is designed to scan for common glitches that might be affecting your computer’s Bluetooth device, such as malfunctioning Bluetooth services, software conflicts, and driver problems.
If it finds any issue, it will attempt to resolve it or tell you what to do.
These steps will show you how to run the troubleshooter:
- Press the
Windows + Ikeys to run the Settings application. - Select Update & Security on the first Settings screen.
- Go to the left-pane menu and click Troubleshoot.
- Go to the right pane and click Additional Troubleshooters.
- Once the Additional Troubleshooters page appears, go to the Find and Fix Other Problems section and click Bluetooth.
- Now, click the Run the Troubleshooter button.
- Allow the Troubleshooter to run and identify the issue. Follow the on-screen instructions to fix the problem accordingly.
Follow these steps to run the troubleshooter on Windows 11:
- Open Windows Settings. You can do this by selecting Settings from the Power User menu. Hit
Win + Xon your keyboard to open the menu. - In the Settings app, navigate to System > Troubleshoot.

- Select Other Troubleshooters.
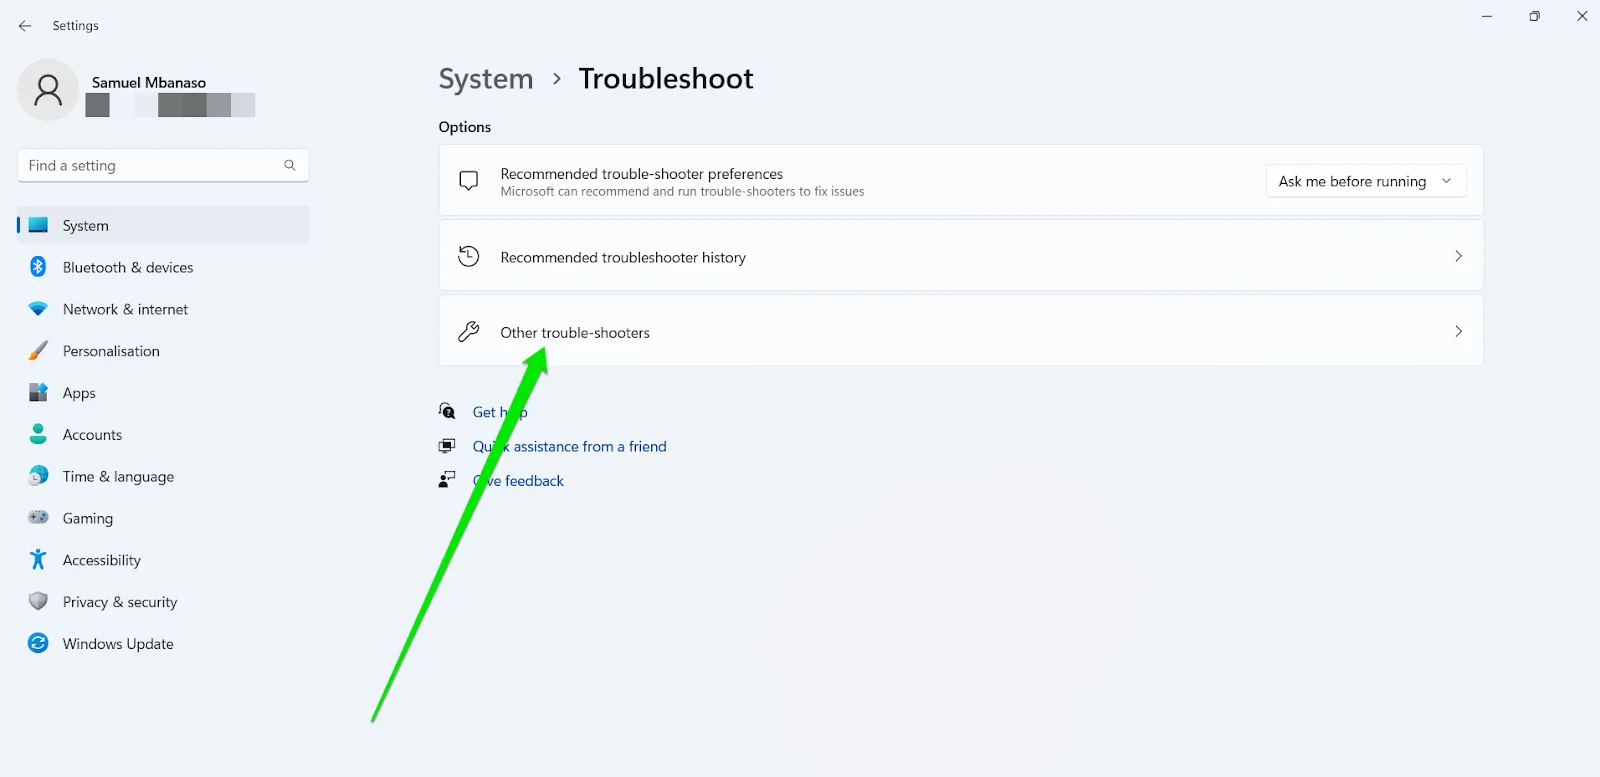
- On the Other Troubleshooters window, look for Bluetooth and click the Run button on its pane to launch the troubleshooter.

- Windows 11’s Troubleshooter is quite different from Windows 10’s because it is quite interactive. It asks for your consent to run the tool and asks you questions as it performs the diagnostic and tries to fix issues with your device. Follow the prompts to continue.
Once the process is complete, check if you can now connect your Bluetooth devices successfully.
Method 6: Restart the Bluetooth Support Service
The Bluetooth technology in your PC can only run properly with the appropriate services, including Bluetooth Support Service.
So, if there are problems with this service, you might end up not being able to use your Bluetooth devices. Thankfully, you can restart this service to fix the issue. Here are the steps:
- Open the Run dialog box by pressing
Windows Key + Ron your keyboard. - Now, type
services.msc, then click OK or hit Enter. - Double-click Bluetooth Support Service.
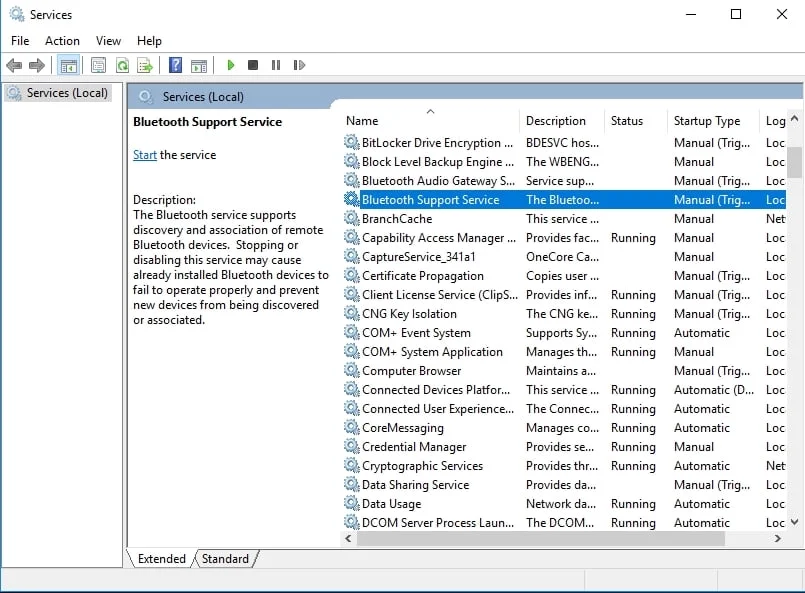
- If you notice that the service is not running, simply click Start to launch it. On the other hand, if it is running, stop it, then start it again.
- Save the changes by clicking Apply and OK.
Once you restart this service, you should be able to resolve the issue and start using your Bluetooth devices.
Method 7: Prevent your computer’s power saving mode from turning off your Bluetooth
Your computer turns off different devices depending on its current saving power management policy. If you’re using a laptop, your Bluetooth device might be one of the components that turn off when you’re running your system on battery.
So, go through the Device Manager to prevent Windows from turning off your Bluetooth.
Follow these steps whether you’re running Windows 10 or Windows 11:
- Right-click the Start menu icon in your taskbar or press the
Windows + Xkeyboard combo to launch the Power User menu. - Select Device Manager after the menu opens.
- Expand the Bluetooth category in the Device Manager.
- Right-click your Bluetooth device and select Properties. Double-clicking the device can also open the Properties dialog.
- Now, go to the Power Management tab and uncheck the box beside Allow the computer to turn off this device to save power.
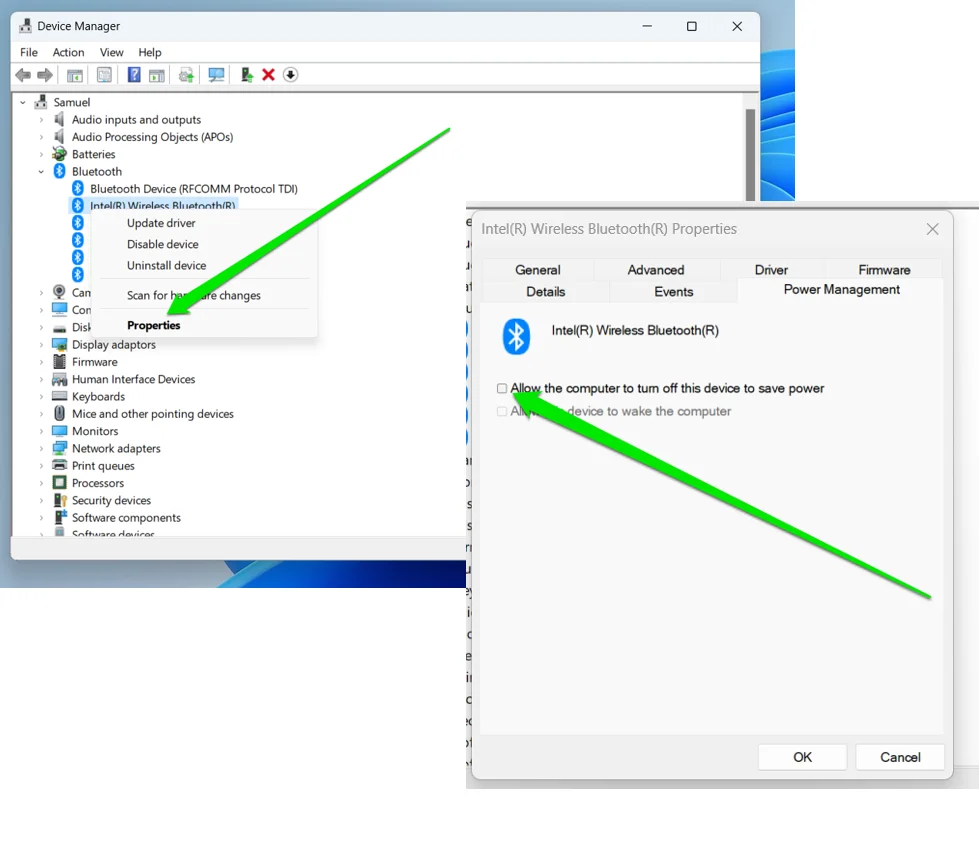
- Try checking for the problem again.
Also Read: Pro Tips: Mastering Advanced Power Settings in Windows 10
Method 8: Ensure that your devices are properly paired to your PC
The problem may lie with the pairing process. If you want your Bluetooth devices to be discovered, you should pair them properly. The process varies from one device to another.
However, most of them should have a Bluetooth pairing button. For some devices, a long press on the Power button would suffice.
It is best to consult the manual for the necessary instructions on how to pair your Bluetooth device properly.
Fix this issue quickly
You can try using a safe and totally free tool developed by the Auslogics team of experts.
A few simple steps to troubleshoot the issue:
- Download the tiny Auslogics TroubleShooter tool.
- Run the application (no installation is needed).
- The app will check for the issue mentioned in the article. When the scan is done, check that this is the issue you were looking to solve and click Apply now to apply the recommended fix.
- You can use the app to troubleshoot other malfunctions for free by simply typing in a brief description of the issue your PC is experiencing. Or you can scan your PC for performance issues using the My Scanner tab.

Developed for Windows 10 (8, 7, Vista, XP). Please review EULA and Privacy Policy.
Method 9: Remove Bluetooth devices
In some cases, other Bluetooth devices can interfere with the pairing process. So, it is advisable to disconnect all the other devices and pair only the ones you need.
This method may not be the best workaround for this problem, but some users tried it and claimed that it had fixed the issue.
So, click the Bluetooth icon in the taskbar and select Show Bluetooth Devices to remove the Bluetooth devices you do not need at the moment.
Method 10: Use a different USB Port for the Bluetooth adapter
A lot of desktop computers do not support Bluetooth technology, and the only way to get this functionality is to use an adapter.
However, it does not always work as expected. If this happens to you, you can try using a different port for your Bluetooth adapter. Some users claimed that switching the adapter from USB 3.0 to USB 2.0 resolved the issue completely.
Also Read: How to replace drivers for a Bluetooth adapter in Windows 10?
Method 11: Disable Wi-Fi
Some laptops contain Bluetooth and Wi-Fi on a single card, which causes some issues. So, if you need to use your Bluetooth device, disable your Wi-Fi adapter temporarily.
Some users claimed that they were able to pair their Bluetooth devices successfully after doing this.
Also Read: How to improve Internet Speed Including Wi-Fi?
Conclusion
Bluetooth devices, whether it’s your mouse, keyboard, or game controllers, are designed for convenience and should not cause you discomfort. The fixes in this article should help you clear the “Bluetooth not working” Windows 10 and Windows 11 problems once and for all.
Remember to always do the regular checks before connecting any Bluetooth device and always check the device’s instructions to ensure you’re going about things the right way.
FAQ
Toggle on the Bluetooth once the Bluetooth & Other Devices page opens. That said, many computers have dedicated Bluetooth switches on their keyboards that you can use to toggle the device on or off. You can check your PC’s keyboard for a Bluetooth icon. You can click on the Bluetooth icon in the system tray and select Add a Bluetooth Device. Make sure the headphones are turned on and ready to pair. Then click the Add Device (Windows 11) or Add a Bluetooth or Other Device (Windows 10) option and click Bluetooth in the Add a Device dialog. If there is a Bluetooth icon in the system tray, your computer likely has a Bluetooth device. But you can check the Device Manager to confirm whether you have a Bluetooth device installed. You can also check your computer’s specifications to be sure, especially if your Bluetooth drivers are not yet installed. Go to the system tray in your taskbar, click the Bluetooth icon, and select Show Bluetooth Devices from the menu. After the Bluetooth & Device > Devices (Windows 11) or Bluetooth & Other Devices (Windows 10) page opens, go to the Related Settings section and click More Bluetooth Settings (Windows 11) or More Bluetooth Options (Windows 10). Check the box next to “Show the Bluetooth icon in the notification area” and click the OK button.