
![[EXPLAINED] Core Isolation Memory Integrity in Windows 10/11: On or Off?](https://www.auslogics.com/en/articles/wp-content/uploads/2024/04/EXPLAINED-Core-Isolation-Memory-Integrity-in-Windows-1011-On-or-Off.png)
Is it necessary to enable the memory integrity feature? What happens if memory integrity is off? Am I vulnerable to attacks?
These are valid questions that many users ask. Depending on your situation, you may need to enable or disable memory integrity.
In this guide, I’ll explain how core isolation and memory integrity work together and provide other helpful tips.
Let’s begin.
What Is Core Isolation?
Windows has a security feature called core isolation, which isolates essential core processes in memory to protect them from malicious programs.
Core isolation can protect your PC because it runs the core process in a virtualized environment.
Examples of features that fall within core isolation are memory integrity and Kernel-mode Hardware-enforced Stack Protection.
What Is Memory Integrity?
So, what does memory integrity do?
Core isolation memory integrity, or Hypervisor-Protected Code Integrity (HVCI), is a Windows security feature that prevents malicious software from using low-level drivers to take over your computer.
You can access this feature via Windows Defender Security under the Device security section.
Windows memory integrity lets you activate features to improve protection by providing status reporting and managing security integrated into your devices.
However, device security depends on hardware support.
So, your firmware must support virtualization to run programs on your Windows 11 or 10 PC inside a container and restrict their access to other areas of the system.
Keep in mind that some operating systems don’t support memory integrity. But if you’re using Windows 10/11 Enterprise or Pro, you should have this feature. ”
You should have the core isolation feature if you have a Windows 11 PC. If you can’t find it, it’s possible that it’s not enabled. Skip to the next section to learn how to enable the feature.
Core Isolation and Memory Integrity: How They Work Together?
Windows 10 or Windows 11 core isolation and memory integrity work together to offer complete security against different types of cyber threats when they are both enabled.
Memory integrity ensures the safety of system memory, whereas core isolation establishes a secure environment for system processes.
This collaboration reduces the chances of malware attacks and protects important system components, improving your device’s overall security.
Should You Enable or Disable Memory Integrity?
Based on what I’ve outlined so far, if you disable core isolation, the system processes will function with less isolation, which could make your system more susceptible to malware attacks.
In other words, you make it easier for cybercriminals to access sensitive data on your computer and compromise system processes.
However, if you’re a gamer like me, you can optimize Windows 11 for gaming by turning off memory integrity.
That’s because Windows 11 or Windows 10 core isolation uses a lot of CPU resources. If core isolation memory integrity is off, you can use the free resources to run your games.
So, whether you disable or enable Windows memory integrity depends on your preference.
Regardless, we’ll show you how to enable or disable memory integrity on your PC.
How to Turn On/Off Core Isolation Memory Integrity
In this section, we’ll show you how to turn core isolation on or off. Go through the various steps below to enable the feature:
Method 1: Use Windows Security
Here’s how to enable or disable core isolation:
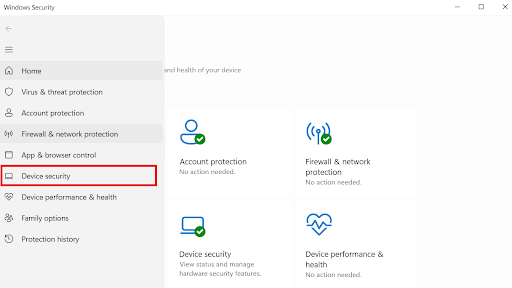
- Type Windows Security in the search bar and click to open it.
- Click the three horizontal lines in the upper left corner.

- Go to Device security.
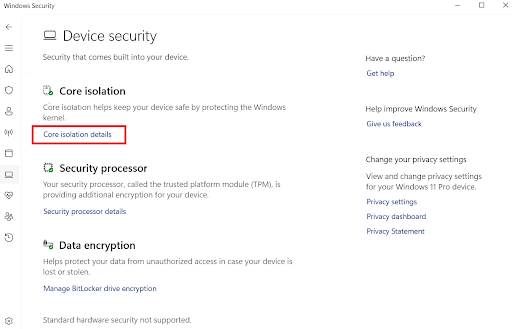
- Select the Core isolation details under Core isolation.
- Toggle the switch to turn it on and off.
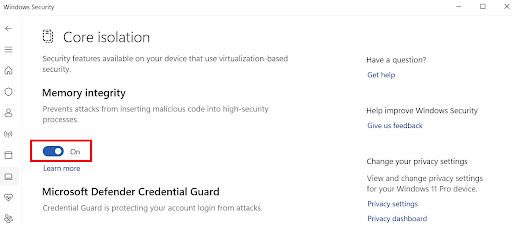
Restart your computer to apply the changes.
Related: Fix Windows Defender Service That Won’t Start
If core isolation doesn’t turn on, I recommend using Auslogics Driver Updater to update your drivers automatically.
This software checks for outdated and missing drivers and updates them according to the manufacturer’s version.
Learn more: Auslogics Driver Updater: New Drivers in One Click!
”
Method 2: Use the Registry Editor to enable core isolation
Follow the steps below to allow core isolation memory integrity:
Please read our guide on Windows 10 backup and restore to learn how to back up your data.
”
- Type regedit in the search bar and press Enter to open the Registry Editor.
- Enter the following in the search field:
HKEY_LOCAL_MACHINE\SYSTEM\CurrentControlSet\Control\DeviceGuard\Scenarios\HypervisorEnforcedCodeIntegrity
- Double-click on Enabled.
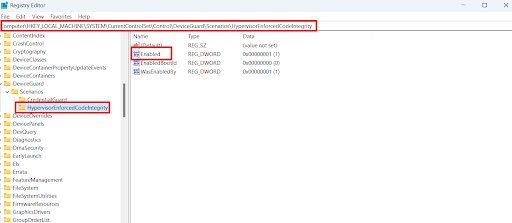
- Set Value date to 1 and click on OK to save the settings.
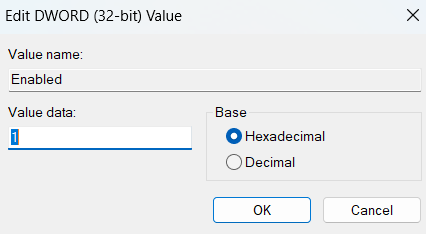
Restart your computer to implement the changes.
Also read: How to Back Up and Restore the Windows 10 Registry
What to Do if Memory Integrity Is Off?
If you can’t turn on your Windows memory integrity, follow the steps to correct the problem:
1. Check for incompatible drivers
If you can’t enable Windows 11 core isolation, it could be because of incompatible or outdated drivers. Follow the steps below to fix the problem:
- Type Windows security in the search box and click on it to open.
- Select Device security from the left-hand side.
- Click on Core isolation details and enable Memory integrity.
- Click Review incompatible drivers if you get this error message: Resolve any driver incompatibilities and scan again.
- Jot down every driver that you suspect may be the reason why your core isolation memory integrity is off.
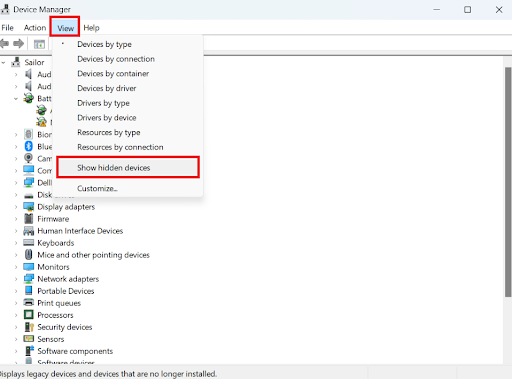
- Open Device Manager by typing Device Manager in the search box and hitting Enter.
- Then, click View and select Show hidden devices.
- Right-click the faulty driver, choose Uninstall device, and then follow the on-screen instructions to complete the process.
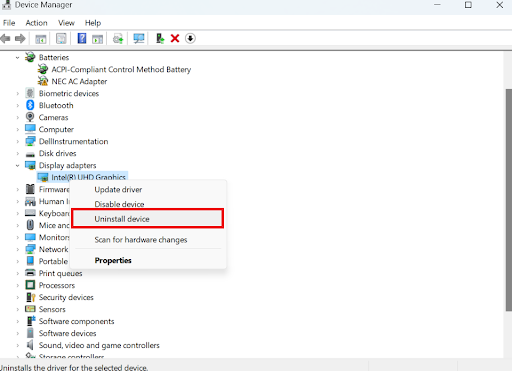
- If it still doesn’t work, you can choose Update driver to update the driver.
2. Remove incompatible drivers
Another way to resolve the problem if your core isolation memory integrity is off is to delete all the incompatible drivers.
Here’s how to do it using the Command Prompt:
- Type command prompt in the search bar, right-click the first option, and select Run as administrator.
- Type the following command and press Enter. Remember to jot down the faulty drivers: dism /online /get-drivers /format:table

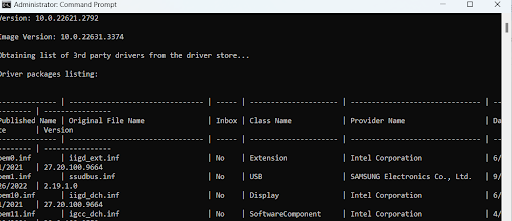
- Next, type the following command to delete the problematic drivers: pnputil /delete-driver (driver’s published name) /uninstall /force
So, if I want to delete that driver, the command will be: pnputil /delete-driver oem0.inf /uninstall /force.
Make sure to enter the correct driver’s published name, or you may delete other drivers that are not causing the problem. So, it’s better to copy and paste.”
3. Check for Windows updates
Sometimes, you can update your Windows system to get rid of the problem. That’s how I fixed the problem when I couldn’t enable Windows core isolation.
All you have to do is press the Windows + I keys, select Windows Update, and click on Check for updates.
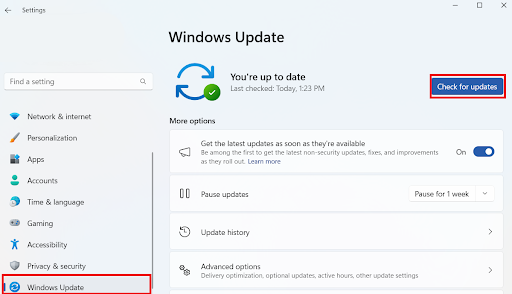
Related: How to Fix Windows Update Error 0x80070057
4. Repair system files
Another way to fix the problem if your core isolation memory integrity is off is to use an SFC scan to repair system files. Here’s how to do it:
- Open the Command Prompt with administrative privileges.
- Type sfc /scannow and press Enter.
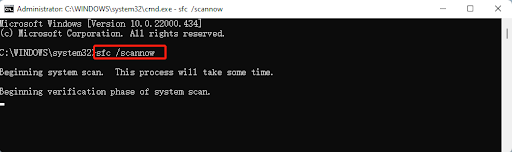
Wait for the process to complete and check if the problem is resolved.
Related: How to Find and Fix Corrupted Files in Windows 10?
5. Perform a clean boot
Sometimes, performing a clean boot can fix the problem.
Here’s how to do it:
- Type msconfig in the search box and press Enter.
- Click on the Services tab.
- Check the Hide all Microsoft services option.
- Click Disable all.[/sc]
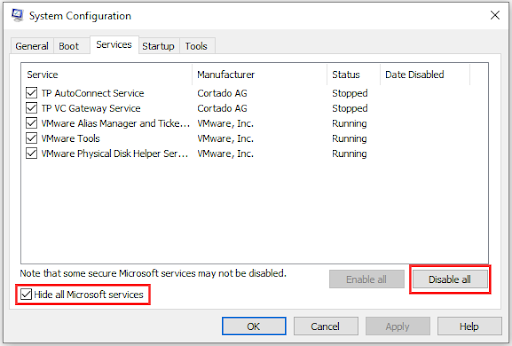
- Restart your computer.
Core Isolation Memory Integrity: Explained
Whether you enable or disable Windows core isolation, it is a crucial decision only you can make, since it affects security and performance.
Throughout this tutorial, I’ve examined how these features work together to protect system memory and isolate essential processes to improve system security.
While core isolation and memory integrity offer crucial security advantages, speed optimization is also worth considering, especially if you’re a gamer.
So, your priorities and risk tolerance will ultimately determine whether you activate or disable these features.
Was this article helpful? Share it with your friends who might need it, and let us know your thoughts or additions in the comments below!